Installation shower corner with a pallet with your own hands is possible if everything is done according to the instructions for the device. Even without much experience working with plumbing equipment, you can install a shower stall in your bathroom yourself.
Required materials and tools
In order to start installing the shower enclosure, you need to collect everything necessary tools and materials:
- Pipes for connecting the structure to the sewer and water supply systems.
- Ready pallet. Usually it comes included. It comes with all the necessary elements for installation. These are fixing legs and fastenings.
- Corner walls of the shower stall.
- Beams for glass cabin doors.
- Elements for securing the components of the shower cabin.
- Hermetic material. For example, it could be silicone mass.
Features of installing a shower corner
Stages of work on installing a shower enclosure:
- Because When installing a shower enclosure, this device does not have rear walls or a roof. The tray and doors are installed. The first step is to make all the necessary markings in the bathroom. The installation of the structure will be carried out based on them.
- Because the liquid will constantly get on the walls and possibly on the ceiling, they will need to be treated with a water-repellent compound.
- Installation of the pallet on the floor begins with its assembly. The set should include legs for the device. They should be firmly secured to the bottom of the pallet. To prevent them from squeaking, it is better to use a rubber seal.
- The pallet should fit snugly against the wall. A quality product has an angle of exactly 90 degrees. The same angle should be at the wall. This needs to be checked in advance. If there are deviations, it is recommended to eliminate them.
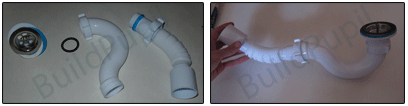
- A siphon must be connected to the pan. It should fit snugly into the drain hole. Additionally, it is better to cover the joint with sealants.
- The pallet is turned over and placed on the floor. At this stage, it is checked whether the product wobbles or creaks under the weight of an adult man.
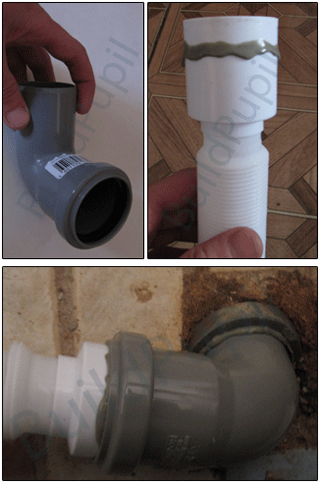
- Connecting the pan to the sewer system. To do this, the drain pipe connected to the pan is led into the sewer manhole. The place where the sewerage components combine must also be treated with sealed silicone.
- Once the pan is connected to the sewer, it will be possible to finally fix its side walls.
- It is easier to install the beams on which the curtains will be hung on your own. Glass doors can be installed. But this process requires professional knowledge and training.
Instructions for installing a shower enclosure:
Additional information:
- Among the wide variety of plumbing equipment, it is difficult to choose something for yourself right away. You need to know the rules of how to choose a shower stall for…
- The shower cabin connection diagram is represented by the following sequence of actions: Installation of the tray. The features of this stage of work directly depend on the selected device. They differ...
- Installing a shower cabin with your own hands is necessary if you are equipping a small bathroom. There is absolutely no place to put a Jacuzzi in it. A…
So, shower trays come in different sizes, shapes, depths and are made from various materials:
Square shower trays range in size from 70x70 to 130x130 cm.;
Rectangular - 70x85, 70x100, 70x120, 80x100, 80x120 cm....;
There are semicircular pallets 80x80, 90x90 cm...;
Pentagonal ( install flat side to the wall), - 90x90, 100x100 cm. etc.;
The differences in depth are: 45 , 70 , 75 , 100 , 110 , 115 , 150 And 180 mm.;
Shower trays are made of cast iron, steel, ceramics, acrylic ( plastic) and cast marble.
Cast iron pallets expensive, but the most durable and durable. They are heavy, but this gives them stability. Cast iron is not very malleable when melted, so pallets made from it, as a rule, have the same shape.
Steel pallets less durable compared to cast iron, but their safety margin is quite large. Steel pallets are lightweight and inexpensive. Steel trays make noise under running water, unlike acrylic ones.
Acrylic pallets light and have greatest number modifications and forms. Small scratches on them are not noticeable and not critical. A standard acrylic pallet bends under the weight of the body, so additional fasteners are required, or you need to immediately purchase a pallet with an additional reinforced layer.
Decorative ceramic trays They are quite expensive, they are beautiful and durable, but they are cold and not resistant to mechanical damage.
Marble pallets the most expensive, they are practical, warmer than ceramic ones and less susceptible to chipping.
Choose which pallet to buy yourself. I purchased an inexpensive steel pallet 80x80 cm. (photo above), based on the size of the shower room. It will require a special sanitary siphon for tray.
There are several ways to install shower trays: they are mounted on a metal frame, on plastic supports, ceramic trays are simply installed on a flat surface. I decided to install a steel pallet on top of the bricks.
The shower room, as you can see in the photo below, has a deplorable appearance, so it was decided to renovate it.
 |
We install a siphon for the pan. A PVC pipe with a diameter of 50 mm. Additionally, I needed a corresponding PVC square 90° (connecting parts of the pipeline - elbows, tees, adapters of various configurations, are called fitting ). Although the common pipe and fitting have a socket for a rubber ring, when installing the unit ( for more reliable sealing of the joint) apply sealant to the smooth end of the square and to the socket of the siphon, and only after that, insert them into the sockets ( with rubber ring) drain pipe and elbow, respectively. |
 |
We place a ceramic corner in the gap between the wall and the pallet. The corner comes in different widths, so choosing the right one was not difficult ( but I knew in advance, even before purchasing the pallet, which corner I would need. Here's some advice for you - plan and calculate everything in advance. ). I did not place the pallet close to the far wall, but made a gap in which I installed plastic panel (it overlaps with the pallet - it rests on it with a mounting shelf), having built a frame for it from slats. This will allow me to quickly take action in the event of a possible accident: the panel can be easily dismantled and thus gain access to the drainage system. |
Add site to bookmarks
- Species
- Choice
- Installation
- Finishing
- Repair
- Installation
- Device
- Cleaning
How to install a shower tray?
- Types of pallets: nuances of operation
- How to install a shower tray: installation and its features
- DIY shower tray for a bathroom made of brick and concrete
High-quality installation of a shower stall requires strict adherence to all manufacturer’s recommendations and the implementation of measures to protect the room from possible leaks. The issue becomes especially serious if you install a shower tray yourself in a multi-storey building, because the wrong installation will lead to damage to the repairs of the neighbors below.
Installation shower tray must be carried out carefully and in accordance with all necessary requirements, otherwise the neighbors may be flooded.
Types of pallets: nuances of operation
Shower stalls and corners have recently become very popular, as not only the already small space of the bathroom is saved, but also a wide range of functions becomes possible, for example, hydromassage treatments, aromatherapy, steam generation, musical accompaniment and much more.
In addition, many samples sold on construction markets allow the buyer to choose exactly the option that will ideally suit the bathroom interior and meet their financial capabilities.
![]()
A wide variety of shower trays in shape allows you to choose exactly the option that suits the specific interior of the bathroom.
Installation can be carried out either by invited craftsmen who know everything about the correct installation of shower trays and other elements of equipment, or by yourself. However, you should first familiarize yourself with all the nuances of performing the work.
Pallets vary in design. The most expensive and durable besides marble pallets is a cast iron pallet, and only after that come all the others. In reality, all pallets have relatively long term service and high strength characteristics. A ceramic tray will be particularly beautiful and unique, but such trays are expensive and unstable to mechanical damage.
Today, the most affordable and popular are acrylic shower trays. But under load they bend, as a result of which installation must be carried out using special frame brackets for fastening, adjustable legs and other elements that ensure correct installation shower trays.
Cheap shower trays made of acrylic without support for the base and central part, reinforced only around the perimeter, may not cope with the load and burst.
Therefore, in order to install a shower tray correctly - and this does not depend on who performs the work, be it a team of craftsmen or self-installation shower stall - you need to pay attention special attention strengthening the bottom of the pallet.
If the set frame base includes only the outer legs, the tray in the bathroom will require the manufacture of additional supports. You can do this work yourself; the design is simple. For this you will need a piece metal pipe, a box tube of the required length and a rubber gasket.
Return to contents
How to install a shower tray: installation and its features

Diagram is an example of dimensions for installing a shower tray.
If you install the pallet yourself, you must be especially careful to align and adjust its legs. They should be adjusted according to the unevenness of the floor. The assembly procedure is usually described in detail in the attached instructions and includes installation of a pallet (plastic or metal trough), connection of the drain mechanism and removal of sewage.
Installation of cubicle doors and walls (if any) depends on the type of structure and may include installation of electrical or water connection. Upon completion of work, control tests must be carried out (especially for multifunctional units).
Quality control (whether the shower tray was installed correctly) can be done as follows: you need to stand on the tray, and if it cracks and bends, modification is necessary.
It is very easy to secure the tray in the bathroom by installing support bricks under its base.
Having previously placed the pallet in a horizontal position using a level, the bricks can even be placed on mortar for additional strength.
Failure to comply with the above rules may result in damage to the acrylic shower tray. Although acrylic pallets can be repaired, no one wants to incur additional expenses.
If necessary, after preliminary leveling, you can use bath enamels, fiberglass and epoxy putties or mastic. Certainly, appearance This will make it lose its attractiveness.
Installation of shower trays made of marble, ceramics and cast iron is not so common. However, steel pallets are quite popular. Often the installation is carried out without any walls or doors, only a protective curtain is installed. Although it's quite economical option, but it requires cladding of the wall sides, additional sealing and waterproofing.
Steel pallets, like acrylic ones, must be placed on a metal frame (the bottom of the trough must be thoroughly secured), plastic support elements or ordinary bricks.
To further insulate and compact the base, the space between the trough and the floor can be filled polyurethane foam. But it should be understood that this will create certain difficulties during repair or dismantling.
A shower corner is the simplest, but very practical thing in the bathroom. What is especially attractive is that its cost is several times less than a shower stall. In addition, any man can do it on his own if he has an installation kit and these instructions. Therefore, read the secrets on how to install a shower enclosure without the help of specialists in this article.
What do you need to know when installing a shower enclosure?
The key differences between a shower corner and a stall are that the first structure is nothing more than a fenced-off part of the bathroom. - more complex design. This is a kind of capsule in which manufacturers have provided such additions as hydromassage, a steam generator, a telephone and other useful elements. However, in addition to physical differences, these two designs also differ in installation. It is more difficult to install a shower stall, but anyone can handle installing a corner.
Before revealing the secrets of how to install a shower enclosure yourself, it is worth highlighting several features of this design:
- Frame structures are sold assembled or partially assembled.
- Installing a frameless shower enclosure requires the most accurate measurements and care in installation work. The walls of a frameless corner are fragile and can crack or break.
Before installing the shower enclosure walls, you need to take care of:
- Reliable drainage.
- Connecting cold and hot water.
- Pallet organization.
You can make the tray yourself by laying out the frame with tiles and installing a shower drain into the floor.

Or buy the necessary parameters and install it in your bathroom. The latter option will be more reliable, since pipes can be hidden under the pallet and, in the event of a breakdown, it is easier to dismantle. There will be no need to tear off tiles to get to the drain pipe.
It is worth distinguishing two types of walls for shower enclosures:
- Plastic. Lightweight, easy to install. May have a print.
- Glass. Heavier than plastic ones. Strength depends on the thickness of the glass.
The choice of material for the walls of the corner is a personal matter, which depends not only on the aesthetic preferences of the person, but also on the budget.
Features of installing a shower corner
Installation of a shower enclosure consists of three stages:
- Pallet installation.
- Sewage connection.
- The actual installation of the corner walls.
Installation of the pallet is carried out according to the following scheme:
- We place the pan in the corner of the room and mark the location of the drain hole.
- A corrugation is mounted to the sewer pipe. Its other end is attached to the siphon using a union nut.
- We attach the siphon to the pan. Using a level, check that the pallet is horizontal. It should stand straight without tilting.

- We lay the sewer system (instructions below).
- We install the pallet. Carefully seal the joints of the walls and sides of the pallet with sealant.
Connecting the sewer system is the most difficult stage. Here you need to choose the right size pipe, lay it so that there are no bends in which sediment would accumulate.
- The height of the siphon with the sewer hose is set so that there is space (approximately 5-7 centimeters) between the entrance to the sewer and the lower part of the siphon. It is worth considering that the speed of draining water from the pan will depend on how high you install the siphon with the pan above the level of the sewer hole.

- Next, the drain hose must be connected to the sewer tee. In this case, it is worth using a sealant to avoid water leakage.
- Flexible hoses are connected to the water supply system.
- The installation of glass shower enclosure walls depends entirely on the design. If the tiled walls of the bathroom serve as one of the sides of the shower stall, then it is enough to fix metal profiles and install the missing walls.
If the shower enclosure has 3-4 walls of its own, then its installation is much more difficult.
The instructions before such installation will be as follows:
- Using a level, check the vertical position of the walls of the corner.
- We drill holes in the wall. We mount the profile using dowels.

- We pass rubber gaskets at the joints with the profile with sealant to prevent water from entering.
- We install glass or plastic walls in the profile.
To increase the rigidity of the structure, additional jumpers are mounted on top of the glass sheet to the opposite wall.
The method that is not adjacent to the walls of the bathroom is identical. The only difference is that the profile is not attached to the wall, but a frame is assembled, which after assembly is fixed to the wall.
For information on how to install a shower enclosure, watch the video: