1.
2.
3.
4.
Wall-hung toilets are no different in functionality from floor-mounted structures, but there are significant differences in design and installation. The main difference is the need to install a suspended structure on the installation.
Advantages and disadvantages of wall-hung toilets with installation
To understand how to install a toilet installation, you need to understand the operating principles of wall-mounted toilets, their design features and their qualities.Advantages of suspended structures:
- Significantly simplified cleaning. Wall-hung toilets were primarily created precisely to make cleaning the bathroom easier, if done correctly, since the presence of floor structures in it creates several hard-to-reach areas.
- Excellent aesthetic qualities. Mounted devices are characterized by good appearance and the ability to “fit” into the interior. It is simple to explain this phenomenon: there are no pipes in sight, all internal elements are covered with cladding, which can be processed in a style that best suits the interior of the bathroom. Only the toilet bowl and flush button remain undisguised - and choosing them correctly will be a good design decision.
- Visual advantage. In addition to good design qualities, suspended structures look better in the eyes of people from the point of view of rationality. As a rule, the human eye evaluates a room by its floor and ceiling. In this case, the floor is unloaded, and it seems that the bathroom is a little larger.
- Freeing up space. The design of wall-hung toilets does free up a small amount of space, but this point is considered the most controversial: in practice, it turns out that the wall with the installed installation tends to the opposite side of the room, so the space savings will be insignificant.
Do-it-yourself toilet installation requires the following tools:
- Hammer with drill. Any structure requires fastening, and a hammer drill in this case will be the best solution. The main thing is that the diameter of the drill matches the diameter of the dowels that come with the toilet. In order to carry out the installation of toilet bowls efficiently, it is better to use anchor bolts that will connect the installation to the wall almost tightly.
- Construction level. The installation diagram of the toilet installation assumes compliance with horizontal and vertical levels. The level may be required for others construction work in the house.
- Roulette. When measuring distances between various structural elements, accuracy must be maintained. Roulette is an indispensable assistant in such situations.
- Pencil. Marking of mounting and technological holes is carried out using a pencil.
- Adjustable wrenches. They are used when connecting the water supply to the toilet and at the final stage - securing the toilet in its place.
- Silicone sealant. It is used where it is necessary to ensure the tightest possible connection, for example, at the junction of the toilet with the sewer.
Step-by-step installation of a toilet for installation
First you need to mark the frame. All measurements must be carried out in compliance with the levels. It is worth noting that when laying tiles on the floor, the toilet will be located below its surface (more details: " ").Now you need to drill out all the fasteners and mount the steel frame with screws or anchors.
The next step is to connect the tank to the water supply. To do this, you can use a flexible liner, but experts advise using pipes: rigid connections are much more reliable, but flexible connections will leak in the coming years, which will require breaking or dismantling the wall to fix.
The next step is covering the installation. As practice shows, the best material is double moisture resistant drywall. It is better to make a frame from metal profile, since the frame, due to its dimensions, is not very well suited for the role of support.
The drain button must be equipped with a cuff and a plug, which will protect the control element from clogging.
Now you can start installation finishing material. After completing this work, it makes sense to wait one and a half to two weeks until the tile or tile sits firmly in place.

Now you can adjust the dimensions of the drain and outlet pipes, after which the toilet is attached to the installation. The space between the wall and the toilet bowl must be covered with a gasket that will dampen the load. If the gasket was not included, you can use sealant.
The last step is connecting the drain key. When adjusting the rod of the control element, it is necessary to create the minimum possible free play. This completes the installation of the toilet.
There are a number of recommendations that will tell you how to choose the right plumbing fixtures and install them:- the choice of toilet can be made depending on personal preferences, and their quality can be determined visually when purchasing;
- the quality of the installation needs to be given much more attention, so here it is worth paying attention to the manufacturer (Western European companies are considered the best);
- creating a service hatch under the drain button can greatly facilitate repair work in the future;
- you need to lay the tiles symmetrically, and it is best to start from the flush button: this will allow you to position the cladding in the best possible way;
- It is advisable to use a system with dosed water discharge, which will save money and be much more convenient.
Conclusion
Installing a toilet installation is not the most difficult process if you follow all the described recommendations. As a last resort, you can always look at the photo, which shows in detail all the nuances associated with wall-hung toilets.
After purchasing a toilet, many decide to install it themselves. The procedure is very simple and does not require special skills. Increasingly, people are buying in order to save space; there is an additional design - an installation, which ensures that the toilet is attached to the wall. In such cases, installing a toilet installation yourself can raise a number of questions. To provide a complete picture of the work process itself, there is a special toilet installation instruction that will help in acquiring all the necessary knowledge.
Let's take a closer look at the entire sequence of work that must be performed when installing the installation. wall hung toilet.
Before starting work, you need to check that you have all the tools that may be needed during the work process. This is a tape measure, a pencil or marker, a hammer drill with drills for concrete, a building level, spanners and open-end wrenches.
Now you should unpack the box with fasteners and see if everything is available. Manufacturers try to complete their products as much as possible so that a person does not have to buy additional fasteners. Therefore, it is enough to compare the equipment available with the one specified in the instructions.
Let's start the work process.
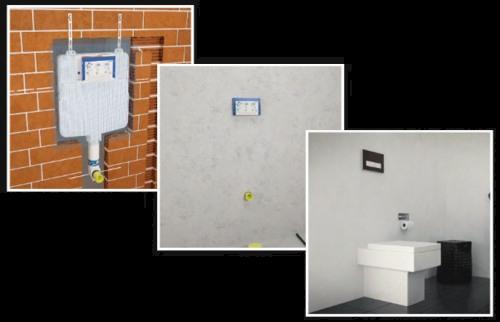
The first step is to start applying markings that will indicate the mounting location. The location of the sewer drains must be taken into account to ensure the installation procedure is as simple as possible. Typically, the installation system should be located at a distance of 14 mm from the wall.
- Now you should mark the attachment points of the cistern; usually it is located at a height of 1 meter from the floor level.
- It is also necessary to mark the mounting points of the installation elements on the wall and floor.
- After applying the markings, you need to use a hammer drill to make holes in the wall and floor where the installation fasteners will be located, and insert dowels into the holes.
- Regardless of the type and features of the installation, it will require horizontal and vertical fastening.
- It is necessary to install mounting anchors into the holes with installed dowels; with their help, the installation will be attached to a vertical plane.
- When installing, it is important to follow the sequence so that in the future there is no need to adjust the vertical level.
- Now you can install the installation structure itself and attach it to the levels.
- It is very important to install the housing in a level position relative to the vertical and horizontal levels.
- Only after the installation is installed correctly can all fasteners and bolts be tightened, firmly fixing the structure.
- Now comes the stage at which the sewerage system is connected to the installation and secured.
- The design is initially equipped with special plastic clamps, this will significantly facilitate the work and speed up its implementation.
After all the work is completed, you need to once again make sure that the installation is securely fastened, that the bolts are properly tightened, and that the structure complies with the levels. At this stage of control, you should be extremely careful; any inaccuracy or poor fixation of the structure can lead to breakdown in the future.
We study installation installation on video
Installation can be done in several ways. For example, to provide structures with higher reliability, people buy special brackets. But the manufacturer of the pendant does not provide for such a design, so the brackets are not included in the package and are not mentioned in the instructions.

Therefore, to understand how the work will differ, you can visit the Internet and watch the corresponding video, which shows all the intricacies of the work process. In the video clip, each stage will be described in as much detail as possible, so that even a person who has no idea about this procedure can cope with the work quickly and efficiently.
The result is a strong and reliable fastening of the toilet installation that will last for a long time.
We install it ourselves
When installing a toilet installation with your own hands, a person can use previously acquired skills, instructions included with the design, and video clips from the Internet. There is enough information to get an idea of what the design should look like in the end, and how to achieve the desired result. But, if you have doubts about your strengths, it is better to seek the help of professionals. Using modern tools, they will quickly cope with this task and in the near future will provide a decent result of the work.
If you think there is not enough information, you can always supplement it and express your opinion in the form below “Your opinion”.
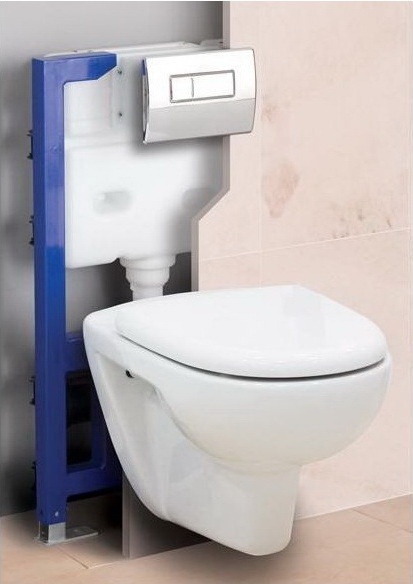
Wall-hung toilets are gaining immense popularity, so installing a toilet installation is a fairly pressing issue.
Hanging models have the main advantage of being aesthetically pleasing appearance, since all the drain fittings and the tank are hidden in the wall.
You can install a wall-mounted (wall-hung) toilet with your own hands, but you must approach this process with maximum responsibility, and the instructions must be followed.
After all, the service life of the equipment depends on the quality of the work performed.
The installation method depends on the type of installation.
Therefore, first of all, you need to choose a suitable model.
Types of installation
There are two types of installations: block and frame. Block type fixed exclusively to the main wall.
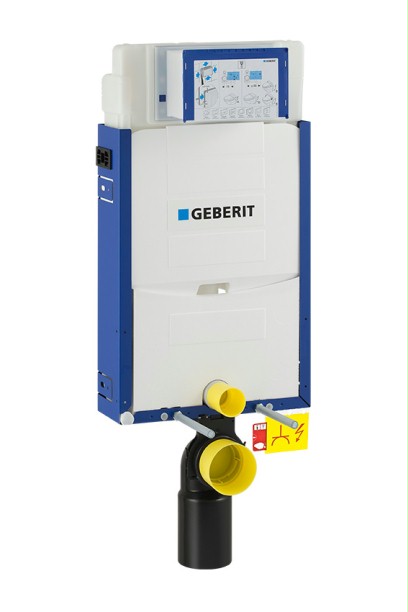
The block design consists of a plastic tank, which is attached to the drain fittings, as well as fastening elements for the toilet.
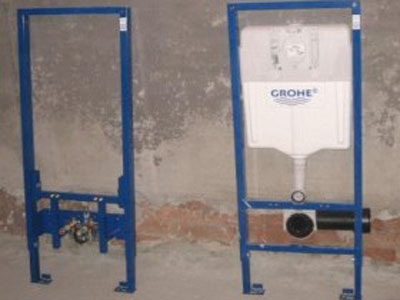
In a frame installation, the basis of the structure is a metal frame on which fasteners for the toilet and drainage outlets are installed.
This installation is more expensive than a block installation.
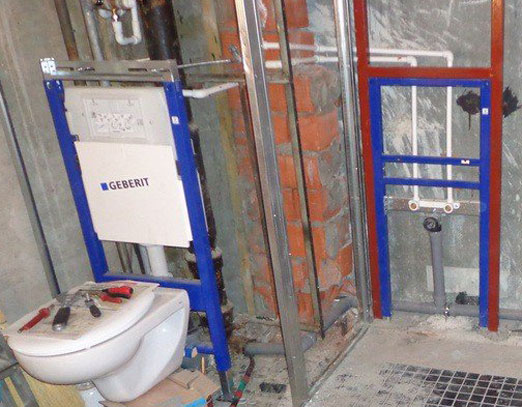
There is also a corner version of the frame installation, which can be installed at the junction of the walls.
![]()
The corner installation option allows for rational arrangement of plumbing fixtures, that is, two plumbing fixtures can be placed in one block.
The instructions for installing a corner installation are similar to the installation algorithm for a standard installation.
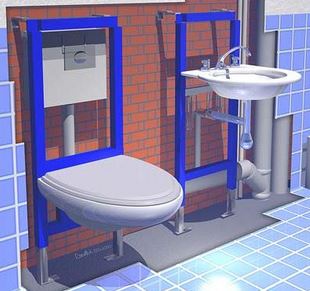
The design can be clearly seen in the diagram.

Frame installation technology
You need to approach the choice of location as responsibly as possible, since, for example, the installation of a block structure is carried out exclusively on permanent walls.
If installation is carried out in an apartment with a standard layout, then best place There will be a niche in which the water supply and sewer risers are located.
It is better to change the niche by placing risers in the corners.
To install a frame installation with your own hands, you first need to mount a metal frame to which the drainage system is attached.
The frame can be adjusted using brackets located at the top of the structure. The frames are universal and fit any toilet.
The height of the frame should not exceed 145 cm. The width of the frame should not exceed the width of the drain tank.
The frames can support weights up to 400 kg.
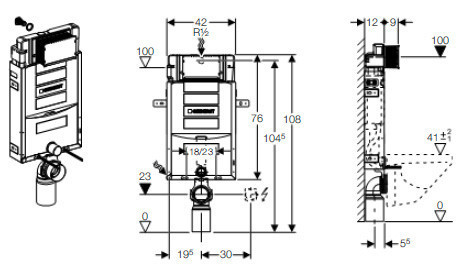
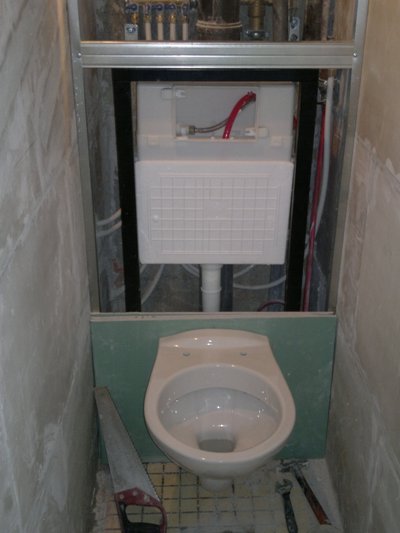
Below is a diagram of the installation installation. This diagram allows you to clearly see the structure of a wall-mounted toilet.

At the next stage, with your own hands, the drain tank is fixed to the structure.
When attaching equipment, it is important to consider certain nuances:
- The panel with the drain button should be located at a height of 1 m;
- The sewer pipe should be located at a height of no more than 25 cm;
- The toilet bowl is mounted at a height of 40 cm.
The metal frame is fixed in four places. There are two mounting options: 4 in the wall or 2 in the wall and 2 in the floor.
The next stage is installation of the finished installation. The location of the frame must be strictly horizontal.
First you need to attach the frame to the wall and make markings for the holes.
Then you need to drill holes in the marked places and screw the structure to the floor. Use screws to adjust the height and attach the frame to the wall.
Now you need to connect the water supply to the drain tank. The inlet can be top or side.
It is better to use plastic pipes. The tank and pipes must be insulated to prevent condensation.
The false wall is made of plasterboard. But before manufacturing, you need to screw pins into the installation to fix the toilet and close all drain holes with plugs to protect from debris and dust.
Now you need to move on to installing the plasterboard wall. The drywall used must be waterproof and at least 10 mm thick.
Immediately you need to make holes for the pipes. It is necessary to assemble a frame from a metal profile, and then attach the sheets of plasterboard to the frame from a metal profile using screws.
Now you need to install the toilet, however, it is recommended to install a wall-hung toilet only 10 - 14 days after installing the frame structure.
To install the bowl, the outlet of the hanging equipment is adjusted to the sewer pipe.
Silicone sealant is applied between the wall and the toilet bowl or a rubber gasket is placed, the bowl is mounted on pins that are tightened with nuts.
An important point in installing hanging equipment is the installation of a drain button.
Due to the fact that the drain fittings are hidden in the wall, it is necessary to install a flush button, which is a small panel of various shapes and colors.

To use water economically, you can purchase a button with two flush modes, thanks to which you can control the amount of water used.
An excellent option is the “stop-flush” panel, which allows you to stop the flow of water at any time by pressing a button. There is also a remote control button.
Control is possible from a distance of two meters; a remote control is included.
Having completed the installation work on installing a wall-hung toilet, you need to check the tightness of the equipment; to do this, just turn on the water supply.
Block installation technology
The block version is used for installing suspended and floor-standing models of equipment.
When installing a block installation with your own hands, the installation procedure is slightly different.
Installation begins with marking the fastening locations. If the work is carried out in an apartment, then the axis of the wall-mounted toilet should coincide with the axis of the room, since the area is small.
In other cases, the axis of the toilet bowl must coincide with the axis of the sewer system. These axes are marked on the wall.
Now you need to measure the height, which should not exceed one meter, and mark the locations for the holes for the dowels, through which the entire structure is secured.
The dowels should be located at an equal distance from the axis. For example, with an installation width of 50 cm, 25 cm are removed from the axis in each direction.
Having made the markings, you need to use a hammer drill to make holes and drive in dowels for attaching the wall-hung toilet.
Now you need to place the drain tank against the wall and screw it.
When connecting to the drain hole, you need to check the presence of all gaskets, then connect a water pipe to the drain tank.
The pins need to be screwed into the holes made. The size of the protrusion of the pins depends on the size of the toilet.
The bowl is attached only after all installation work has been completed.
Now you need to make a false wall in the same way as in the case of a frame installation.
For floor-standing equipment, the installation of a block installation differs from that of a suspended installation. First, the position of the structure is fixed using metal fasteners.
Then the toilet outlet is treated with silicone sealant, and the equipment is placed in place. The toilet is outlined and the mounting locations are marked.
Then you need to remove the toilet, align the mounting angles according to the finished markings, then put the toilet back.
Now installing cistern, which must be secured with mounting bolts. A connecting cuff is attached to the toilet outlet.
Then the bolts are tightened and closed with decorative caps.
The final steps are to connect the drain button and check the tightness of the structure.
Do-it-yourself toilet installation is accessible even to non-professionals.
The most important thing is to follow all installation rules, which will ensure long term installation services.
We have already talked about the parameters by which it is worth. Today we will look at the features of its installation and connection to the sewer.
The modern market offers installations of two types. Block installations differ in that they are attached only to the main wall. Their design is simple: a plastic tank attached to the fittings, as well as fasteners for the toilet (only wall-hung, because this kind of installation is not provided for floor-standing models). Such structures are recessed into the wall, so they require a pre-made niche or backfill after installation on the wall.
Important information! If the toilet is located in the center of the house/apartment, far from the main walls, then it will not be possible to install a block installation.
Characteristic feature frame structures, as the name suggests, is a frame primarily made of steel. Fasteners for the toilet and outlets for sewer pipes are installed on the frame. There is also a corner frame installation, which is mounted at the junction of two walls or partitions - in this case, the presence of fastenings in the wall is not necessary, which destroys all barriers to the flight of design ideas. Note that frame structures are much more expensive than block structures.
Necessary materials, tools
To install the installation yourself, be sure to purchase the following list of tools and materials:
- building level;
- ring wrenches, the sizes of which are selected based on the size of the fasteners;
- marker or pencil;
- perforator;
- drills for concrete walls(if required), their diameter should be the same as that of the fastening elements of the structure;
- roulette;
- installation.
If you choose the right tools, the installation will take place without any problems, which is important. Now directly to the installation process.

Selecting a location
Regardless of what type of installation structure has been chosen, installation should begin with the right choice places. In apartments with a standard layout there is an ideal place - this is a niche in which the sewerage and water supply risers are located. You will need to redo the niche a little and place risers in the corners. If they (risers) are metal, then replace them with plastic ones.
Installation of a frame installation for a wall-hung toilet
Once you have decided on the location, you can begin installation work. They consist of several stages.
Stage 1. First, you mount the frame - a metal frame with movable fasteners. Attach the cistern to the frame. To adjust the position of the frame, use the brackets that are located in the upper part and the screws at the bottom. All frames are sold separately and, being universal designs, are suitable for all types of toilets. After installation, you should have a structure about 130 - 140 cm high. The width of the frame will depend on the features of the model, but it should not be less than the width of the tank with wall mounts. On average, such frames can support up to 500 kg of weight.
Stage 2. Attach the cistern to the frame, observing the following requirements:
- the drain button should be at a height of 1 meter;
- the fastening points must be at the same distance from each other as the toilet eyelets;
- the sewer pipe should be at a height of 22–23 cm;
- wall-hung toilet - at a height of 40 - 42 cm.
Often the frame is attached at four points. There should be a gap of no more than one and a half centimeters between the wall and the drain tank.
Stage 3. Next, you must install the finished installation. It is necessary that it stands strictly horizontally, so first check the slope of the wall using a plumb line. If such a slope is detected, then fix the plumb line at a height of 140 - 150 cm, and then draw a line parallel to the wall in the place where it comes into contact with the floor. Next, measure from this line the distance required to install the frame, and draw a second one.
Place the structure on the wall and make markings, marking the points for the holes. Drill holes. Screw the frame to the floor and, using adjusting screws, set the required height and level it (the frame) horizontally using a building level. Do the same procedure with the vertical position.
Stage 4. Connect the water supply pipe to the drain tank. There may be two options for supply - top and side, but you need to remember that almost all modern products require changing its location.
Important information! When connecting the cistern, it is better to refrain from using flexible hose. The fact is that such a hose will last much less than the toilet itself, but replacing it, hidden behind a false wall, if necessary, will be very difficult.
Better do your eyeliner plastic pipes. Tanks, often also made of plastic, are usually insulated with special materials, which prevents the formation of condensation. Also included with the tank are all the necessary fasteners. The panel on which the drain buttons are located must be purchased separately.
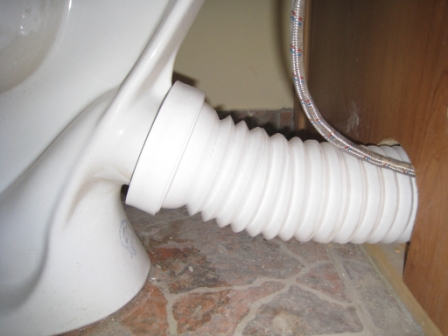
Next, connect the toilet outlet to the sewer riser. Don't be upset if you can't place them directly - in most cases this happens, so you need to use corrugation. Before you begin installing the false wall, carefully examine all joints and connections for leaks.
Stage 5. Before you start making a drywall box, do two things:
- screw the pins for attaching the toilet into the installation frame (they should come with it);
- Close all outlet drain holes with plugs (they should also be included) to prevent dust or debris from getting there.
Using metal profiles, assemble the frame, making sure to maintain all the necessary levels. The drywall that you will use for sheathing must be moisture-resistant, at least 1 cm thick, and it is recommended to lay it in two layers. Cut out all the necessary holes for the drain button and pipes in it, attach the sheets to the metal profiles with screws. Place tiles on the drywall.

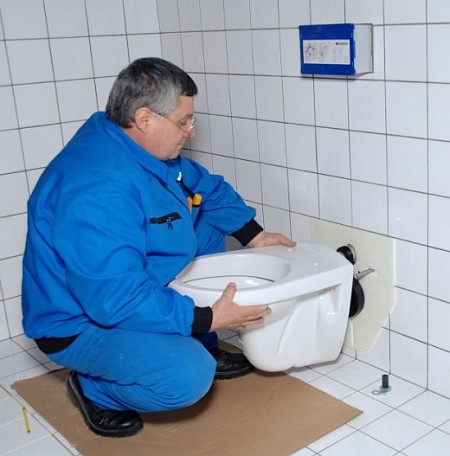
Stage 6. All that remains is to install the toilet, but it is recommended to do this no earlier than 1.5 weeks after installing the frame installation and laying the tiles. To do this, adjust the toilet outlet to the sewer hole. Apply a layer of silicone between the tiles and the toilet or place a gasket, sit the toilet on the pins and tighten the nuts. The final touch: drain the water to check the tightness of the structure.
Installation of a block installation for a wall-hung toilet
If you install a block structure, the order of your actions will be slightly different.

Stage 1. You start by marking the installation location. If the toilet is in an apartment, then the axis of the toilet must exactly coincide with the axis of the room, because the area in this case will be insignificant. In other cases, it is necessary to tie the toilet to the axis of the sewer drain. Mark on the wall with a marker where such an axis will pass.
Stage 2. Next, measure the height. It will depend on the features of the installation, but often does not exceed 1 meter. Mark the points for the dowels, with the help of which the structure will be attached. The dimensions here need to be looked at only in the instructions attached to the tank, since they may be different for different manufacturers and models. The dowels must be equidistant from the axis, for example, if the width of the structure is 0.5 meters, then you need to retreat 0.25 meters from the axis in each direction. Make holes with a hammer drill and hammer in dowels.
Stage 3. Place the drain tank and screw it on. Twist the drain hole (you can also read about this in the instructions). Be sure to check that all gaskets are in place. Connect a water pipe to the tank.
Stage 4. The toilet should come with pins that you screw into pre-drilled holes. The extent to which the pins protrude will depend on the dimensions of the toilet itself. In this case, until the installation is completed, the pins will hang “naked”, the bowl will be installed last.
At the end, we fix the drain hose with clamps, if the design requires it. All that remains is to finish the wall, as in the previous version, checking the tightness of the system in advance.
Video – Installation of Geberit block installation
Installation of a block installation for a floor-standing toilet
Video - Installation of a Geberit Sigma concealed cistern for a floor-mounted wall-mounted toilet
Common difficulties during installation installation
Conclusions
Now you know how to install a toilet installation. The main thing is to strictly follow the instructions, and also check the reliability of the connections after each stage of work. If defects are found, fix them immediately, since it will not be easy to do this later, when the structure is hidden by a false wall.
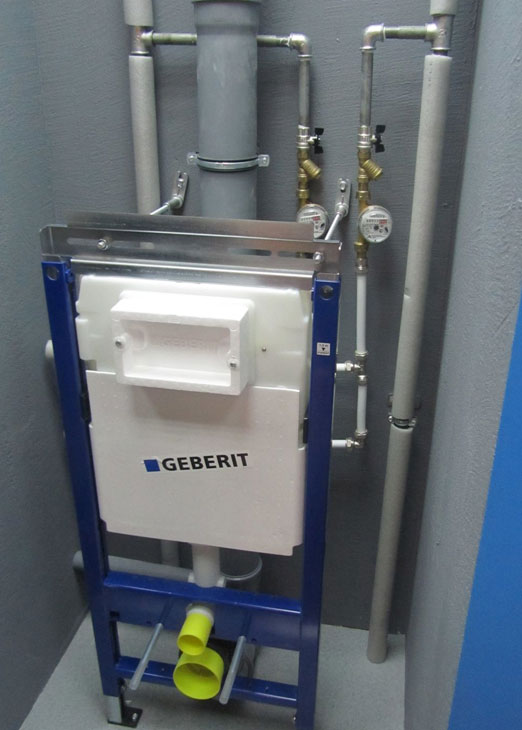
When purchasing a toilet, many people look at the shape and color scheme, few people think about the reliability of the product. A completely different attitude towards the installation - guarantees of strength and absence of problems with plumbing for the next 10-20 years. Installing a toilet installation requires the technician to have certain knowledge and skills.
The leaders in this market segment are considered to be German manufacturers - Grohe Vega and Geberit. By purchasing equipment from a renowned manufacturer, the owner of the toilet does not have to worry about the quality, which is carefully checked at all stages of production. There are two types of frame designs for DIY installation:
- Block;
- Frame.
The latter option is more popular among plumbers, because... provides more space design ideas. This applies most of all to the installation for the toilet, which must be mounted on feet to the floor surface.
Tools
Installation of a toilet installation involves the use of certain tools for work:
- Hammer drill with a drill diameter equal to the size of the dowels (supplied as standard);
- Kit adjustable wrenches so that installation on your own goes more quickly;
- Construction level required to align the frame in all planes without distortion;
- Tape measure for measuring the distance of the toilet relative to the floor (approximately 41-45 cm).
Important: when measuring the height, it is necessary to take into account that tiles laid on the floor will raise the lower level by several cm.
At the preparatory stage, the technician must carefully study the composition of the consumables for the installation. If anything is missing, these spare parts will have to be purchased. Unscrupulous manufacturers do not worry about the comfort of craftsmen who install the frame with their own hands and forget to put anchors or a damper gasket installed between the wall and the body of the toilet.
Important: some mechanics replace the above-mentioned gasket with a layer of adhesive-sealant; this does not affect the reliability of the fastener.
Installation process
Installation of the toilet installation is carried out before finishing works in the toilet, i.e. before laying the tiles. An algorithm for doing this process yourself:
Important: DIY installation must include maintenance of the structure afterwards. To do this, a technological hatch hole is often made under the drain button.
Economical models are considered to be those models of drain buttons that are bifurcated or have a “start/stop” function.
This article is intended to clarify for the home handyman the issue of installing a toilet frame. If some nuances remain unclear, you can always watch thematic videos on YouTube