Good day everyone! Preparations for Easter are in full swing, the sun is shining brightly outside, the birds are singing, in general the mood is lifted and you want to sing and, of course, create. And they will help us in this case. Today let's make another souvenir in which you can easily put Easter eggs and even put a hen and chicks in it. We are talking about baskets.
I think that you have already learned how to decorate, found the most suitable way for yourself and painted them somehow in a special way this 2020. After all, doing the same thing every year gets boring, you want variety, don’t you?
As usual, I went and strolled through the Internet and what I found there, and in general from various magazines and newspapers, I will show you today, I think you are all for it! By the way, you can also write what else you would like to see in my next articles.
The first thing that comes to my mind is that you can make such a beauty out of paper or cardboard. Or you can cheat a little more, using a lid or something similar as a basis. The box will turn out colorful and original, and most importantly, you can make it in a couple of minutes.
We will need:
- colored paper (can be replaced with office paper) - 2 pcs.
- openwork napkin - 1 pc.
- stationery knife
- satin or other decorative ribbon - 1 pc.
- Hochland processed cheese lid
Stages of work:
1. Take sheets of paper and you need to make them square and then follow these steps which you see in these images.

2. In my opinion, it looks very charming and gentle. Can you imagine, if you put more paint in there, it will definitely be cool!

These cockerels have sunk into my soul, this year we’ll do just such a cool little thing with our little one, do you like it?

Even an ordinary napkin or fabric can be folded in such an unexpected way, such as bunnies.


You can take any idea as a basis and decorate it with corrugated paper.

Either go the original route, for example, find a wooden ring, or make it out of thick cardboard, tie it with thread and decorate it with something, even feathers can come in handy. And place the testicles. This will make a kind of modest stand, and it also looks very good!

And if you are friends with fabric and are head over heels in love with it, then perhaps you will be hooked by this idea from foamiran.

We will need:
- foamiran
- glue gun
- scissors

Stages of work:
1. Make flowers from this fabric, you can take any shape, or like this:


3. Make the base itself green. These will be the leaves.

4. Then follow these steps. You need to buy or make a bow and a handle yourself.


The most favorite activity for kids is playing with plasticine or you can use play dough. First roll it into a bun, and then use flagella to mold it as shown in these instructions.


There are many options, you can come up with something unusual yourself.

You have no idea, but you can even use newspaper strips or paper from old unwanted magazines.

Remember, in childhood we made bookmarks for books this way, this is exactly the same technique.

This is what it might look like if you show up at someone’s house with an Easter egg.

And one more paperwork.


Or consider this option.

They are even made from twine, hiding it in multi-colored fabric.

It turns out that such a seemingly ordinary egg box can also be used to make another souvenir.

Or this one with grass, you need to cut the egg mold.


Cut out imitation grass from any material or paper. You can also decorate a living one.

Place flowers.

And this is what happens, cool!

This is such an interesting idea made from threads and sticks.

You can take regular threads, preferably thicker ones, and wrap them around any glass or container.


Or you can make a laying hen. The base is a candy box.


The fence is made of ordinary paper strips.

You will be very surprised if you look at this miracle.

This beaded craft looks fantastically elegant and beautiful.

Making a craft from newspaper tubes
It’s not difficult to learn how to do this, so if you like this idea, then go ahead and sing.
Well, for those who are in the know, look what the great Internet offers us, to make such a nice chicken.

Or like this. How cool it is, and the main thing is that you can do everything yourself.


How to crochet a basket (description and diagram attached)
Let's move on and make some wonderful souvenirs for Easter from knitting threads, take note for needlewomen. For those who know how and love to knit, this post will also be interesting. From last years I still have such different ideas on my shelves.
I’ll start with perhaps the egg, namely the stand or case, I don’t even know how to put it more correctly. But one thing I can say is that you can crochet such a beauty in literally an hour. And please others too. You only need a little bit of thread.

So, try to create! An approximate diagram is like this.

Or you can make it even more delicate; to do this, take this idea and turn it into reality. If you need a diagram and description of this model, write to me at the bottom of the article, I will send it to you by email.

I can offer another option, it looks a little like a vase.

Honestly, someone might even say that this is such an original box. Although they put mushrooms here, you can bring Easter gifts here.


This is such a wonderful, beautiful cockerel, just wonderful, I once made it out of a magazine description a long time ago.


I also really like this bird family of chickens. You can hide Easter eggs with them.

Or tie potholders on which to place the Easter cakes.


If you are new to knitting, you can use this craft - an egg stand.

Or knit a chick that will decorate your holiday table. 
Cool new items this year are, of course, basket bunnies and mother hen.

I also have a detailed description and diagram of this illustration in my piggy bank, if anyone needs it, please contact me.

Either take this blank and create something weird, it’s also a cool version of a bunny, or maybe it’s a rabbit. According to the description, this is a mini crochet basket for Easter eggs.


I also liked this option. A very simple diagram.

And in conclusion, this is a charming miracle, which is also unrealistically beautiful.

It feels like a flower opening.


I was really looking for a description for this model, but unfortunately I couldn’t find it. If anyone has one, please share).

Interesting souvenir idea Basket decorated with hares
Another version of the basket with bunnies looks cool and very unusual, and you can take any material, be it cotton fabric, felt or even any unnecessary scraps.
In order to create such an exclusive gift, you first need to outline the correct pattern; it may look something like this.

And then you apply it to the material and trace these funny figures by hand.


After stitching or hand stitching, remove any unnecessary items.


Looks like a whole army of rabbits))).


All that remains is to decorate them, add a nose, mouth and eyes, and embroider these parts of the body with floss threads.

Then give the ears uniqueness and some playfulness, tie them with thread carefully and slowly.


Then stuff the toys with cotton wool or padding polyester.


And now all that is missing is the base, make two circles, insert cardboard.


And then connect the bunnies and the stand together, sew on a gathered skirt. It turns out very cute and attractive.


Now let's make a mold for paints in the shape of a bunny's face.
We will need:
- white fleece or velor
- any fabric: linen or satin
- buttons
- calico white
- padding polyester
Stages of work:
1. Cut out parts of the basket from velor.

2. The template for these side parts will be like this.


4. Make blanks like these from calico.


6. Then make a headband from checkered fabric.

7. Start directly assembling all the parts, sew with a blind seam.


Don’t forget to fill it with padding polyester and add something of your own to this product. It turned out to be a cool Easter bunny.
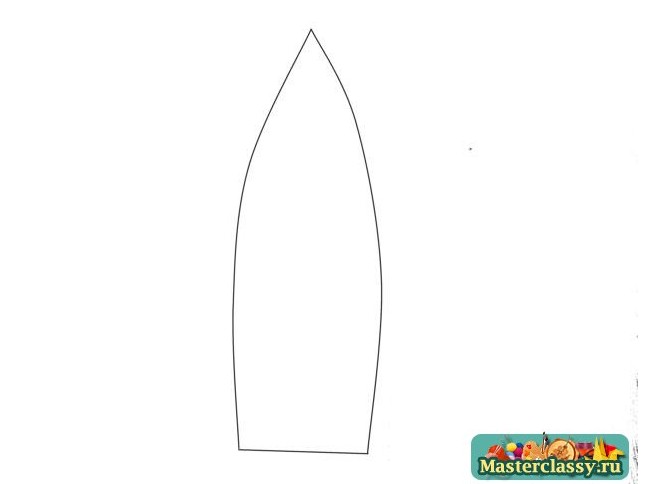
Templates and diagrams of paper boxes for eggs
Let's start with the most primitive and common form. Take this sample, print it out and color it however you like. Bend where the dotted lines are and then glue them together.

The next option will be more interesting, with a little plot.

Or take this one, you won’t have to paint it at all.


You can even make it in the form of an applique.
Master class on Easter pasta baskets
If you are a lover of all sorts of decorative things, and especially like to create weird things using household materials, then I suggest you watch this charming story. Today you can make such a charming large egg in the form of a handbag where you will place your gifts.
Don't think it's difficult, it's easier than you expect, you will need a balloon, glue and of course noodles and your crazy hands.
Beautiful cardboard basket in the shape of an egg for children
Now it’s time to surprise and make very unusual things, for example from threads.
Stages of work:
1. Take a large bowl or even a basin so as not to get dirty, you can cover it cling film or cover with newspapers.
Inflate the balloon with your mouth to the desired size. Blow until it resembles an egg, and then tie the ends with thread.
Then apply PVA glue directly over the ball, and fill the threads with glue too.
2. Now rewind the ball with threads randomly. And then boom, pop, pierce it with a needle.
3. Wait until the threads are completely dry, and then take scissors and make a hole.
Each one produces absolutely their own masterpieces.
This time we cannot do without the kirigimi or protruding technique.

You will first have to print the template on your printer, and then use a cutter to cut and glue two bunny blanks together.
Same with the flower.
Do the same with the chickens.
The main thing is to take your time and be careful and everything will work out.

Or will you stick with these options?
This will take a little work.

You can do something interesting and unusual yourself.

I always associate Easter with the sun and light. I enjoyed painting eggs and making appliqués for my family. I liked walking down the street and shouting “Christ is Risen!”
Having matured, I began to understand that for me this is a family holiday, when there is peace and tranquility in my soul. You can already feel the approach of spring and warmth and a strong feeling is forming that something magical is about to happen.
The child also wants to instill respect for this holiday, and one of the stages of such education is to make a craft.
As we know, the symbols of Easter - an egg, a chicken - have symbolic meanings and imply Life. There was no Easter Bunny on the Christian holiday. It comes from Western traditions, but it’s interesting to make it too.
It will be very easy to make paper crafts with children. It easily takes any shape, so it will be interesting for the baby to work with it.
There are a lot of ideas made from paper and cardboard, so let's start with the cute figures of a hare and chicken.

You can draw any shapes, or just an egg, to which add eyes and a mouth.

Divide half of the figure with a horizontal line.

And from it at a distance of 1 cm we draw parallel lines.

Carefully start cutting. You also need to cut out five strips of a different color, 1 centimeter wide.

One edge of the strips of a different color needs to be glued. Tape or glue is suitable for this. If you have tape, wrap it on the wrong side.

Thread the strips, alternating them with the main ones. You will get a weaving technique.

All stripes should be the same width, then the result will look neater.
Here's another idea for cute eggs with pockets for pets.

Paper stand in the shape of a laying hen. A very bright and themed craft.

Using this template, you can cut out the laying hen and glue the stand itself.

An interesting version of a stand made from a tray for eggs and a chicken made of cardboard.

With the same paper tray, you can make another version of stands.

The tray needs to be cut so that there is one separator and one place for the egg. Before the separator, remove all unnecessary paper and backing.

Paint the blank white and glue on the eyes, beak and scallop.

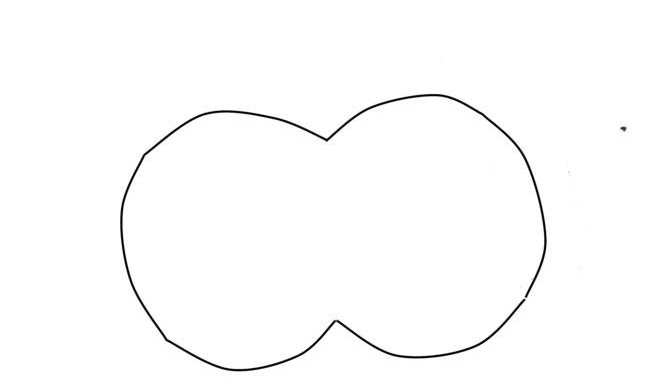
The diagram is shown below.

We cut out according to the template, bend all the allowances and side parts so that the basket can take a semicircular shape.

Glue the seam allowances and the front sides of the handles together.

For those who make cards, I found such a cute little guy. I couldn’t pass it by; by the way, it was made using the scrapbooking technique. It was necessary to come up with the idea to make the button eyes.

For the next application we will take many multi-colored stripes and two sheets of cardboard. One will be the base on which we will paste all the strips in order, one below the other.
And in another sheet of cardboard we will cut out an oval in the shape of an egg and glue it on top of the workpiece.

We can also create such wonderful little bunny-shaped coasters from cardboard. Cut out a strip of cardboard 8 centimeters wide. We form a circle by first measuring it in the widest part of the egg. And glue the sides together with hot glue or connect them with a stapler. Then we measure the bottom and glue it underneath. All that remains is to add ears and eyes.

Lovely present is back in shape eggshells can be done in five minutes.

Use this template that you can print straight away.

And any child will be delighted with a themed garland. Look how rosy and festive she looks, she immediately wanted to smile and start creating.

Here are the bunny silhouettes for cutting out.

Make more preparations. It is better to take double-sided and thick paper.

We glue the tail, it can be made from cotton wool or strands, and connect all the silhouettes.

A funny and very simple congratulations on this happy holiday you can create in the form of a postcard.

And also a fun wreath for inspiration. For it you need to find ribbons, a disposable plate and many different backgrounds printed on paper.

To cut out identical ovals you will need a mold. These helpers are sold at craft stores or in the cookie aisle.

Using glue, overlapping each other, begin to form egg rows.

There are always a huge number of paper ideas. As you can see, all crafts are created very quickly, and they are easy to dispose of if you do not want to keep them as a keepsake.
Easter crafts made from felt
Chickens, baskets and the eggs themselves are made from felt.
I liked the idea of the fabric being shaped like an egg and decorated beautifully. You can use them to make a wreath or hang them on willow trees, thus making an Easter tree.

Attach loops or string to the blanks so that you can decorate willow or curtains with them.

The shape of the egg is very simple, but at the same time it gives a lot of scope to the imagination.

Look how the craftswoman came up with the idea of putting the blanks on skewers. This way it’s more convenient to hold them, and you can also stick them in the ground with flowers or put them in a vase.

In felt, it is important to seal the edges well so that the inner filling in the form of cotton wool or padding polyester does not come out through the seams, otherwise the gift will not look neat.

Felt comes in different thicknesses. Don’t buy one that’s too thick; it will look rough and awkward on such a testicle. It is optimal to choose a thickness of 1.5 millimeters.
Patterns for crocheting eggs
Incredible beautiful crafts are obtained when an egg is crocheted. A delicate openwork composition on the table will immediately attract the attention of guests and delight you with its beauty.
For inspiration, here are a few knitting patterns so you can start preparing now.

You can simply alternate double crochets from different colors or use one of the patterns below.

Here are three more knitting patterns. They are immediately shown how they will look on the egg.

And this is what an egg looks like, tied with single crochets or an elastic band. Looks very cool too.

We don't use a real egg, it's too fragile for handicrafts. Let's use a balloon, inflating it to about the same size as the testicle.
Easter crafts from plastic bottles for school
A very cute and functional idea that any student can make. Make a storage container.
This craft is not embarrassing to show at school and is convenient to use at home. You can store small things in it and fill it with felt circles, then it will work great option decor for the nursery.

Funny little animals, right? For them you will need any bottle, but preferably a small one, a napkin for cakes and decor. The entire master class is shown on a collage.

You can also make a basket with bottles, into which the child will carefully place his own painted eggs.

In this particular idea, I think teeth are superfluous, but I don’t insist on it.
How to make a craft from satin ribbons
Using ribbons you can make an interesting egg decor. Of course, we again take not the real thing with a thin shell, but a homemade base. It’s better to buy it, but you can make it from foam rubber or polystyrene.

Also, such egg-shaped shapes are created from papier-mâché. There are a lot of base options.
As a last resort, you can take an egg, break it at the top and carefully pour the white and yolk through a small hole, and use the almost intact shell as a base.

Secure the edges of the ribbons with tape or hot glue.

And we wrap it, each time fixing the ends from below. Try to ensure that the strips are pressed tightly and that there are no gaps between them.
I also applied pieces on the sides double sided tape so that the tapes do not move relative to each other.
Master class using improvised materials at home (threads, dough, etc.)
I really liked the thread shell. This is such a cute applique.
And you can put anything inside, whether you want chicken, or multi-colored eggs and candies. The idea is simply wonderful.

For this craft we will use threads, paste or PVA glue and a balloon.
We inflate the balloon and tie the tail tightly so that it does not shrink in size until our design dries.

Preparing the paste. To do this, take 1 liter of water and 4 tbsp. flour.
Add water to the flour and stir to break up any lumps.
Then put the mixture on the stove and heat it until it reaches a viscous and sticky consistency. Let it cool and then test for stickiness. It should set well.

We wrap the ball with threads, generously coating each layer with adhesive mixture. You don’t have to save it, because the product is completely natural and easy to make if you suddenly don’t have the required volume.

We wait for the paste to dry completely and burst the ball inside. To see the inside, you need to carefully cut out a circle with scissors.

I also liked the children's idea with puff pastry. It turns out very colorful and harmless.

Knead the dough in a 1:1 ratio. So, we will take 1 cup of flour, 1 cup of salt. This will be our base, then we will introduce five tbsp. sunflower oil and add one glass of flour until a soft and elastic dough is obtained.

We give the dough the finished shape, make holes, mark the pattern and dry it.

You can dry it for a day in the sun or 3-4 hours in a warm oven.
Now all that remains is to paint the blanks with gouache or food coloring.

Thread a string through the holes and decorate the branches, thus creating an Easter tree.

An interesting option for creating an applique using a potato stamp.

Cut a piece from the tuber. First, wash the peel well so that the soil does not fall on the craft.

We give the inside of the stamp a simple pattern in the form of zigzags, circles or other simple geometric shapes. We try to create a distance between the lines of the pattern.

We paint the protruding elements and apply them to paper.

Here's what might happen. Believe me, the child will be captivated by such work for a couple of hours.

If you have napkins and disposable spoons left over from last year's picnic, we will use them too.

And from a disposable cup we will create a bunny face.

The imagination of needlewomen and mothers knows no bounds. And you can create crafts using ordinary household items.
Simple crafts for Easter from cotton pads
The little ones also have something to do, for example, make wonderful chickens from cotton pads. They need to not only be glued in the right places, but also painted in the right color. Sprinkle cereal onto the glue near the beak; egg or semolina will do.
The child will develop fine motor skills and imagination, and a warm attitude towards Easter will already begin to form.

Another interesting and simple idea. For the beak and eye, you can use self-adhesive paper.

We use a cotton pad and a disposable spoon. For the wings you will need a piece of paper.

Easter crafts are done quickly and the child does not have time to get tired or overtired.
How to braid an egg with beads and weaving patterns
I consider the process of weaving a shape with beads to be a craft too. It’s not so much about decorating eggs, but rather the creative work itself is interesting. Yes, and you can take not the testicles themselves, as I already wrote above, but also any other base.

The process starts from the very top. A row of six beads is made, then first one bead is added between them, then two. And the result is an increase in width.

As soon as you reach the widest part of the base, then according to the same principle as you started, proportionally reduce the number of beads.

Here is another interesting weaving pattern.

Or you can make a craft in the shape of an Easter cake, it turns out very realistic and festive.

Thank you, dear readers, for your attention, add the article to your bookmarks so as not to lose it when you want to start creating with your baby.
For many people, regular plastic bottles don't make a big difference. Of course, now everyone has such containers and in quite large quantities, so they are simply thrown away as unnecessary. However, as today's craftsmen with golden hands show, it is in vain. You can use them to make wonderful crafts from plastic bottles, which will be not only useful, but also beautiful decorative elements. These things can decorate your personal plot, changing his appearance beyond recognition.
Crafts from bottles for the garden (+photo)
As a rule, various crafts are made, the material for which is plastic bottles, for garden plots or vegetable gardens. After all, every summer resident wants to equip his plot in such a way as to create comfort and coziness on it, and making crafts from plastic bottles with your own hands is not so difficult, or rather, quite simple. And the materials for the products do not require large financial outlays; everyone always has them at hand.
Products made from bottles do not require the use of any special tools, and no skills are required to create something unusual from such material.


Tired of spending money on clay pots that constantly break - original hanging plastic pots will be a real salvation for prudent owners


With a little ingenuity, an ordinary plastic bottle turns into a wonderful bird feeder
What can be made from a plastic bottle
Plastic bottles can be an excellent material for making decorative items intended not only for the site, but also for the home. After reading this article you will find many various examples successful use of this material. So, a little more about everything...
Greenhouse or gazebo
It can be built from bottles. Such buildings will not require large expenditures on various building materials, and the result will please any avid gardener.
Having large number bottles made of polyvinyl chloride, you can safely begin building the building, giving it any desired shape. Using this material, you can build not only a greenhouse or, but even.

To build this structure you will need to adhere to the following instructions:
- Before you start building a gazebo or greenhouse, you need to build a frame made of metal or wood;
- After the frame is ready, holes should be made in the bottom of the bottles. The covers also need to be drilled;
- Next, through the holes, the bottles are threaded onto the wire. Next, you need to secure the wire to the frame, thus carrying out the process of building walls;
- You can use vertical and horizontal methods of threading bottles onto metal wire. When these methods are mixed, the structure is much stronger. To create patterns on the future walls of the structure, you need to use multi-colored bottles.
PVC bottles can be used for cultivating plants as well as vegetables. To do this, you need to cut off the top of the bottle and make holes in its bottom. Then you can pour soil into the resulting container and plant seedlings or flowers.


You can make original crafts from plastic bottles with your own hands. different topics. Using your imagination, you can make a comfortable chair or table for your garden that will harmoniously fit into the overall design of your summer cottage. You can also build an original birdhouse or bird feeder that will not only decorate your garden, but also bring benefits.
You can use absolutely any item as a material, of which there is always plenty in any household. This could be an old unnecessary bucket, a cast iron pot, worn out car tires and much more.


Using original decor for decoration, plastic bottles can be used to make excellent containers for storing various small items
How to make original decor from a bottle
As mentioned above, plastic bottles can be an excellent material for making decorative items intended not only for the site, but also for the home.
To make the design of the area more beautiful, you can use bottles to create flower arrangements. These can be daisies, tulips, roses, cornflowers, asters, begonias, carnations and many other flowering plants.
Daisies from plastic bottles (+photo)
For example, to create daisies you will need green and white bottles. The sequence of work is as follows:
- For white bottles you will need to cut out the base for daisies. To do this, you need to cut out the side walls in the shape of a circle. The diameter of the circle should be 7 centimeters;
- The resulting circles should be cut without reaching the center. The result will be future chamomile petals;
- Next, you need to give the petals an oval shape. After which you need to warm the future flower over the fire. This way the chamomile will seem real;
- A small circle of yellow plastic is perfect for making the core of a future chamomile. The green bottle will act as leaves and stem;
- The final stage is to combine all the elements into a single composition.


Lilies of the valley from plastic bottles (+photo)
To make your garden look more beautiful and attractive in spring, you can also create lilies of the valley from plastic bottles. This craft will look very unusual in the garden.
To create lilies of the valley you will need the same plastic white and green bottles:
- The top of white bottles is cut off. The cork in this case will play the role of a bud;
- Holes are made in the lids;
- Leaves and stems should be made from green bottles;
- The buds are attached to the stems with wire.
After the lilies of the valley are ready, they must be carefully placed in the ground; you can place such flowers in a small flower bed.


Vase made from a plastic bottle (+photo)
From unnecessary bottles you can create an original vase, which can be used as a decoration not only in the garden but also at home. For this we need a regular transparent bottle and sharp scissors.
- The first step is to cut off the neck of the bottle. This must be done so that the cut is smooth and without burrs;
- Next, cuts are made in strips of the same width;
- The resulting strips need to be bent outward;
- After which, the strips need to be bent, giving the vase its shape. You can use the same scissors for this.
When working with plastic bottles, you need to do everything carefully and slowly, otherwise your work may be in vain, and all your efforts will be nullified. You should also be extremely careful when using sharp tools, which can seriously injure you.

A beautiful vase is only for beautiful flowers


A white stork and a pink flamingo together is a picture that you will probably never see in nature
Glass bottles are also suitable for making flower vase. It is advisable that they have a wide neck and are made of thick glass, so they will be more convenient and practical to use.
You can decorate them using multi-colored wool threads and special glue. The bottle is wrapped completely, from the bottom base to the very neck, where the end of the rope is securely fixed with glue. It is best to use beads as decoration for finished products.


As practice shows, everything is ingenious, simple!!!
Broom made from plastic bottles
You can make a broom from a bottle, which will be convenient for cleaning up garbage. It is done quite simply.
- To do this, you need to cut the bottom, cut the bottle into strips to the base of the neck;
- After that, the resulting broom should be placed on a handle specially selected for the width of the neck and securely fix the attachment point with a nail or self-tapping screw.


Crafts from bottles for children
Who else, if not small children, will be delighted by various crafts made from plastic bottles, especially if they are made with their own hands. The most important thing in this matter is to find time and desire, but there is no need to worry about the material; as they say, the summer resident always has it in abundance.
The limitless possibilities of this universal material allow you to realize even the most bold ideas and fantasies.


There is probably nothing better than the mischievous laughter of children, their joy and delight. Therefore, by making various fun decorations for your kids, you are guaranteed to provide them, and yourself, with a good and fun time at summer cottage, which will give you a storm of positive emotions.


Sometimes you can take a break from plastic bottles and try to create something from other scrap materials.
Look around, use your head, ingenuity and imagination - this is exactly the occasion when you need to show your true ingenuity and creative skill.


There are many more ideas related to the use of plastic bottles that are easy to make. And the result can please everyone.
Yes, and the functionality of crafts can be aimed at various areas. The main thing is imagination, and then the plastic that no one needs will become a real work of art.

We hope that this article was useful to you and you were able to emphasize something for yourself personally. Good luck in your endeavors!
The family hearth for each of us is a sacred repository good hearts, warm and affectionate words, gentle kisses and caring hands. This is the place where everyone relaxes their souls, is filled with positivity and positive energy, feels relaxed and cheerful, cheerful and at ease. And so that the reigning idyll does not exhaust itself over time, every day caring housewives and owners, including, strive to equip every corner of their “royal” possessions as best as possible. And this does not mean that you need to move dishes, furniture and household appliances, grow your favorite flowers, keep order and cleanliness. This, of course, is of great importance for the prosperity of harmony in your home, but it would also be nice to pay attention to the adjacent areas of your home - this is the garden and vegetable garden. Of course, growing vegetables, fruits and berries is useful and economically profitable, but besides this, we invite you to add some zest to well-kept land plantations - decorate your backyard with various crafts made with your own hands from plastic bottles. Many people have a cart and a cart full of such goods, and all this, as is commonly believed, will be useful in the household, but it is better to transform the old and unnecessary into something original and new that will bring benefit and joy to those around them. So, dear friends, the topic of our article is directly related to needlework. If you are interested in this, then we provide 10 photos of ideas for do-it-yourself supports made from plastic bottles for the garden and vegetable garden, made at home. Our creative ideas are meaningfully revealed to you through prepared master classes with step-by-step instructions. Check them out and start creating your own creations. You and your children will definitely love this!
Ladybug beetle made from plastic bottles
In order for your garden and vegetable garden to acquire bright outlines, we recommend using our step-by-step master class with detailed instructions course of action. We will make cool crafts with our own hands from plastic bottles in the shape of colorful ladybugs. If you have children or grandchildren, you should definitely like this idea with a visual photo, and especially the younger generation. Arm yourself with the necessary materials at hand and move on to exciting creativity.
To work you will need:
- plastic bottles - liter and two liter;
- stationery knife;
- scissors;
- dye;
- brush;
- small foam ball;
- toothpick;
- disposable fork;
- candle;
- nail clippers;
- ready-made eyes;
- glue gun
Manufacturing process:
- At the beginning of creative work, we will need to prepare building material for the body of the bug. To do this, take all the bottles that you have - from small to large, and cut off the bottom of them with a stationery knife.
- The finished parts should be coated with the paint of your choice in bright colors on both sides - internal and external. If stains remain during the decorating process, it is advisable to repeat the steps. After which it is recommended to dry your workpieces.
- In the meantime, we begin to form the head of the beetle. For this purpose, you need to take a small foam ball and use a stationery knife to cut it into two parts, one of which will be slightly larger. This is what we will need for work. We need to slightly cut off the edge of this foam part so that the future head of the insect fits snugly to the body.
- After we have made the head of the craft with our own hands, we should paint it black on all sides. Take a toothpick and stick it into the beveled edge of the part. This will be our holder while the product is being processed. After the decorating process, we take some time to dry the elements of the body.
- Now we need to make antennae for our bug from a disposable fork. To do this, light a candle and slightly bend the ends of the cutlery teeth using the flame. And when you have succeeded, you need to use nail clippers to cut off all the teeth of the fork to the base.
- When all the parts are ready, you can start assembling the bug. We attach the foam head with a glue gun to the body made from a plastic bottle.
- We need to revive the insect's face with ready-made store-bought eyes and antennae we created earlier. We attach them with glue into holes made using ordinary nail scissors.
- The final step of our creative work will be decorating the back of the ladybug with black dots. For this move you will need black paint. After this, you need to thoroughly dry the craft, then display it in the garden or in the garden, wherever you like. Believe me, your neighbors will be simply amazed at your resourcefulness and creativity.
Flowerpot “Jolly Pig”

To make wonderful crafts from plastic bottles with your own hands for the garden, you will need a little patience and skill. To somehow help you in this skillful task, we provide step by step wizard class with informative instructions, thanks to which you will create unique piglets in the form of a flowerpot or other vegetation. So let's get started.
To work you will need:
- five-liter plastic bottle (for the body);
- plastic two-liter bottle (for ears);
- water-repellent paint in pink and black;
- scissors;
- brush;
- glue gun;
- stationery knife.
Manufacturing process:
- We take a five-liter container and use a utility knife to cut out one of its sides, leaving room for the face and back of the pig.
- Separately, from this available material, we make with our own hands the ears, tail of the animal, and, if desired, legs from the cut-off necks of plastic bottles.
- After preparing the body and all its constituent elements, we will need to paint all the parts pink with water-repellent paint.
- Draw the eyes and nose of the animal in black, as in the photo idea.
- Using a glue gun, we attach the ears to the product and its protruding tail. If you want, you can add hooves, they also need to be glued. After drying, our craft is ready for use in the garden or vegetable garden as a decorative and unusual flowerpot for vegetation.
Flowers "Daisies"

To decorate and effectively complement your garden, you will need, of course, flowers. However, attention, the topic of our article today, as you remember, is related to crafts from plastic bottles, so the riot of plants will be made with your own hands from this material at hand. You will certainly like our idea, so go ahead, dear friends!
To work you will need:
- tree trunk;
- multi-colored paint;
- plastic liter bottles;
- stationery knife;
- scissors;
- glue gun
Manufacturing process:
- First, we need to prepare the “stem” for our future flower. We take a thick stick or a strong branch, remove and sharpen the excess knots, and then paint our trunk in green.
- We will have to cut off the bottom from one liter container, since we will use it for the base of the flower. We paint it yellow.
- Then we prepare our “petals” of the plant. We take liter or half-liter plastic bottles and paint them in variegated colors.
- When our flower base and “petals” dry, we need to connect them together, as in the photo. For this purpose we need a glue gun.
- Don’t forget to attach leaves made of the same material as the flower itself to the stem of the plant. We also attach them with glue. So, in principle, our “Chamomile” craft for the garden is ready. You need to create more of such products with your own hands so that the look seems richer and more saturated.
Plastic bees in the garden

To make your garden or vegetable garden come alive, you definitely need to decorate it with bees. Such products, created with your own hands from plastic half-liter bottles suspended on low-growing trees, will cause a lot of admiration and smiles among your family, children, grandchildren and acquaintances. Our step-by-step master class with a photo idea will be useful and educational for you. Study it and get down to creative work immediately to quickly make a wonderful craft at home.
For production you will need:
- plastic half-liter bottles;
- black and yellow paints;
- stationery knife;
- scissors;
- brush;
- loop thread.
Work process:
- To get beautiful cartoon bees, we need to take half-liter plastic bottles with caps and decorate them with paints, giving them a natural striped color.
- When the craft is dry, attach wings to it, cut from the same material at hand as the insects. We make small cuts with a stationery knife, almost at the base of the expansion of the container, and insert our blanks into them. For reliability, fix the work with universal glue.
- The final stage will be the formation of a loop on the back of the bee and hanging it on a tree you like. It’s just so simple that you can create a cool decorative item with your own hands, even with your children, for the garden. They will be delighted with your ideas and fantasies.
Fly agarics

Fly agaric mushrooms will also look great in your garden. Make them with your own hands from plastic bottles and place them somewhere in the grass with a small family. Such a craft will not leave anyone indifferent, especially small children. View our photo idea and start the step-by-step master class.
To work you will need:
- plastic bottles;
- paints - red and white;
- brush;
- glue gun;
- scissors;
- stationery knife;
- your fantasy.
Creation process:
- We cut off the bottom of a two-liter plastic bottle and immediately paint it red with white splashes, like a fly agaric in nature.
- We make the leg with our own hands from the same material at hand, only from leftovers. We twist the plastic into a kind of tube, fasten it with a glue gun, and then completely transform it with white paint.
- Don’t forget about the “skirt” of the fly agaric, located on the stem of the mushroom. We also form it from a small piece of flexible material and attach it with a glue gun, and then dress it in white.
- We connect the parts of the future product we have prepared using the same glue. So our original fun craft for the garden and vegetable garden is ready, which will gather many onlookers around it! You'll see!
Penguins made from plastic bottles

In order for your DIY craft from plastic bottles for the garden to turn out interesting and bright, you need to put all your effort into this creative activity, patience and creativity. Well, for example, look at our photo idea and try to translate it into reality using the provided step-by-step master class with detailed description course of action.
For creativity you will need:
- plastic liter, five-liter or six-liter bottles;
- paints - black, red, white;
- stationery knife;
- scissors;
- glue gun;
- paint brush.
Manufacturing process:
- In order for our future craft to be believable, it is necessary to comply with all the rules of the natural color of the bird. We take a six-liter bottle and, without cutting off the neck, decorate it with black and white paints, as in the photo provided.
- From a two-liter container we cut off the top, slightly beveled. It will become the head of our northern bird after we skillfully transform it with black paints, provide it with eyes and a red beak, made with our own hands from plastic waste, rolled into a sharp thin cone and glued together.
- We should carefully attach the finished penguin head to the body using a glue gun.
- We create the wings, as well as the beak, from waste containers painted in the black color characteristic of this bird.
- We form the legs from two flattened liter plastic bottles, repainted red and attached with the neck back with glue under the weight of the penguin’s body. Our product is ready to decorate your garden! Now choose a suitable place on your land plantation to accommodate guests from the snowy north.
Beautiful pink flamingo

A craft in the form of a flamingo will look quite beautiful and exotic on your plot of land in the garden or vegetable garden. It is also easy and simple to do with your own hands at home using plastic bottles and paints, and, of course, your spiritual and creative investment. Like any other work on creating decorative products, it will require maximum patience and diligence, since the external aesthetic appearance of your creation will depend on this. Let's get started.
For creativity you will need:
- six-liter plastic bottle or food canister;
- foam ball;
- silicone hose;
- thick flexible wire;
- stationery knife;
- glue gun;
- scissors;
- brush;
- two metal rods or sticks;
- water-repellent paints of pink, pale red, black and white.
Manufacturing process:
- At the beginning of creative work, we will need to make with our own hands all the necessary parts for our craft. First, we make the head of an exotic bird out of a foam ball. We masterfully, but extremely carefully wield the knife to achieve this intended goal. We look at the idea provided by us in the photo and try to create something similar or even better.
- As for the body itself, to make it you will need a six-liter plastic bottle or a canister made of the same material. We cut off its neck, mask the resulting hole with a petal of this material at hand and a glue gun.
- Subsequent creative work will be related to the creation of the “plumage” of a flamingo. We cut it from the same material as the container itself. Their number should correspond to the size of the body in order to cover both the top and, if desired, the bottom of the bird. After the component elements are ready and painted with pink paint, we attach them to the back of the flamingo with a glue gun from the beginning of the plastic bottle to its very bottom.
- Now we connect the bird’s head to the body. For this we need a long narrow neck. We take a strong but flexible wire and a silicone hose, and insert a metal element inside. By the way, the length of the neck is purely your personal matter. We embed the wire pin that has come out on one side into a foam head, which also needs to be painted pink in advance for convenience and the eyes and beak drawn in the corresponding colors. The connection of these two parts - the base of the neck and the head - must be tight and neat. We will need to insert the second end of the wire and silicone hose into the flamingo's body. Just below the disguised neck of the container we make a small hole where it is and insert our product in the form of a neck. We fasten everything with universal glue.
- All that remains is to install our product on the legs. We create them from wooden sticks or metal rods. We cut out the limbs from a plastic bottle, attach them to the legs with wire, and paint the entire structure with a pale red color.
- At the bottom of the body we make two small holes for attaching the legs. We push them through and fix them with glue. Our adorable DIY craft is complete! Give it the most prominent place in the garden or vegetable garden so that everyone, even passers-by, can admire such beauty.
Cheerful gnome and his girlfriend made from plastic bottles

To make your DIY craft from plastic bottles for the garden unusual and eye-catching, we recommend using our prepared photo idea. The gnome and his girlfriend will greatly decorate your plot of land, giving it a certain fairy-tale feel and carefree childhood.
To work you will need:
- plastic liter bottles - 4 pcs.;
- five-liter plastic bottles - 2 pcs.;
- disposable flower pots - 2 pcs.;
- water-repellent paints in green, red, black, white and pink;
- scissors;
- brush;
- gray yarn;
- glue gun;
- stationery knife;
- plastic kinder egg - 1 pc.;
- decorative elements: basket with artificial fruit, any garden tools.
Manufacturing process:
- First of all, let's create a gnome. We take a five-liter bottle and cut two opposite holes on the sides, equal to the volume of the liter container. This will be the place for future hands.
- We will create the arms from the same material at hand as the body of our product. We cut off the top of the containers and insert them into pre-made holes on the body of the craft. We fix everything with a glue gun for reliability.
- Now let's formalize appearance products. We paint clothes with green paints, and additional accessories in the form of a belt and cuffs with black paints.
- We dress the gnome's fingers and face in soft pink or beige.
- Using a convenient brush, we depict the eyes, mouth, cheeks, and the nose with glue from half a kinder egg, the same color as the face.
- We make our own eyebrows and beard from gray yarn. Having cut to the required length, we attach the parts with strong glue.
- We put a flower pot on the head and transform it into red with a black hand-drawn strap for beauty.
- Since our gnome is a hard worker, we insert a mini-spatula and a rake into his hands, and then we begin to create his girlfriend - an assistant.
- Using a similar procedure, we make a girl’s torso from a five-liter bottle, cutting off the neck of the container and making holes for the arms.
- We also make the arms from the same material and attach them to the body with glue.
- We put a flower pot on the head and paint it white. As decoration - any artificial flower.
- We paint the face tender pink, glue a pink nose from a kinder egg, draw eyes and a mouth.
- We braid the braids from gray yarn and attach them under the hat of the craft with our own hands.
- The shirt on the gnome's girlfriend will be white with green cuffs and a bow at the neck.
- The skirt can be made of plastic, slightly heated over a fire and taking the shape of some tails. If this is a little difficult for you, then simply - just paint the skirt with black paints.
- We insert a basket with artificial fruit into one handle of the product we created, and some flowers into the other. Such cool helpers have appeared in your garden or vegetable garden. Make a lot of these creations and you will see how excellent it is!
Palm trees made from plastic bottles

A very simple and original craft made from plastic bottles is a palm tree. It will look great in your garden or vegetable garden, where there is a flower bed or a well-groomed lawn. It’s quite easy to make such a product with your own hands, especially since our step-by-step master class with a photo idea will explain everything to you in detail and clearly.
To work you will need:
- any plastic bottles;
- scissors;
- stationery knife;
- wire;
- glue gun
Manufacturing process:
- We pre-prepare our building material. We cut off the bottoms of plastic bottles. Their number should correspond to the height of the future palm tree.
- After this, we form our exotic tree with our own hands, placing the trimmed products on top of each other.
- You can use a glue gun as a fixer or just use a metal rod, a wooden stick or something else as a rod and place it in the middle of the palm tree trunk.
- We make the crown from trimmed “sheets” of plastic. We finely cut the edges of each and collect the finished composition into a bundle, which must be secured with a piece of wire.
- We insert decorative vegetation into the top of the trunk and once again secure ourselves with a piece of wire.
- The finished tree can be coated with paint and some patterns can be drawn. In general, everything is at your discretion, dear friends! The craft will perfectly complement your garden or vegetable garden, rest assured!
Videoinstructions
In a house where there are children, there are always small things that we try to get rid of from time to time - this is plastic packaging for toys in the form of eggs. Don't throw them away, you can use them for other holidays. A little imagination and a useless thing will become interesting and individual. So, plastic Easter Egg, decorated with beads and flowers from a plastic bottle and we are expanding our section on handicrafts for the home. As you probably already guessed, this crafts from plastic bottles is done in several stages: preparing for work, decorating the egg with beads and creating.
Crafts from plastic bottles. Tools and materials:
To work you will need:
- plastic egg (sold in stores, usually inside is a voluminous toy for children and jelly beans)
- flowers from plastic bottles, so you will need 2 bottles of different colors: green - from beer and yellow - from DEW drink.
- beads (preferably even and the same size)
- fishing line (diameter size 0.10-0.20mm)
- glue gun (you can do without it)
- scissors,
- needle,
- thin awl or drawing pen,
- wax pencil
DIY crafts from plastic bottles. Master class with step-by-step photos:
Initially, for work we will need a plastic egg and a wax pencil.
It is necessary not to snap the shells tightly, because The pencil is easily erased and you can remove the drawing when you open it further. Use a pencil to apply 1 element of the pattern; the remaining patterns should be applied a little later, when this part is prepared for embroidery with beads.

If you have a thin awl, then use it; if you don’t, you can take a regular pen and clamp a regular needle with an eye in it. Heat the end of the needle over the fire and pierce the plastic shell according to the intended pattern. Step 0.4-0.6 cm.

Then we apply the next pattern, and the procedure of piercing the plastic is repeated. This way we will prepare the surface of the egg for sewing beads on it.

The prepared shell is ready for painting with beads and we will continue to work on crafts for Easter. For convenience, we recommend keeping the beads in a wide bowl, so it will be easy to pry them off with a needle.

We thread the first bead and tie a triple knot on it, for strength. Carefully cut off the tip of the protruding fishing line with scissors.

The most important thing is to start. In the second puncture on the plastic from the outside we thread a bead tied in a knot (it is number 3 according to the diagram), return the needle to the first puncture and add the missing number of beads in place, in quantity it can be either 2 or 3 beads (bead number 1 and 2 according to the scheme). We thread it through the original (No. 3) bead again and add the next number of beads (4 and 5). We thread the corner into the next puncture and return the needle to the previous one. Now you need to thread the bead from the last bunch (No. 5) with a needle and add the next batch. This past-engaged seam gives a cleaner look and greater strength.

Having passed through one element, secure the fishing line with several ordinary sewing knots and drag the tip through several beads before cutting the fishing line. This is how the entire drawing is processed on one part of the egg, and then on the second. The beadwork for the Easter craft is finished.

The next stage, as you probably guessed, is the creation flowers from plastic bottles.
Take a bottle, plastic, which is painted in a rich green color, most pubs have just that. Cut it, cutting off the top and bottom, and then along the entire length. The result will be something like a regular sheet. Two circles are made on this sheet, circle a tin can from canned corn or peas.
From each circle we make a blank similar to a flower, as indicated in the diagram, leaving the middle untouched.

Over a lit candle, you need to process the edges of flowers from a plastic bottle. It is processed not over the flame, but over the hot air of the candle, kept at approximately a height of 4-7 cm above the flame (depending on the intensity of the flame itself). The edges will be carefully melted. Afterwards, we deform each of them a little over the same hot air.

The flower stand made from a plastic bottle is ready. Don't forget to try it on, because... you may need to adjust the petals a little.

We make blanks for plastic flowers from a yellow bottle. To do this you will need 10 squares measuring 2.5 cm on each side. For each flower you need 2 such blanks.

We cut each piece as shown in the diagram, leaving the middle intact.

Carefully process the flowers over hot air. We leave the outer petals of the flower more open, and close the inner ones more tightly. To do this, turn the inner petal over with the center on top and, holding the flower with 4 fingers, quickly pass it over the candle so that the plastic softens, and with your fingers we press the edges inward. You don't need to hold it for long, 1-2 seconds is enough.
Then you need to pierce the middle of each part to connect.

There is initially a hole at the top of the egg; we cover it with a flower, because... the bead will simply fly into it. We begin the stage in the same way as before, when we embroidered the elements. We thread the second puncture and bring the needle out into the first. We collect a flower from a plastic bottle and finish the middle with one bead, after which we return the flower back to the puncture in the corner and bring it into the second one, where the very beginning goes.

The next steps in the design of crafts made from plastic bottles will be the design of the prepared “egg” with previously prepared flowers.

You need to add flowers according to the same principle as the first one.

The final touch is to attach the stand to the plastic egg. You can plant the pieces using a glue gun or by making holes in the green petals and the bottom of the egg and secure with fishing line, sewing the pieces like a button with 4 holes.
Craft for Easter from a plastic bottle and the plastic egg is ready.
You can put a gift in the middle or store small items.


Crafts from plastic bottles: an Easter egg, decorated with beads and flowers, prepared especially for the Women's Club Jet Housewives