Modern human life cannot be comfortable without electricity at all. When it is absent, it seems that life has stopped, because any household appliance or electric tool requires connection to the mains. Sometimes without electricity it will not even be possible to cook food, not to mention the normal lighting of the home. Therefore, if you are thinking of building, then the wiring diagram in a private house should be a priority issue that should be given special attention. It is necessary to think over and calculate everything to the smallest detail, so that no slightest mistake or inaccuracy in laying and connecting the power supply network will lead to further breakdown of household appliances, or, even worse, to fire and fire.
What is the need for a schema?
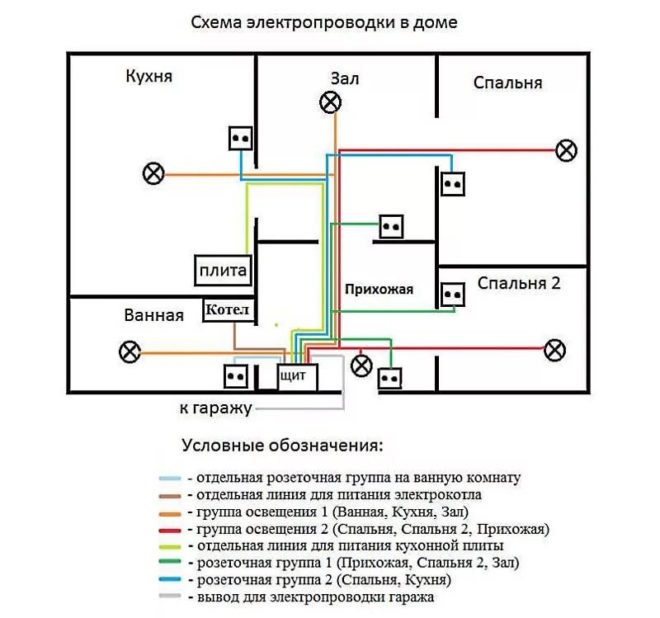
The wiring diagram in a private house is a drawing on which all the main power supply units are applied:
- An introductory line, which is carried out by a branch from the main power line to the house itself.
- Location of the switchboard.
- Protective devices and electricity meter.
- Places for installing junction boxes, switches and sockets in rooms and premises.
- Wiring paths from junction boxes to switching devices.
- Places for installing elements of the lighting network (chandeliers, sconces, lamps).
By the time you do the wiring in the house, it is advisable to already clearly define where the main household appliances will be located - a refrigerator, an air conditioner, a washing machine, a water heater, a dishwasher. This is necessary in order to immediately mount the sockets next to the equipment, and not later stretch it through the entire carrying room.
If your building belongs to a typical one, which was erected by a construction company (this is how entire cottage settlements are being built now), then you should be provided with a building project and a wiring diagram. In the case when the construction is carried out independently, for each house they develop their own personal scheme. But in both versions, the main purposes of the circuit are the same:
- If you have a ready-made schematic drawing, you can make a list of materials that will be needed to complete the wiring in the house. This will help save money. That is, having a list in hand, you can go through different outlets, calmly decide, choose the most high-quality and suitable for the price of electrical goods. You will not buy anything extra and at the same time save yourself from the situation when the installation is already being done, and some materials are not enough, and you urgently run to the first store you come across to buy them at any price.
- The wiring diagram will make it possible to determine the maximum load of each electrical unit, which will allow you to correctly select the wire cross-section, calculate the total power, select the necessary protective devices and input cable.
- Also, the scheme will help you competently and rationally plan the sequence of work.
Paperwork

Be prepared for the fact that electrical wiring in a private house will also require your nerves, because in order to obtain a permit to perform work, you will need:
- Contact the organization that has a power line on its balance sheet, from which it is planned to connect the input. They must issue technical conditions (TU) for this connection.
- The next will be an organization or a commercial firm, which, according to the issued specifications, will draw up a project.
- Again, the energy supply organization will need to agree on the project, and write an application for connection (on the main line, this must be done by their electricians).
- The made input line must be tested by a special electrical laboratory, after which a protocol is issued stating that the input has passed the test and is suitable for operation.
- Now the input cable is brought into the switchboard and connected to the input of the electricity meter, which must be sealed by representatives of the energy sales. After the meter, do-it-yourself electrical wiring is done in the house, or you can invite specialists, you will no longer need any other organizations.
- The last thing left for you is to conclude an agreement with the energy supply organization for the supply of electricity from their side, and for the timely payment of consumed kilowatt-hours from your side.
Entry planning
The most important thing that distinguishes an electrician in an apartment and in a private house is the input. In multi-storey buildings, the input comes to the switchboard, and from there the wiring to the apartments is already going on. And for a private house, it is necessary to carry out layering from the main line passing nearby. The reliability, quality and safety of power supply depends on how competently and correctly you do this. There are two ways:
- Installation of air inlet with cable or insulated wire.
- Underground cable entry.
Before you draw an introductory line for a private house, it is very important to think over and plan it so that it is resistant to strong winds, and also does not carry the risk of electric shock to a person in rainy, snowy or wet weather.
Air entry
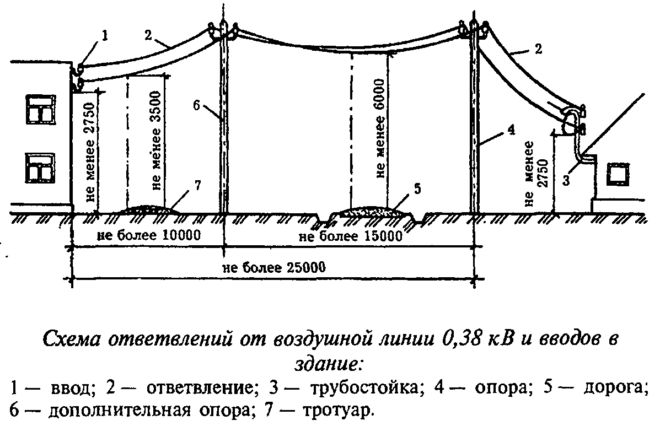
Such air entry involves pulling a wire or cable from the nearest support of the main power line to the housing construction.
I would like to warn you right away that air input will be rational if the distance from the support to the house is less than 20 m. In the case when the span is more than 20 m, you will need to install another additional support, which may be on the territory of your site. Such a measure is necessary in order to reduce the mechanical load on the wire. When the span is very large, there is a possibility that the wire may break under the influence of strong winds or under its own weight.
How to make an air entry?
- It is necessary to drill a hole in the wall of housing construction and insert a piece of metal pipe or a special plastic corrugation into it (the diameter of the hole and pipe will depend on the cross section of the input wire).
- A bracket with an insulator installed on it is fixed on the wall outside the house.
- Now it is necessary to stretch the steel cable between two insulators (one is on the bracket, the second is on the traverse of the support from which the layers are made).
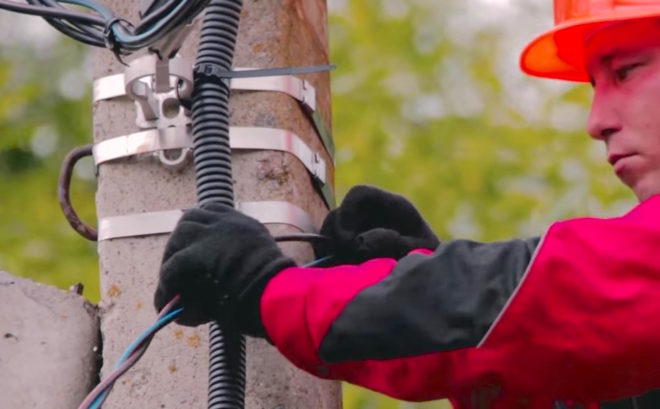
- The lead wire or cable on the pole is connected to the line wires. Then it is laid along the cable to the house, where it is pulled through the hole made into the building. Every 0.5-0.6 m, it is desirable to fix the wire to the stretched steel cable with plastic or metal clamps.

That's all, the input cable went into the building, where it will already be wound up in the switchboard. As you can see, nothing complicated, but some nuances should be taken into account here:
- It is very important to ensure sufficient tension on the steel cable.
- The wire should be attached to the cable freely, without tension.
- The distance from the ground to the wire should not be less than 3.5 m.
- The cable and the lead wire attached to it along its entire length should not touch any outbuildings, trees or tall shrubs.
- The place where the wire enters directly into the house must be sealed. After it is stretched into the pipe, all the remaining space must be filled with mounting foam. You can apply another option - tightly tamp with mineral wool from a non-combustible material.
The best option for air entry to the house is the SIP brand wire (self-supporting insulated wire). Firstly, its insulation is made of materials that are suitable for use in conditions of sunlight and precipitation, and also withstand significant temperature fluctuations. Secondly, under the insulating layer, in addition to aluminum conductors, there is a steel cable. That is, when installing such a wire, there is no need to stretch a separate carrier cable.
If a single-phase voltage (220 V) is required for private housing construction, then a two-wire wire is required. In the case when a three-phase voltage (380 V) is needed, a four-core wire is required. The minimum cross section of SIP wires is 16 mm 2.
How the installation of air input of electricity is carried out, you can see in this video:
underground input
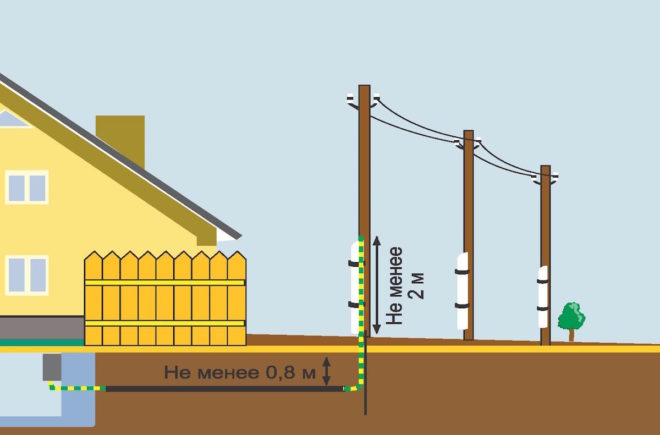
Laying an introductory cable in the ground has a number of advantages compared to the air method:
- Reliability increases due to the fact that the cable is not exposed to sudden temperature changes, precipitation, strong winds.
- The style and architectural design of the site has a complete look, that is, they are not spoiled by a stretched cable with a fixed wire or additional support. As a rule, it is for this reason that all fashionable cottages and country houses have an underground entrance.
- If this is a summer cottage, where people live only in the summer, and in the winter the housing construction is empty, there is a possibility that hooligans or vandals will cut out and steal the air inlet. With underground laying, this situation is unlikely.
- In the event of a short circuit and an electric arc during an underground entry, there is practically no chance that property and people may be affected. And with air input, the fire that occurred can spread to buildings. So high fire safety when laying cables in the ground is a very important advantage, especially for houses made of wood.
But not everything is so perfect, the soil is also quite an aggressive environment. The chemical composition of the soil over time can cause corrosion processes, which will render the cable sheath unusable. At the same time, the soil itself can sag and swell, move and freeze. Groundwater, rodents and microorganisms, as well as pressure from the roots of large trees, will also have their effect. Therefore, if you decide to bring electricity to the house underground, take care to protect the cable, lay it in a plastic or metal pipe.
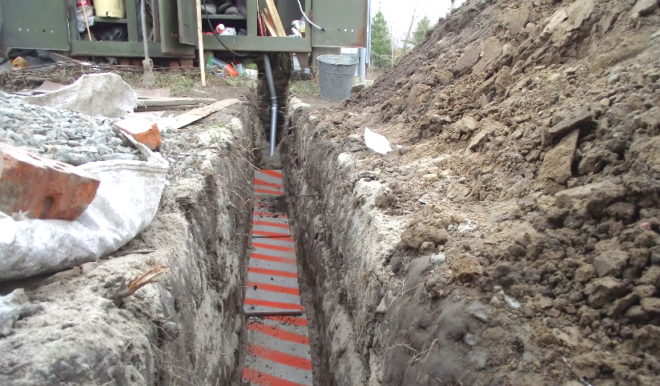
Well, the main disadvantage of underground input is earthworks. Firstly, they must be coordinated with a bunch of various organizations that can have something laid in this land - water, gas or sewer pipes; heating mains; main cable power lines; telephone lines. Secondly, to lay the cable in the ground, you will need to dig a trench, and this is an additional (and decent) cost. If you do it yourself, spend a lot of time and effort. If you hire someone to carry out earthworks, spend money in terms of money.
In order to better understand the scope of work, we recommend watching the following video:
So before you do the wiring in the house, first weigh the pros and cons, consider the advantages and disadvantages, choose the appropriate input option for yourself. And when you are finished with the external power supply, you can safely proceed to the installation of the internal one.
Load calculation

Do-it-yourself installation of electrical wiring in a private house requires preliminary work with the head, that is, mental work, namely, you need to calculate what kind of load your home electrical network will have. To make it easier for you, break all electricity consumers into groups:
- Lighting elements.
- Kitchen appliances (refrigerator, extractor hood, bread maker, electric stove and oven, electric kettle and coffee maker, multicooker and microwave, etc.).
- Low-power household appliances and electrical appliances (computer, TV, music center, etc.).
- Conditioners.
- Electric heating.
- Bathroom equipment (water heater, hair dryer and washing machine).
- Power tools that are used in utility rooms (hammer drill, electric drill, electric lawn mower, pump, etc.).
Sum up the power of all appliances. Correct the resulting figure by multiplying by 0.7 (this is the generally accepted coefficient for switching on devices at the same time). Please note that the power of each group should not exceed 4.5 kW. Based on the calculated load, determine the cross section and brand of wires. Wiring in a private house is carried out with copper wires. For hidden laying, choose the brands VVGng, PUNP, VVG, for open laying - PUGVP, PUGNP. Wiring made in a private house with such wires will have a decent service life (about 10 years), minimal losses and safe operation.
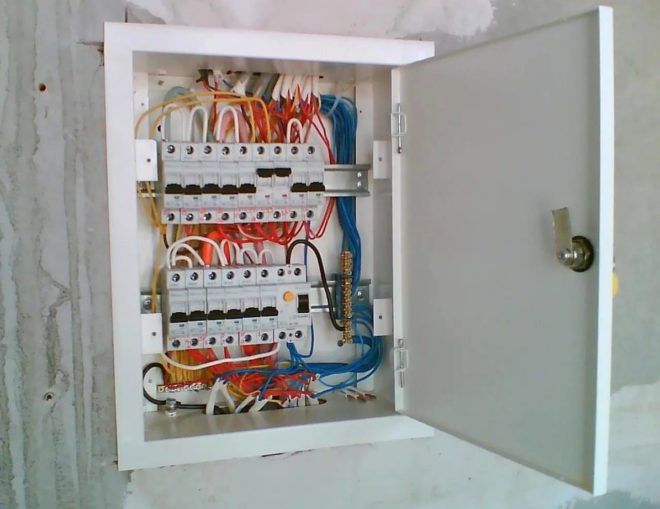
Distribution board
Normatively, the place where the shield can be installed is not standardized in any way. The only condition is that it must be located no closer than 1 m from the pipelines (meaning any pipes - gas, water, sewer).
In which room it is better to mount the shield, it is also not specified anywhere. Many people prefer to install it in some utility rooms, where it will be convenient to perform switching, or located at the entrance to the house. In any case, try to follow these simple rules:
- This room should not be a fire hazard (such as a boiler room). It is forbidden to store gas cylinders and flammable substances near the switchboard.
- It is necessary that the room where the shield is located is dry, that is, it is undesirable to install it next to the bathroom.
- There must be free access to the shield, do not arrange a warehouse from the room where it is located.
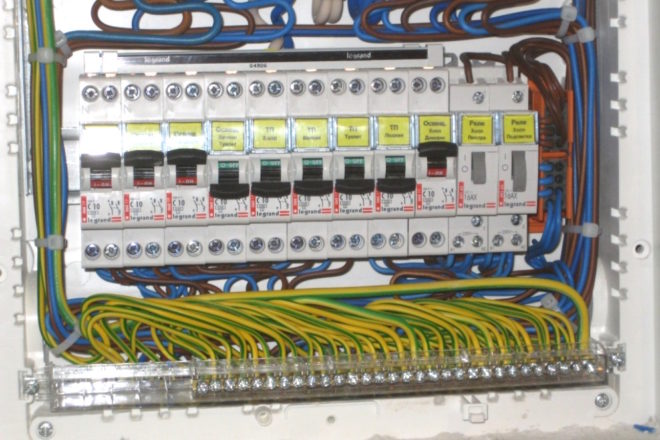
In the shield itself are mounted:
- electricity meter;
- introductory machine, it is responsible for the power supply of the whole house;
- several automata for connecting outgoing pantographs according to their breakdown into groups;
- residual current device (RCD), which is paired with an introductory machine.
The shield can be installed in a niche specially made for it, or simply hung on a wall surface.
If the house is huge on several floors with baths, saunas, garages, then one shield is not enough. In such cases, one introductory shield is mounted and additional ones on each floor.
Layout of internal power supply
There are two ways to conduct electrical wiring in a private house - open and hidden. Let's briefly consider each of them separately.
open wiring
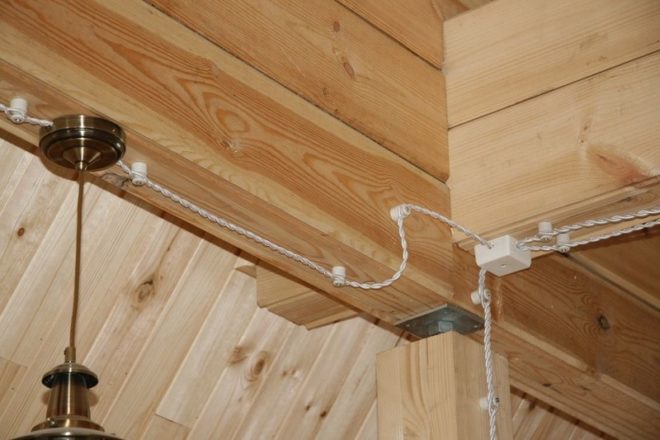
The open method of laying wires is also called outdoor, most often used in wooden houses.
Wires can be laid:
- in special plastic boxes;
- on porcelain insulators using a special cable (the so-called retro style).
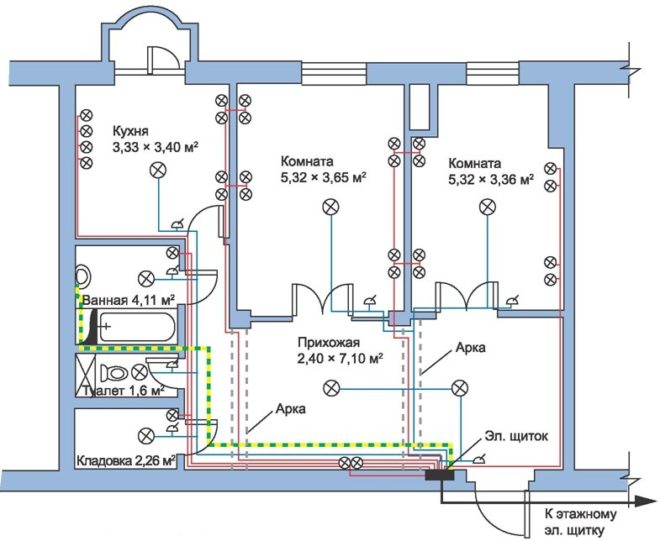
The diagram should show which route you are going to route the cables and mark the places where the fixing elements (insulators) will be installed.
For open wiring, special outdoor switching devices (sockets, switches) are used.
Hidden wiring
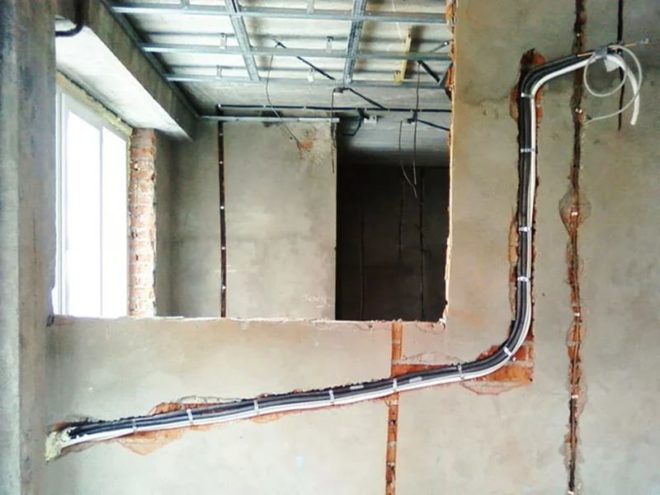
If the structure is concrete, with many technological voids, a hidden method of laying wires is used. It is more difficult, since you first need to make special grooves in the walls, called strobes, into which the wire or cable will be laid. And after that, the laid conductors will still have to be fixed with alabaster or gypsum mortar.
You will also need indoor switches and sockets. Before installing them, holes are made in the walls, socket boxes are also fixed in them with the help of a solution, and only then switching devices are mounted.
Do-it-yourself hidden wiring is easy to do, the only thing that can cause difficulties, take a lot of time and effort is making strobes and holes.

Everything related to electrical work is regulated by the set of Rules for the installation of electrical installations (PUE). Those who are seriously involved in the installation of electrical wiring, it is useful to get acquainted at your leisure with this book. Here we will give the most basic and important points that you should definitely consider before you do the wiring in the house with your own hands:
- All junction boxes, sockets and switches should be easily accessible (not covered with wallpaper, not hidden under drywall sheets, not cluttered with bulky furniture that cannot be moved).
- The grounding conductor must be attached to household appliances with a bolted connection.
- The switches are mounted at a height of 60-150 cm from the floor level, the wires are brought to them from top to bottom.
- All wiring connections should be made in junction boxes. Connecting nodes must be securely insulated, it is forbidden to connect copper conductors with aluminum.
- Sockets are mounted at a height of 50-80 cm from the floor level. The distance between sockets and gas stoves, pipes, heating radiators should not be less than 50 cm.
- Electrical wiring wires should not touch the metal building structures of the building (this is especially true for hidden wiring, be sure to consider this point when you lay wires in strobes).
- The number of sockets per room is taken into account at the rate of 1 switching device per 6 m 2 of area. The exception is the kitchen, where you can mount as many sockets as you need to connect all household appliances.
- Horizontal wiring is carried out no closer than 15 cm to the ceiling and floor. Vertically, the wires are placed at a distance of 10 cm from door and window openings. The wires of the electrical network should not be brought closer than 40 cm to the gas pipes.
We hope that all this conversation was not in vain. Installation of external and internal power supply of your home, you will definitely start by drawing up a diagram. Think with the whole family where and what kind of equipment you want to place, put everything on paper, draw all the switching devices and wiring paths. So it will be much easier for you to calculate the amount of materials needed. Then it remains only to transfer your scheme from paper to real walls and do the installation work.