If you play Minecraft and know about the modification called Industrial Craft, then you are most likely familiar with the problem of a terrible lack of energy. Almost all the interesting mechanisms that you can build using this mod consume energy. Therefore, you definitely need to know how to produce it so that there is always enough of it. There are several sources of energy - you can even get it from coal when it is burned in a furnace. But at the same time, you must understand that it will not work out at all. large number energy. Therefore, you need to look for the best sources. The most energy you can get is from a nuclear reactor. The design for it can be different depending on what exactly you want to target - efficiency or productivity.
Efficient reactor
In Minecraft it is very difficult to collect large amounts of uranium. Accordingly, it will not be easy for you to build a full-fledged nuclear reactor, the design of which would be designed for low fuel consumption with high energy output. However, do not despair - it is still possible, there is a certain set of schemes that will help you achieve your goal. The most important thing in any scheme is the use of a quad uranium rod, which will allow you to maximize energy production from a small amount of uranium, as well as high-quality reflectors that will reduce fuel consumption. Thus, you can build an effective one - the scheme for it may vary.
Diagram of a uranium rod reactor

So, for starters, it’s worth considering a scheme that is based on the use of a quadruple uranium rod. First you will need to get it, as well as those same iridium reflectors that will allow you to get the maximum fuel from one rod. It is best to use four pieces - this way maximum efficiency is achieved. It is also necessary to equip your reactor with 13 advanced heat exchangers. They will constantly attempt to equalize the temperature of the surrounding elements and themselves, thereby cooling the case. Well, of course, you can’t do without overclocked and component heat sinks - the first will require as many as 26 pieces, and the second will be enough for ten. At the same time, overclocked heat sinks lower the temperature of themselves and the case, while component heat sinks lower the temperature of all elements surrounding them, but they themselves do not heat up at all. If we consider the IC2 Experimental circuits, then this one is the most effective. However, you can use another option by replacing the uranium rod with MOX.
MOX rod reactor diagram

If you are creating a nuclear reactor in Minecraft, the schemes can be very diverse, but if you are aiming for maximum efficiency, then you do not need to choose among many - it is better to use the one described above, or use this one, in which The main element is the MOX rod. In this case, you can abandon heat exchangers, using exclusively heat sinks, only this time there should be the most components - 22, overclocked ones will be enough for 12, and a new type will be added - a reactor heat sink. It cools both itself and the case - you will need to install three of these. Such a reactor will require a little more fuel, but will provide much more energy. This is how you can create a full-fledged nuclear reactor. Schemas (1.6.4), however, are not limited to efficiency - you can concentrate on performance as well.
Productive reactor

Each reactor consumes a specific amount of fuel and produces a specific amount of energy. As you already understood, the nuclear reactor circuit in Industrial Craft can be designed in such a way that it will consume little fuel, but at the same time produce enough energy. But what if you have enough uranium and you don’t spare it for energy production? Then you can make sure you have a reactor that produces lots and lots of power. Naturally, in this case, too, you need to build your design not at random, but think through everything in great detail so that fuel consumption is as reasonable as possible while producing a large amount of energy. The diagrams for a nuclear reactor in Minecraft in this case may also differ, so you need to consider two main ones.
Productivity using uranium rods

If in effective schemes If only one uranium or MOX rod was used in a nuclear reactor, then in this case it is assumed that you have a large supply of fuel. So a productive reactor will require 36 uranium quad rods, as well as 18 320K coolers. The reactor will burn uranium for energy, but the cooler will protect it from explosion. Accordingly, you need to constantly monitor the reactor - the cycle with this scheme lasts 520 seconds, and if you do not replace the coolers during this time, the reactor will explode.
Performance and MOX rods
As a matter of fact, in this case absolutely nothing changes - you need to install the same number of rods and the same number of coolers. The cycle is also 520 seconds, so always monitor the process. Remember that if you produce a large amount of energy, there is always a danger that the reactor will explode, so keep a close eye on it.
In this article I will try to tell the basic principles of operation of most known nuclear reactors and show how to assemble them.
I will divide the article into 3 sections: nuclear reactor, moxa nuclear reactor, liquid nuclear reactor. In the future, it is quite possible that I will add/change something. Also, please write only on the topic: for example, points that were forgotten by me or, for example, useful reactor circuits that provide high efficiency, simply a large output, or involve automation. Regarding the missing crafts, I recommend using the Russian wiki or the game NEI.
Also, before working with reactors, I would like to draw your attention the fact that it is necessary to install the reactor entirely in 1 chunk (16x16, the grid can be displayed by pressing F9). Otherwise, correct operation is not guaranteed, because sometimes time flows differently in different chunks! This is especially true for a liquid reactor that has many mechanisms in its design.
And one more thing: installing more than 3 reactors in 1 chunk can lead to disastrous consequences, namely lags on the server. And the more reactors, the more lags. Distribute them evenly over the area! Message to players playing on our project: when the administration has more than 3 reactors on 1 chunk (and they will find it) all unnecessary ones will be demolished, because think not only about yourself but also about the other players on the server. Nobody likes lags.
1. Nuclear reactor.
At their core, all reactors are energy generators, but at the same time, these are multi-block structures that are quite difficult for the player. The reactor begins to operate only after a redstone signal is sent to it.
Fuel.
The simplest type of nuclear reactor runs on uranium. Attention: Before working with uranium, take care of safety. Uranium is radioactive, and poisons the player with a permanent poisoning that will remain until the end of the action or death. It is necessary to create a chemical protection kit (yes yes) made of rubber, it will protect you from unpleasant effects.
The uranium ore that you find must be crushed, washed (optional), and thrown into a thermal centrifuge. As a result, we get 2 types of uranium: 235 and 238. By combining them on a workbench in a ratio of 3 to 6, we get uranium fuel that must be rolled into fuel rods in a conservator. You are free to use the resulting rods in reactors as you please: in their original form, in the form of double or quadruple rods. Any uranium rods work for ~330 minutes, which is about five and a half hours. After their depletion, the rods turn into depleted rods that need to be charged into a centrifuge (nothing else can be done with them). At the output you will get almost all 238 uranium (4 out of 6 per rod). 235 the uranium will turn into plutonium. And if you can use the first one for the second round simply by adding 235, then don’t throw away the second one, plutonium will be useful to you in the future.
Work area and diagrams.
The reactor itself is a block (nuclear reactor) with an internal capacity and it is advisable to increase it to create more efficient circuits. At maximum magnification, the reactor will be surrounded on 6 sides (all) by reactor chambers. If you have the resources, I recommend using it in this form.
Finished reactor:
The reactor will output energy immediately in eu/t, which means that you can simply attach a wire to it and power it with what you need.
Although the reactor rods produce electricity, they also generate heat, which, if not dissipated, can lead to an explosion of the machine itself and all its components. Accordingly, in addition to fuel, you need to take care of cooling the work area. Attention: the server does not have a nuclear reactor passive cooling, both the compartments themselves (as written on Wikia) and from water/ice, on the other hand from the lava it also does not heat up. That is, heating/cooling of the reactor core occurs exclusively through the interaction of the internal components of the circuit.
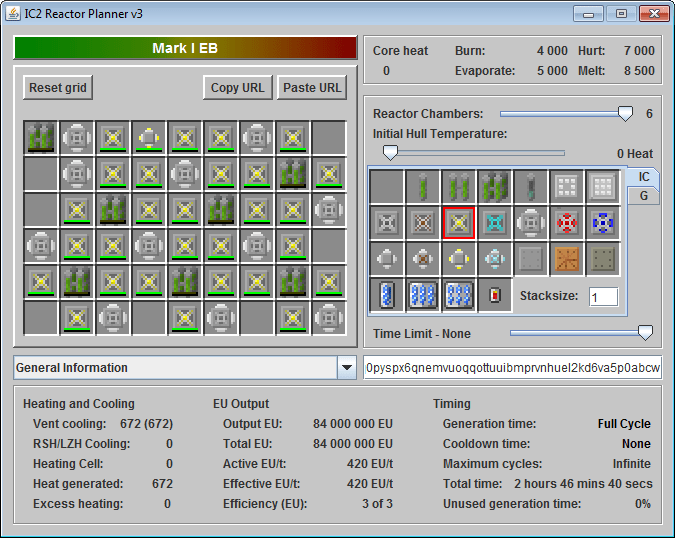
The scheme is- a set of elements consisting of reactor cooling mechanisms as well as the fuel itself. It determines how much energy the reactor will produce and whether it will overheat. The system can consist of rods, heat sinks, heat exchangers, reactor plates (the main and most commonly used), as well as cooling rods, capacitors, reflectors (rarely used components). I won’t describe their crafts and purpose, everyone look at the Wikia, it works the same way for us. Unless the capacitors burn out in literally 5 minutes. In the scheme, in addition to obtaining energy, it is necessary to completely extinguish the outgoing heat from the rods. If there is more heat than cooling, the reactor will explode (after a certain heating). If there is more cooling, then it will work until the rods are completely exhausted, in the long term forever.
I would divide circuits for a nuclear reactor into 2 types:
The most favorable in terms of efficiency per 1 uranium rod. Balance of uranium costs and energy output.
Example:

12 rods.
Efficiency 4.67
Output 280 eu/t.
Accordingly, we get 23.3 eu/t or 9,220,000 energy per cycle (approximately) from 1 uranium rod. (23.3*20(cycles per second)*60(seconds per minute)*330(duration of operation of the rods in minutes))
The most profitable in terms of energy output per reactor. We spend maximum uranium and get maximum energy.
Example:
28 rods.
Efficiency 3
Output 420 eu/t.
Here we already have 15 eu/t or 5,940,000 energy per cycle per rod.
See for yourself which option is closer to you, but do not forget that the second option will give a greater yield of plutonium due to the larger number of rods per reactor.
Pros of a simple nuclear reactor:
+
Quite a good energy yield at the initial stage when using economical circuits, even without additional reactor chambers.
Example:

+
Relative simplicity in creation/use in comparison with other types of reactors.
+
Allows you to use uranium almost at the very beginning. All you need is a centrifuge.
+
In the future, one of the most powerful sources energy in industrial fashion and on our server in particular.
Cons:
-
Still, it requires some equipment in terms of industrial machines as well as knowledge on their use.
-
Produces a relatively small amount of energy (small circuits) or simply not very rational use of uranium (solid reactor).
2. Nuclear reactor using MOX fuel.
Differences.
By and large, it is very similar to a reactor powered by uranium, but with some differences:
As the name implies, it uses moxa rods, which are assembled from 3 large pieces of plutonium (will remain after depletion) and 6 238 uranium (238 uranium will burn into pieces of plutonium). 1 large piece of plutonium is 9 small ones, so to make 1 moxa rod you must first burn 27 uranium rods in the reactor. Based on this, we can conclude that creating moxa is a labor-intensive and time-consuming undertaking. However, I can assure you that the energy output from such a reactor will be many times higher than from a uranium reactor.
Here's an example:


In the second exactly the same scheme, instead of uranium, there is mox and the reactor is heated almost all the way. As a result, the yield is almost fivefold (240 and 1150-1190).
However, there is also a negative point: mox works not 330, but 165 minutes (2 hours 45 minutes).
Small comparison:
12 uranium rods.
Efficiency 4.
Output 240 eu/t.
20 per cycle or 7,920,000 eu per cycle for 1 rod.
12 moxa rods.
Efficiency 4.
Output 1180 eu/t.
98.3 per cycle or 19,463,000 eur per cycle per 1 rod. (duration less)
The main principle of cooling of a uranium reactor is supercooling, while that of a moxa reactor is maximum stabilization of heating by cooling.
Accordingly, when heating 560, your cooling should be 560, or a little less (slight heating is allowed, but more on that below).
The higher the heating percentage of the reactor core, the more energy the moxa rods produce without increasing heat production.
Pros:
+
Uses virtually unused fuel in a uranium reactor, namely 238 uranium.
+
At correct use(circuit + heating) one of the best energy sources in the game (relatively advanced solar panels from the Advanced Solar Panels mod). Only he can give out a charge of a thousand EU/tick for hours.
Cons:
-
Difficult to maintain (heating).
-
It uses not the most economical (due to the need for automation to avoid heat loss) circuits.
2.5 External automatic cooling.
I’ll step back a little from the reactors themselves and tell you about the cooling available for them that we have on our server. Specifically about Nuclear Control.
For correct use of the control core, Red Logic is also required. This only applies to a contact sensor; this is not necessary for a remote sensor.
From this mod, as you might guess, we need contact and remote temperature sensors. For conventional uranium and moxa reactors, a contact reactor is sufficient. For liquid (due to design) a remote one is already required.
We install the contact as in the image. The location of the wires (freestanding red alloy wire and red alloy wire) does not matter. The temperature (green display) is adjusted individually. Don’t forget to move the button to the PP position (initially it is PP).

The contact sensor works like this:
Green display - it receives data on the temperature and it also means that it is within normal limits, it gives a redstone signal. Red - the reactor core has exceeded the temperature indicated in the sensor and it has stopped sending a redstone signal.
Remote is almost the same. The main difference, as its name suggests, is that it can provide data about the reactor from afar. He receives them using a kit with a remote sensor (ID 4495). It also eats energy by default (disabled for us). It also occupies the entire block.
3. Liquid nuclear reactor.
Now we come to the last type of reactor, namely liquid reactor. It is called that because it is already relatively close to real reactors (within the game, of course). The essence is this: the rods emit heat, the cooling components transfer this heat to the refrigerant, the refrigerant gives off this heat through liquid heat exchangers to stirling generators, the same convert thermal energy to electric. (The option of using such a reactor is not the only one, but so far it is subjectively the simplest and most effective.)
Unlike the two previous types of reactors, the player is faced with the task not of maximizing the energy output from the uranium, but of balancing the heating and the ability of the circuit to remove heat. The energy output efficiency of a liquid reactor is based on the outgoing heat, but is limited by the maximum cooling of the reactor. Accordingly, if you put 4 4-rods in a square in a circuit, you simply will not be able to cool them, in addition, the circuit will not be very optimal, and the effective heat removal will be at the level of 700-800 e/t (heat units) during operation. Need I say that a reactor with so many rods installed side by side will operate 50 or maximum 60% of the time? For comparison, the optimal design found for a reactor of three 4-rods already produces 1120 units of heat over 5 and a half hours.
So far, the more or less simple (sometimes much more complicated and costly) technology of using such a reactor gives a 50% yield from heat (stirling). What is noteworthy is that the heat output itself is multiplied by 2.
Let's move on to the construction of the reactor itself.
Even among the multi-block structures of Minecraft, it is subjectively very large and highly customizable, but nevertheless.
The reactor itself occupies an area of 5x5, plus perhaps installed blocks heat exchangers + stirling. Accordingly, the final size is 5x7. Don't forget about installing the entire reactor in one chunk. After which we prepare the site and lay out the 5x5 reactor vessels.


Then we install a conventional reactor with 6 reactor chambers inside in the very center of the cavity.

Don't forget to use the remote sensor kit on the reactor, we won't be able to reach it in the future. In the remaining empty slots of the shell we insert 12 reactor pumps + 1 reactor red signal conductor + 1 reactor hatch. It should look like this, for example:

After which we need to look into the reactor hatch, this is our contact with the insides of the reactor. If everything is done correctly, the interface will change to look like this:

We will deal with the circuit itself later, but for now we will continue installing external components. First, you need to insert a liquid ejector into each pump. Neither now nor in the future they do not require configuration and will work correctly in the “default” version. It’s better to check it twice, rather than take it all apart later. Next, install 1 liquid heat exchanger per pump so that the red square faces from reactor. Then we fill the heat exchangers with 10 heat pipes and 1 liquid ejector.

Let's check everything again. Next, we place the Stirling generators on the heat exchangers so that their contact faces the heat exchangers. You can rotate them in the opposite direction from the side the key touches by holding Shift and clicking on the required side. It should end up looking like this:

Then in the reactor interface we place about a dozen coolant capsules in the upper left slot. Then we connect all the stirlings with a cable, this is essentially our mechanism that removes energy from the reactor circuit. We place a remote sensor on the red signal conductor and set it to position Pp. Temperature doesn’t matter; you can leave it at 500, because in fact it shouldn’t heat up at all. It is not necessary to connect the cable to the sensor (on our server), it will work just like that.

It will give out 560x2=1120 eu/t at the expense of 12 stirlings, we output them in the form of 560 eu/t. Which is pretty good with 3 quad rods. The scheme is also convenient for automation, but more on that later.
Pros:
+
Produces about 210% of the energy relative to a standard uranium reactor with the same design.
+
Does not require constant monitoring (like, for example, mox with the need to maintain heating).
+
Supplements mox using 235 uranium. Allowing together to produce maximum energy from uranium fuel.
Cons:
-
Very expensive to build.
-
Takes up quite a bit of space.
-
Requires certain technical knowledge.
General recommendations and observations on liquid reactor:
- Do not use heat exchangers in reactor circuits. Due to the mechanics of a liquid reactor, they will accumulate the outgoing heat if overheating suddenly occurs, after which they will burn. For the same reason, cooling capsules and capacitors in it are simply useless, because they take away all the heat.
- Each stirling allows you to remove 100 units of heat, so having 11.2 hundred units of heat in circuit 11.2, we needed to install 12 stirlings. If your system produces, for example, 850 units, then only 9 of them will be enough. Keep in mind that a lack of stirlings will lead to heating of the system, because the excess heat will have nowhere to go!
- A rather outdated, but still usable program for calculating circuits for a uranium and liquid reactor, as well as some moxa, can be taken here
Keep in mind that if the energy does not leave the reactor, the stirling buffer will overflow and overheating will begin (the heat will have nowhere to go)
P.S.
I express my gratitude to the player MorfSD who helped in collecting information to create the article and simply participated in brainstorming and partly the reactor.
The development of the article continues...
Modified March 5, 2015 by AlexVBGIn this article I will try to tell the basic principles of operation of most known nuclear reactors and show how to assemble them.
I will divide the article into 3 sections: nuclear reactor, moxa nuclear reactor, liquid nuclear reactor. In the future, it is quite possible that I will add/change something. Also, please write only on the topic: for example, points that were forgotten by me or, for example, useful reactor circuits that provide high efficiency, simply a large output, or involve automation. Regarding the missing crafts, I recommend using the Russian wiki or the game NEI.
Also, before working with reactors, I would like to draw your attention the fact that it is necessary to install the reactor entirely in 1 chunk (16x16, the grid can be displayed by pressing F9). Otherwise, correct operation is not guaranteed, because sometimes time flows differently in different chunks! This is especially true for a liquid reactor that has many mechanisms in its design.
And one more thing: installing more than 3 reactors in 1 chunk can lead to disastrous consequences, namely lags on the server. And the more reactors, the more lags. Distribute them evenly over the area! Message to players playing on our project: when the administration has more than 3 reactors on 1 chunk (and they will find it) all unnecessary ones will be demolished, because think not only about yourself but also about the other players on the server. Nobody likes lags.
1. Nuclear reactor.
At their core, all reactors are energy generators, but at the same time, these are multi-block structures that are quite difficult for the player. The reactor begins to operate only after a redstone signal is sent to it.
Fuel.
The simplest type of nuclear reactor runs on uranium. Attention: Before working with uranium, take care of safety. Uranium is radioactive, and poisons the player with a permanent poisoning that will remain until the end of the action or death. It is necessary to create a chemical protection kit (yes yes) made of rubber, it will protect you from unpleasant effects.
The uranium ore that you find must be crushed, washed (optional), and thrown into a thermal centrifuge. As a result, we get 2 types of uranium: 235 and 238. By combining them on a workbench in a ratio of 3 to 6, we get uranium fuel that must be rolled into fuel rods in a conservator. You are free to use the resulting rods in reactors as you please: in their original form, in the form of double or quadruple rods. Any uranium rods work for ~330 minutes, which is about five and a half hours. After their depletion, the rods turn into depleted rods that need to be charged into a centrifuge (nothing else can be done with them). At the output you will get almost all 238 uranium (4 out of 6 per rod). 235 the uranium will turn into plutonium. And if you can use the first one for the second round simply by adding 235, then don’t throw away the second one, plutonium will be useful to you in the future.
Work area and diagrams.
The reactor itself is a block (nuclear reactor) with an internal capacity and it is advisable to increase it to create more efficient circuits. At maximum magnification, the reactor will be surrounded on 6 sides (all) by reactor chambers. If you have the resources, I recommend using it in this form.
Finished reactor:
The reactor will output energy immediately in eu/t, which means that you can simply attach a wire to it and power it with what you need.
Although the reactor rods produce electricity, they also generate heat, which, if not dissipated, can lead to an explosion of the machine itself and all its components. Accordingly, in addition to fuel, you need to take care of cooling the work area. Attention: on the server, the nuclear reactor does not have passive cooling, either from the compartments themselves (as written on Wikia) or from water/ice; on the other hand, it also does not heat up from the lava. That is, heating/cooling of the reactor core occurs exclusively through the interaction of the internal components of the circuit.
The scheme is- a set of elements consisting of reactor cooling mechanisms as well as the fuel itself. It determines how much energy the reactor will produce and whether it will overheat. The system can consist of rods, heat sinks, heat exchangers, reactor plates (the main and most commonly used), as well as cooling rods, capacitors, reflectors (rarely used components). I won’t describe their crafts and purpose, everyone look at the Wikia, it works the same way for us. Unless the capacitors burn out in literally 5 minutes. In the scheme, in addition to obtaining energy, it is necessary to completely extinguish the outgoing heat from the rods. If there is more heat than cooling, the reactor will explode (after a certain heating). If there is more cooling, then it will work until the rods are completely exhausted, in the long term forever.
I would divide circuits for a nuclear reactor into 2 types:
The most favorable in terms of efficiency per 1 uranium rod. Balance of uranium costs and energy output.
Example:
12 rods.
Efficiency 4.67
Output 280 eu/t.
Accordingly, we get 23.3 eu/t or 9,220,000 energy per cycle (approximately) from 1 uranium rod. (23.3*20(cycles per second)*60(seconds per minute)*330(duration of operation of the rods in minutes))
The most profitable in terms of energy output per reactor. We spend maximum uranium and get maximum energy.
Example:
28 rods.
Efficiency 3
Output 420 eu/t.
Here we already have 15 eu/t or 5,940,000 energy per cycle per rod.
See for yourself which option is closer to you, but do not forget that the second option will give a greater yield of plutonium due to the larger number of rods per reactor.
Pros of a simple nuclear reactor:
+
Quite a good energy yield at the initial stage when using economical circuits, even without additional reactor chambers.
Example:
+
Relative ease of creation/use compared to other types of reactors.
+
Allows you to use uranium almost at the very beginning. All you need is a centrifuge.
+
In the future, one of the most powerful sources of energy in industrial fashion and on our server in particular.
Cons:
-
Still, it requires some equipment in terms of industrial machines as well as knowledge on their use.
-
Produces a relatively small amount of energy (small circuits) or simply not very rational use of uranium (solid reactor).
2. Nuclear reactor using MOX fuel.
Differences.
By and large, it is very similar to a reactor powered by uranium, but with some differences:
As the name implies, it uses moxa rods, which are assembled from 3 large pieces of plutonium (will remain after depletion) and 6 238 uranium (238 uranium will burn into pieces of plutonium). 1 large piece of plutonium is 9 small ones, so to make 1 moxa rod you must first burn 27 uranium rods in the reactor. Based on this, we can conclude that creating moxa is a labor-intensive and time-consuming undertaking. However, I can assure you that the energy output from such a reactor will be many times higher than from a uranium reactor.
Here's an example:
In the second exactly the same scheme, instead of uranium, there is mox and the reactor is heated almost all the way. As a result, the yield is almost fivefold (240 and 1150-1190).
However, there is also a negative point: mox works not 330, but 165 minutes (2 hours 45 minutes).
Small comparison:
12 uranium rods.
Efficiency 4.
Output 240 eu/t.
20 per cycle or 7,920,000 eu per cycle for 1 rod.
12 moxa rods.
Efficiency 4.
Output 1180 eu/t.
98.3 per cycle or 19,463,000 eur per cycle per 1 rod. (duration less)
The main principle of cooling of a uranium reactor is supercooling, while that of a moxa reactor is maximum stabilization of heating by cooling.
Accordingly, when heating 560, your cooling should be 560, or a little less (slight heating is allowed, but more on that below).
The higher the heating percentage of the reactor core, the more energy the moxa rods produce without increasing heat production.
Pros:
+
Uses virtually unused fuel in a uranium reactor, namely 238 uranium.
+
When used correctly (circuit + heating), it is one of the best sources of energy in the game (relative to advanced solar panels from the Advanced Solar Panels mod). Only he can give out a charge of a thousand EU/tick for hours.
Cons:
-
Difficult to maintain (heating).
-
It uses not the most economical (due to the need for automation to avoid heat loss) circuits.
2.5 External automatic cooling.
I’ll step back a little from the reactors themselves and tell you about the cooling available for them that we have on our server. Specifically about Nuclear Control.
For correct use of the control core, Red Logic is also required. This only applies to a contact sensor; this is not necessary for a remote sensor.
From this mod, as you might guess, we need contact and remote temperature sensors. For conventional uranium and moxa reactors, a contact reactor is sufficient. For liquid (due to design) a remote one is already required.
We install the contact as in the image. The location of the wires (freestanding red alloy wire and red alloy wire) does not matter. The temperature (green display) is adjusted individually. Don’t forget to move the button to the PP position (initially it is PP).
The contact sensor works like this:
Green display - it receives data on the temperature and it also means that it is within normal limits, it gives a redstone signal. Red - the reactor core has exceeded the temperature indicated in the sensor and it has stopped sending a redstone signal.
Remote is almost the same. The main difference, as its name suggests, is that it can provide data about the reactor from afar. He receives them using a kit with a remote sensor (ID 4495). It also eats energy by default (disabled for us). It also occupies the entire block.
3. Liquid nuclear reactor.
Now we come to the last type of reactor, namely liquid reactor. It is called that because it is already relatively close to real reactors (within the game, of course). The essence is this: the rods emit heat, the cooling components transfer this heat to the refrigerant, the refrigerant transfers this heat through liquid heat exchangers to stirling generators, the same convert thermal energy into electrical energy. (The option of using such a reactor is not the only one, but so far it is subjectively the simplest and most effective.)
Unlike the two previous types of reactors, the player is faced with the task not of maximizing the energy output from the uranium, but of balancing the heating and the ability of the circuit to remove heat. The energy output efficiency of a liquid reactor is based on the outgoing heat, but is limited by the maximum cooling of the reactor. Accordingly, if you put 4 4-rods in a square in a circuit, you simply will not be able to cool them, in addition, the circuit will not be very optimal, and the effective heat removal will be at the level of 700-800 e/t (heat units) during operation. Need I say that a reactor with so many rods installed side by side will operate 50 or maximum 60% of the time? For comparison, the optimal design found for a reactor of three 4-rods already produces 1120 units of heat over 5 and a half hours.
So far, the more or less simple (sometimes much more complicated and costly) technology of using such a reactor gives a 50% yield from heat (stirling). What is noteworthy is that the heat output itself is multiplied by 2.
Let's move on to the construction of the reactor itself.
Even among the multi-block structures of Minecraft, it is subjectively very large and highly customizable, but nevertheless.
The reactor itself occupies an area of 5x5, plus possibly installed heat exchanger + stirling units. Accordingly, the final size is 5x7. Don't forget about installing the entire reactor in one chunk. After which we prepare the site and lay out the 5x5 reactor vessels.
Then we install a conventional reactor with 6 reactor chambers inside in the very center of the cavity.
Don't forget to use the remote sensor kit on the reactor, we won't be able to reach it in the future. In the remaining empty slots of the shell we insert 12 reactor pumps + 1 reactor red signal conductor + 1 reactor hatch. It should look like this, for example:
After which we need to look into the reactor hatch, this is our contact with the insides of the reactor. If everything is done correctly, the interface will change to look like this:
We will deal with the circuit itself later, but for now we will continue installing external components. First, you need to insert a liquid ejector into each pump. Neither now nor in the future they do not require configuration and will work correctly in the “default” version. It’s better to check it twice, rather than take it all apart later. Next, install 1 liquid heat exchanger per pump so that the red square faces from reactor. Then we fill the heat exchangers with 10 heat pipes and 1 liquid ejector.
Let's check everything again. Next, we place the Stirling generators on the heat exchangers so that their contact faces the heat exchangers. You can rotate them in the opposite direction from the side the key touches by holding Shift and clicking on the required side. It should end up looking like this:
Then in the reactor interface we place about a dozen coolant capsules in the upper left slot. Then we connect all the stirlings with a cable, this is essentially our mechanism that removes energy from the reactor circuit. We place a remote sensor on the red signal conductor and set it to position Pp. Temperature doesn’t matter; you can leave it at 500, because in fact it shouldn’t heat up at all. It is not necessary to connect the cable to the sensor (on our server), it will work just like that.
It will give out 560x2=1120 eu/t at the expense of 12 stirlings, we output them in the form of 560 eu/t. Which is pretty good with 3 quad rods. The scheme is also convenient for automation, but more on that later.
Pros:
+
Produces about 210% of the energy relative to a standard uranium reactor with the same design.
+
Does not require constant monitoring (like, for example, mox with the need to maintain heating).
+
Supplements mox using 235 uranium. Allowing together to produce maximum energy from uranium fuel.
Cons:
-
Very expensive to build.
-
Takes up quite a bit of space.
-
Requires certain technical knowledge.
General recommendations and observations on liquid reactor:
- Do not use heat exchangers in reactor circuits. Due to the mechanics of a liquid reactor, they will accumulate the outgoing heat if overheating suddenly occurs, after which they will burn. For the same reason, cooling capsules and capacitors in it are simply useless, because they take away all the heat.
- Each stirling allows you to remove 100 units of heat, so having 11.2 hundred units of heat in circuit 11.2, we needed to install 12 stirlings. If your system produces, for example, 850 units, then only 9 of them will be enough. Keep in mind that a lack of stirlings will lead to heating of the system, because the excess heat will have nowhere to go!
- A rather outdated, but still usable program for calculating circuits for a uranium and liquid reactor, as well as some moxa, can be taken here
Keep in mind that if the energy does not leave the reactor, the stirling buffer will overflow and overheating will begin (the heat will have nowhere to go)
P.S.
I express my gratitude to the player MorfSD who helped in collecting information to create the article and simply participated in brainstorming and partly the reactor.
The development of the article continues...
Modified March 5, 2015 by AlexVBG