Happy owners of six acres usually face the problem of placing household equipment, garden tools and other useful little things on the site. To prevent anything from lying around unattended, from time immemorial small separate outbuildings were used to store country utensils. With the advent of modern materials, these buildings have become much more noble and visually attractive. How to equip a barn at the dacha with your own hands - we will give step by step instructions ? What materials are needed for this?
One of the most useful outbuildings in the country
Dacha plots do not always become habitable, but even if there is country house or a cottage, it is customary to store household luggage in a separate building. They also store chopped wood, hay, sawdust, fertilizers and agricultural equipment, pool care items, prefabricated swings, etc. Often pets are also placed there, with food and equipment for caring for them. A home craftsman's workshop can also easily and practically fit into a cozy small building.

Choosing the location of the future building
A barn can be a permanent or temporary building. Before starting construction, you need to find a place and plan the dacha site.
The location of all elements arranged at the dacha is subject to general rules land management, which are regulated by SNiP 30-02-97, according to which the minimum distance of such buildings from the border of the land plot (fence) is 1 m. Fire standards are described there.
Does a shed need a foundation?
 Any construction begins with the construction of a solid and reliable foundation. For temporary buildings the rule is not mandatory. It is important to understand that the stronger the foundation, the more durable the entire building will be.
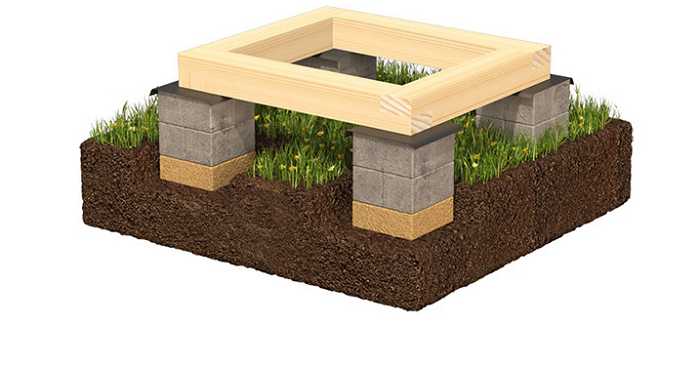
For such outbuildings, shallow or non-buried foundations are installed. They are made mainly from stone materials or reinforced concrete, and less often from wooden beams or logs. The strongest of them is considered monolithic, reinforced with a metal frame made of reinforcement, and filled with heavy concrete. Widely used for frame buildings columnar foundation, monolithic or stone made of rubble concrete or bricks. And for stone ones, tape or monolithic slab, which, if there is a basement, is equipped with a caisson.
What can you build a shed from?
The following materials are used for such construction:

Important! The structure of wood is porous and fibrous, so it must be carefully protected from the penetration of moisture and insect pests. A stone base with horizontal waterproofing significantly extends the service life of wooden buildings, which is no more than 30 years.
Step-by-step instructions for making a do-it-yourself shed
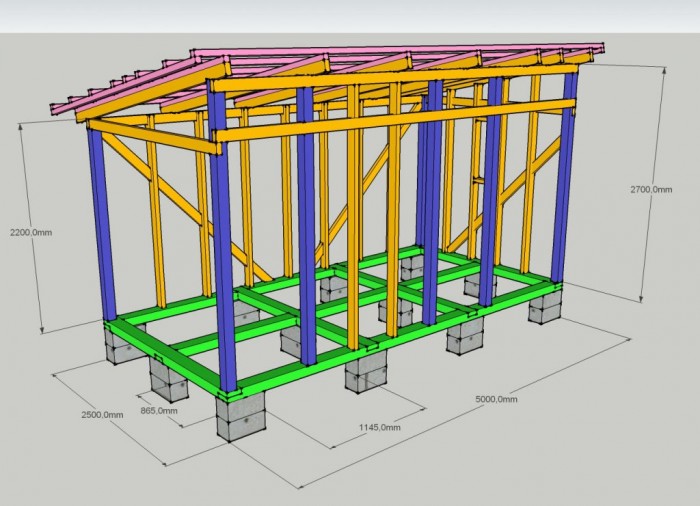
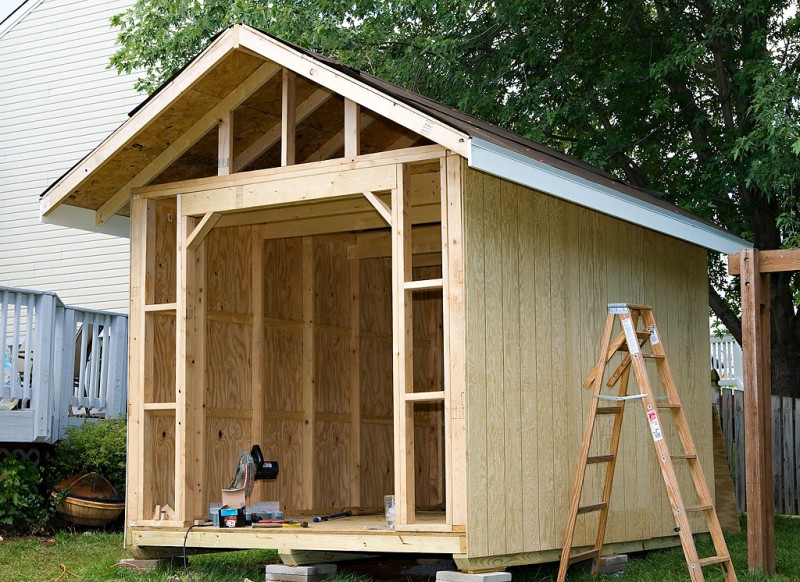
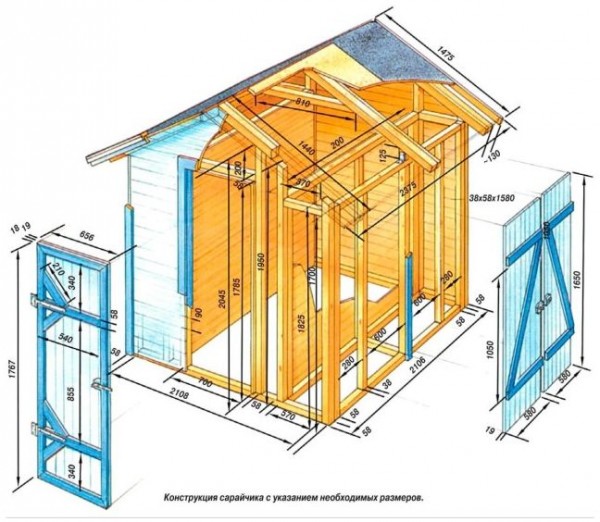
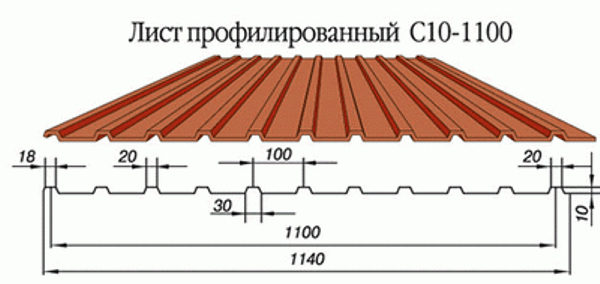
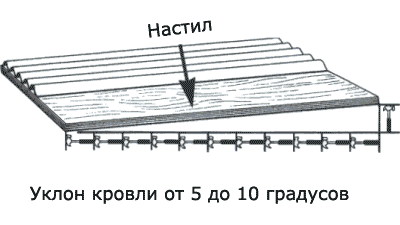
We will analyze the step-by-step construction of a small structure at a dacha using the example of a light frame structure made of wooden beams with its subsequent covering with wooden clapboard. Metal tiles are suitable for roofing. By analogy with it, lightweight construction is made from rolled metal. Before starting construction, you need to make a drawing diagram, as in the following photo.
Building a shed at your dacha with your own hands is not such a difficult task.
The main thing is to decide on the purpose of the building, its size and location on the site. The foundation will not require large expenses and the participation of expensive special equipment. Well, and with modern materials With good fasteners it is a pleasure to work!
A suburban area is, first of all, a suburban farm. And any household requires storage space for tools, materials, firewood and other things needed for everyday life and work. We want to tell you how to build a shed at your dacha yourself.
Preparation
Selecting a location and marking
Depending on the purpose of the building, it is necessary to determine its dimensions and find a suitable location on the site.
Here the logic is like this:
- if you plan to use the room only for storing equipment and materials, a size of 3x4 or 3x3 meters will be enough for you;
- if you plan to also build a workshop, then it is better to take 3x6 meters.
We chose wood as the material for construction, as we were satisfied with its price and ease of processing. Also taken into account was the fact that construction would not require wet processes, instead of which the parts would be quickly assembled using nails and screws.
If the site is new, you will need to rent a diesel generator for your dacha. This will solve the issue of powering the power tool and lighting.
Important! It is advisable that when standing near the barn, you can see the threshold of the house and the entrance. In addition, the utility block should not be too far from the house, since you will have to run there for firewood and other supplies, sometimes in the rain, sometimes at night.
Now you need to mark the site. To do this, we hammer in the pegs and pull the thread, making sure that all the angles are right and the diagonals match in length. It is better to orient it to the cardinal points so that the walls with windows face south, southeast or southwest.
Then you should remove the fertile layer of soil along with grass and turf. The resulting cleared area should be leveled, cleared of excess soil and debris and lightly compacted.
Excavation and foundation
So, any building needs a reliable foundation. We are building a barn in the country, not a castle, so the foundation should be lightweight and shallow.
Important! If the soils in your region are not heaving, but the level groundwater not too high, then it would be most appropriate to use a columnar type of foundation. If the soils are heaving or the groundwater level is higher than 1 meter, then it is better to opt for a strip structure.
We will assume that ours is normal for middle zone Russian soil, and let's stop at the pillars. For a building measuring 3x4 meters, it is enough to install 6 - 9 pillars (this depends on the thickness of the frame and the beams of the lower floor). We will put up 9 pillars.
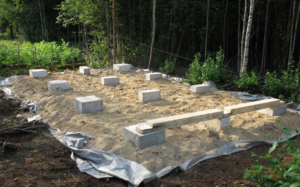
- So, 4 pillars in the corners, one exactly in the middle of each side of the rectangle and one at the intersection of the diagonals. We dig holes at these points measuring 40x40 cm and 50 cm deep;
- Pour a gravel-sand mixture into the bottom of each hole and spill it with water.. Then we install formwork made of plywood 30x30 cm with an extension above the ground level of at least 30 - 40 cm. We put a frame of 8 mm reinforcement into the formwork and tie vertical pins with threads for fastening the timber with wire, pour concrete;
- Before concreting, using a hydraulic level, we mark the concrete pouring level inside each formwork so that the shortest column is at least 15 cm above the ground, and all columns (upper ends) are in the same horizontal plane. After concreting, we wait three days, then remove the formwork;
- We cover the columns with bitumen primer, and after it dries - with bitumen mastic in 2 layers. After two days, the holes can be filled with clay. It is better to sprinkle the surface of the site with a sand-gravel mixture to the thickness of the previously selected fertile layer.
Important! Ceramic bricks can be used instead of concrete, however reinforced concrete structure will be stronger and more durable.
Construction of a barn
Now you can start building the barn itself.
You will have to work with your own hands, but in the case of working with wood, this is only a plus:
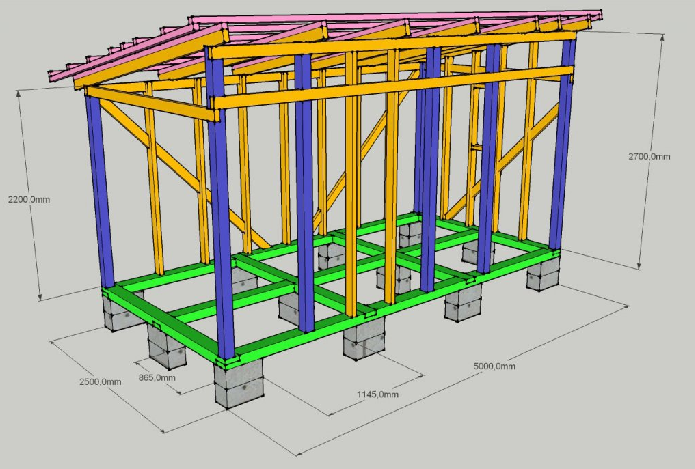
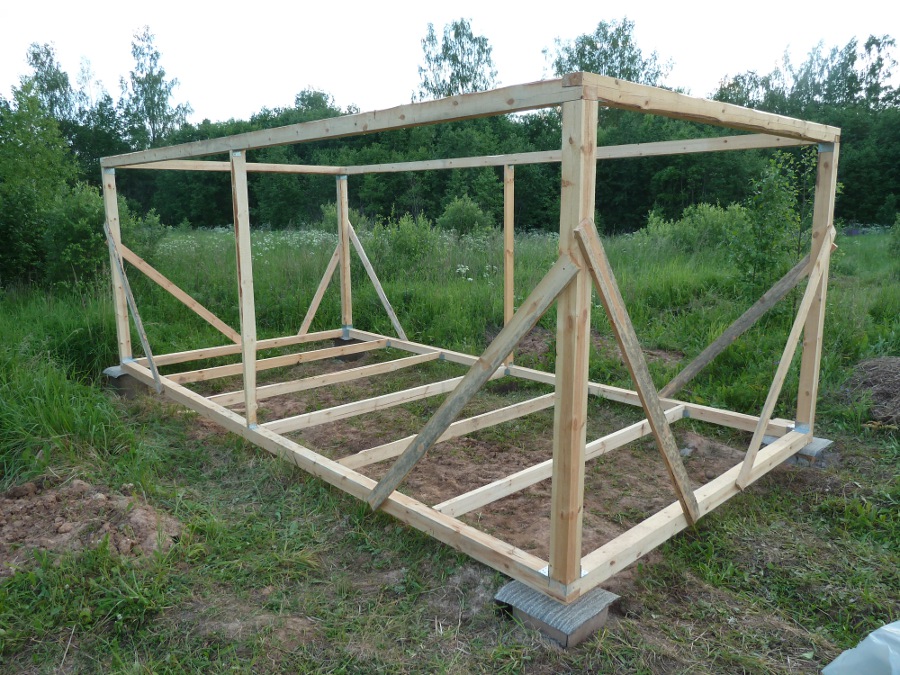
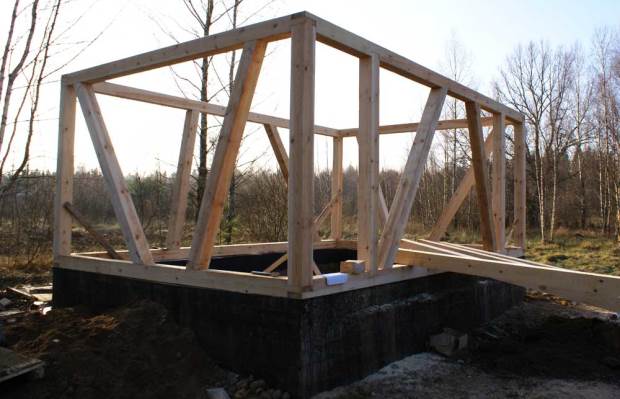
- We make the bottom trim: we lay 150x150 mm timber around the perimeter of the pillars and crosswise inside the platform through the middle pillar. We put roofing felt, join it into half a tree, put it on the pins and tighten it with nuts, which should fit into the pre-cut countersinks;
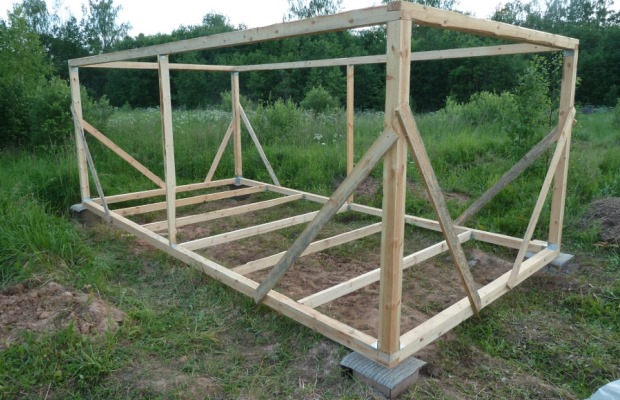
We mount the racks, fix them with corners and screws.
- We make the top trim; to do this, we connect the racks along the perimeter with crossbars made of 100x100 mm timber at a level of 2 meters, and we connect the front racks to each other separately at a height of 3 meters. We fasten the beam with metal corner plates on self-tapping screws in the place where it joins with higher pillars, in other places we join it halfway into the tree with nails;
We paint the walls with a protective compound.
Important! If a house has not yet been built on the site, you can use country houses made from block containers as temporary housing - they are inexpensive and quite comfortable.
Conclusion
You can build a shed on your own. It is best to use wood and a foundation on pillars, and the video in this article will help you get a visual representation and not make mistakes while working.
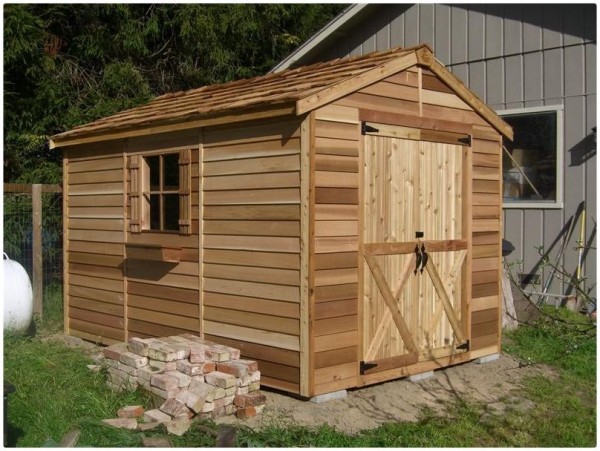
Sooner or later, any owner country house begins to think about building a utility room on his property, for example for drying harvested or storage of household tools and gardening equipment. In such a situation, as the most suitable and inexpensive solution, you can build a small shed in your country house with your own hands using available building materials.
Household buildings made of timber and boardsMaking a shed on a summer cottage
In order to help the reader deal with this simple issue, this article will pay attention to the main aspects of self-construction of unheated utility and utility rooms in garden plot country house.
A brief instruction will also be presented here, which describes the technology for constructing a small shed for storing everyday household items.
Stage 1. Preparatory work
Even for the construction of such a seemingly insignificant building, first of all it is necessary to correctly select the location and develop a brief technical project, which should include all the necessary drawings of a do-it-yourself garden shed indicating the exact dimensions.
- As a rule, the location for installing the shed should be chosen in the backyard of the site, and it is better if it is adjacent to a house, garage, bathhouse or other permanent building with one wall;
- Household location buildings should be located on an elevated, level area and, if possible, should be hidden from prying eyes;
- For ease of use, it is necessary to provide free access or equip access roads;
- Before starting construction, you need to carry out planning work: remove the fertile layer of soil, clear the area of plant roots and mark the perimeter of the future building.
Advice! To save the family budget and use space more efficiently personal plot, a small shed can be made in the form of an extension for a country house, installing it in the backyard, close to one of the walls.
Stage 2. Selection of materials
There are no specific requirements for building materials for the construction of such lightweight buildings. Based on this, first of all, when choosing a material for the construction of walls, one should be guided by the principles of accessibility, low cost, ease of installation, as well as reliability and durability.
- When constructing walls from mineral building materials (brick, concrete blocks), first of all it is necessary to make a shallowly buried strip or monolithic foundation along the entire perimeter of the future building;
- For frame-panel structures, install support pillars in the ground at the corners and along the perimeter with a distance between them of no more than 1500 mm;
- When installing light wooden structures, it is enough to pour a sand and gravel cushion over the entire area, on which to lay flat paving slabs in the corners and along the perimeter;
- Brick and concrete walls erect using cement-sand masonry mortar, following general construction principles;
- Lay the lower base of lightweight structures and secure them to the foundation or support platforms, having previously placed one layer of waterproofing material under it;
- From wooden beams, logs or metal pipe assemble a load-bearing frame of the required cross-section on a finished base, connecting it to the floor beams and strengthening it with side braces;
- Install frames of window and door openings, and then secure external cladding materials around the entire perimeter;
- Install 25 mm board sheathing on the ceiling load-bearing beams, if necessary, lay additional waterproofing and secure roll or sheet roofing material.
Advice! The base of a shallow foundation should be located below the level of soil freezing depth, and the upper plane at a level of 150-200 mm from the ground surface.
Stage 4. Arranging the floor covering
The interior design of a shed and the choice of flooring mainly depends on its purpose, but there are certain basic principles of flooring that apply equally to all types of similar structures.
- When making a country shed with your own hands, which is intended only for storing garden tools, you can leave an earthen floor, but in this case, to maintain cleanliness and additional waterproofing, it is better to make an adobe pad. To do this, you need to evenly lay a layer of damp crumpled clay mixed with wood sawdust on the compacted soil, then compact it thoroughly and leave for several days until it dries completely;
- Wooden flooring is considered more practical. To install it on support posts or longitudinal load-bearing beams, you need to lay transverse logs from timber, and then fasten edged floorboards to them close to each other;
- If necessary, you can make a concrete screed. To do this, you need to lay waterproofing made of thick polyethylene film on the sand cushion, secure a steel reinforcing mesh on top, and then fill the entire floor area with liquid concrete mortar.
Advice! To prevent the concrete floor from collecting dust, collapsing and absorbing water, oil and other liquids, after hardening it is recommended to treat it with a special penetrating impregnation for concrete.
Conclusion
After reading this article, it becomes clear that with certain knowledge, any home craftsman can independently make a shed in his own garden plot.
To get additional information on this issue, you can watch the video in this article or read similar materials on this topic on our website, and if you have any suggestions, I am ready to discuss them below, in the comment form.
The construction of various buildings is such a hackneyed topic that almost all articles that discuss such issues look like twin sisters, with the same type of structure and similar recommendations (only with slight differences in the nuances). But does it make sense to explain to a person who has decided to build something on his own how to properly dig a trench, mix the mortar, and in which hand to hold the hammer?
Probably, material of an analytical nature will be much more useful for the reader, giving hints and advice that will help answer a number of questions - what is the most appropriate material to build a barn at the dacha, according to what scheme, on what foundation, and the like. Let's try together to understand the specifics of constructing (with our own hands) a country shed. And determining the optimal option is a personal matter for everyone.
Features of the choice of design and materials
Construction site
A dacha is, first of all, beds and fruit bushes and trees. Therefore, you should choose a segment for construction in that part of the territory that is either not used too often (intensively), or if it is possible to free it up for the construction of a shed without significant damage to the overall layout.
Dimensions of the building
Practice shows that the most acceptable dimensions of the shed around the perimeter are within 2.5 x 3 m, no more. This is quite enough to organize the storage of equipment, storage of collapsible structures (for example, swings,) and so on. It is unlikely that any of the summer residents will equip this outbuilding as a workshop or something else, if some small carpentry (metallery) work can be done on a small workbench in the open air.

Even if the owners live on the site year-round, even in this case it makes no sense to build a large shed. Most typical dachas are only about 6 - 8 acres. In addition to residential buildings, they will have to equip an autonomous source of water supply (and closed type, ), install a septic tank, equip a parking lot for personal cars. It turns out that there is practically no space left for a large barn, since if this is a dacha, and not just a territory, then there are also plantings + beds on the site.
Construction scheme
Configuration
There are no architectural features no - an ordinary box with a door and a couple of windows.
Roof
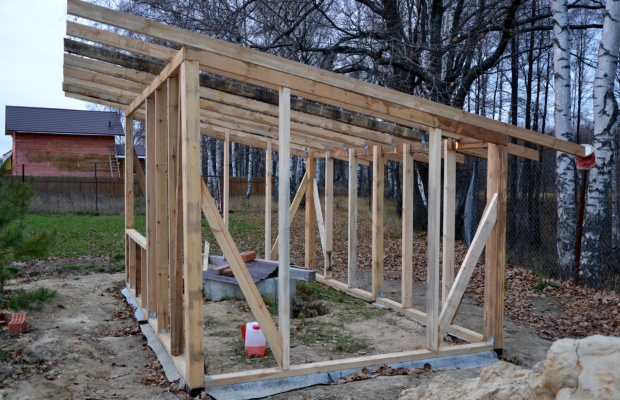
Flat, single slope. So that water does not linger on it, and snow melts off during the thaw, the recommended minimum slope is 5º. For a small country shed, installing a rafter system and constructing a gable (especially sloping) roof does not make sense. Moreover, it is much more difficult to do this with your own hands, and not every summer resident will be able to do it on his own. necessary calculations. Plus - additional costs for materials.
Interior arrangement
This issue needs to be thought through to the smallest detail. The task is to fit into a small building the maximum of everything that is needed on the farm. The only solution is the rational arrangement of various racks, shelves, hooks on the walls and even the ceiling.
Country shed foundation
What to consider when choosing the type of base:
- Minimum excavation work. Firstly, the area is planted, so damage to the root system cannot be avoided. Secondly, there is limited free space, and the excavated soil will have to be stored somewhere.
- Low cost. It’s hardly wise to spend a lot of money on building a garden shed, essentially a temporary shed.
Conclusion - it is not practical to build a slab or traditional strip foundation. Acceptable options are columnar and pile. For construction light type A base assembled from timber, which is laid directly on the ground, is also suitable.
Materials for building a shed
Brick
This type of construction is the most durable. But there are also disadvantages that are specifically for summer cottage make this option less than acceptable.
 Firstly, theoretically, many people can lay masonry. But when it comes to practice, the number of “craftsmen” is sharply reduced. This means you will have to pay for someone’s services.
Secondly, if you take the average price for 1 brick of 16 rubles and multiply it by their quantity (taking into account the battle that is inevitable during transportation), then the amount turns out to be hefty. To this it is worth adding cement, which cannot be called cheap. In addition, you will have to purchase other materials - sand, gravel (crushed stone).
Thirdly, you will have to organize a small construction site/site, which will create certain problems in a small garden plot.
Wood
The timber frame structure is assembled quite quickly. All that remains is to sheathe it with appropriate materials - boards, OSV, MDF or similar products.
- Pros: low cost, ability to do all the operations yourself, light weight.
- Disadvantages - you will have to constantly treat the wood with special agents (fire retardants, antiseptics) and paint it. Consequently, this option, no matter how attractive it may be, will require certain costs for the maintenance of the building.
Cellular concrete
Gas silicate is no longer an option. It absorbs moisture quite intensively, and you will have to invest a lot of money into high-quality finishing of such a barn, since there is no heating in it. But foam concrete works great.
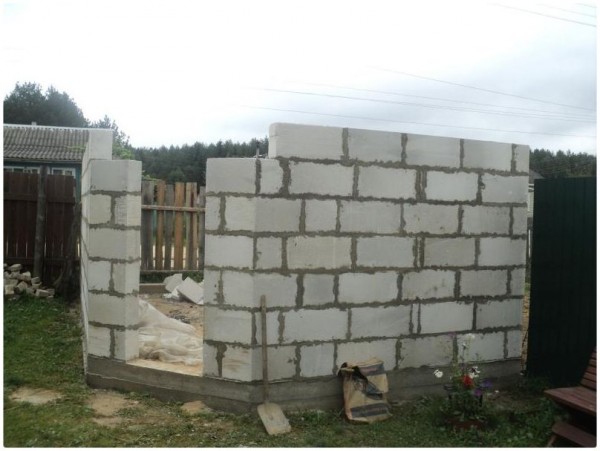
- Pros – low cost of blocks; simple technology; finishing with a plaster compound.
Polymer materials
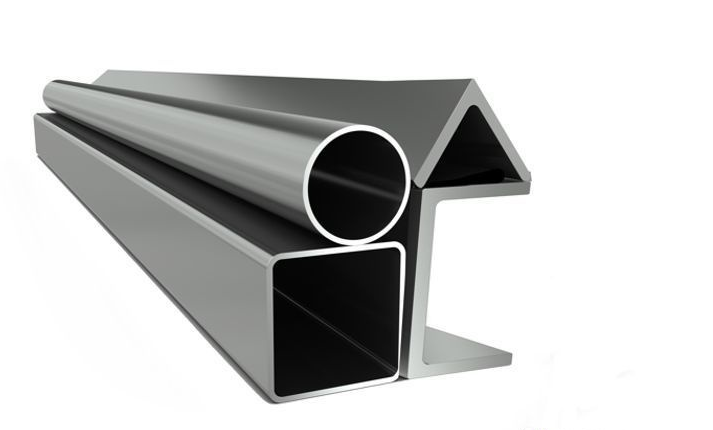
When it comes to a shed, such products are somehow not taken into account. However, this is one of the cheapest options for constructing a lightweight building. After all, good and easy-to-use greenhouses, gazebos, and verandas are built from the same materials. This material is quite suitable for a shed, especially since to install such a structure you can limit yourself to a support frame (mounted from timber), which plays the role of a base. And as parts for the frame you can use, for example, plastic pipes, aluminum profile - there are many options.
With proper organization of work, the shed can be assembled in a couple of days, with minimal costs and without assistants.
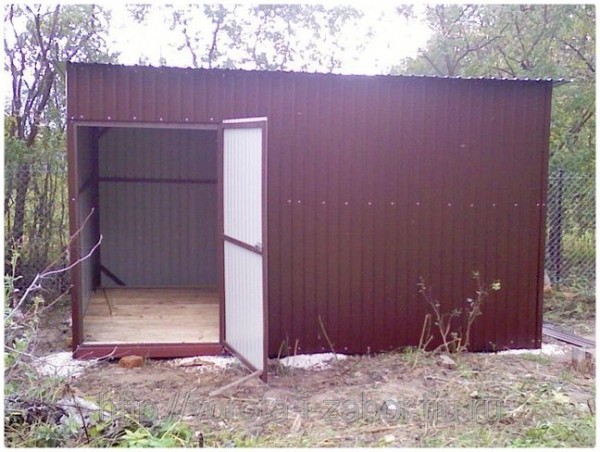
Corrugated sheet
Covering the frame with metal sheets is also one of the budget options. The only drawback is that such a shed will always be damp, since water condenses intensely on any hardware. Leaving a tool in it for the winter without appropriate preparation for storage (if you care about durability) will no longer work.
A separate question is how to cover the roof of the barn. The choice of materials here is huge, but it is still better to focus on products that are fixed to the base using fasteners. Weldable specimens will require a flame source. Carrying a burner and a cylinder to the dacha is an extra hassle, especially if you don’t have your own car. Working with a blowtorch is both time-consuming and ineffective, especially since you definitely can’t do it without an assistant.
Construction Features
Barn foundation
Can be used as supports screw piles or pipes - metal, asbestos-cement. In the latter case, in their cavities (to increase strength) you will have to fill the solution and insert 3 - 4 reinforcing pins. In principle, the technique is simple.
But still, in many cases it is more convenient to make a foundation from timber. If you can get ready-made sleepers (that is, dried and processed in a special way), even better.
Construction order:
- A shallow trench is dug (about 30 cm).
- ASG is poured into it and compacted.
- The “pillow” is covered with P/E film (cut-off waterproofing).
- On top are bars that are fastened together with staples and metal plates.
On such a foundation you can attach a frame from any blanks. In addition, it can be used for arranging a subfloor. This is quite enough for a shed, especially if you lay the flooring boards in 2 tiers.
The only thing that needs to be taken into account is the probable displacement of such a foundation. To eliminate this, pieces of reinforcement are driven into the ground on the sides of the beam. Enough reliable fixation, and it is quite enough.
Barn walls
If the sheathing is done with boards, then a second layer of plywood (multi-layer, moisture-resistant) will have to be installed on the outside. This will save on materials. Firstly, you can also take unedged boards (they are much cheaper). Secondly, there is no need to caulk the cracks.
It is better to use corrugated sheets of category “C”. They are specifically for walls, and are much cheaper than analogues marked “H” or “NS”.
It is better to use cellular polycarbonate. It retains heat well, so the conditions for storing household items/accessories will be better.
Roof
Given the small dimensions of the building, it is advisable to install the sheathing in the form of a continuous flooring. You can use a thin board (on “fifteen”), boards (MDF, chipboard, OSV).
How to cover the roof? For a shed, taking into account such a base for the roof, the most suitable options are roofing felt (it can be glued to mastic), sheet iron (the same metal profile) or polycarbonate. Piece samples can be easily screwed on with self-tapping screws. It will turn out high quality and inexpensive.
The article discusses only the basic methods and materials for building a shed on a summer cottage. The author hopes that even if the reader chooses some other design option, the information provided will still be useful. Good luck!
When you hear the word shed, everyone has their own idea about this utility structure on the site. Someone sees a temporary, windswept building in which nothing except shovels and rakes is stored.
And some people think that a barn is a room not only for storing tools and bicycles, but also a workshop, a temporary vegetable storage, a cellar, and a sofa for relaxation. It’s not a sin to put it there.
Building a shed: from simple to complex
The thought of how to build a shed arises at the first glance at the newly acquired plot. There’s nothing even in the plans yet, but we’re already figuring out where the first buildings will be located: a yard toilet (we couldn’t do without it!) and a simple plank shed.
There is no point in building right away outbuildings made of brick, aerated concrete blocks or timber. More than once your building plans will change, and a shed in the wrong place will pretty much ruin your nerves. Only after the project is finally approved can the construction of a capital utility block begin.
Such buildings do not require special skills and strict adherence technology: as experience shows, this is a temporary structure and only a few requirements are imposed on it:
- We need to build quickly.
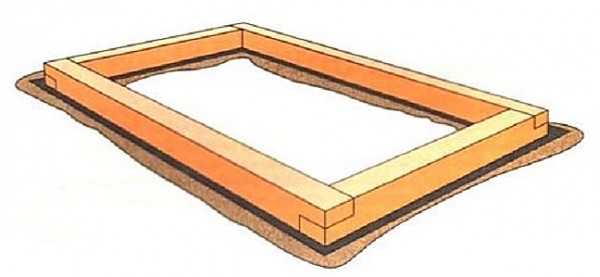
- The foundation is simple. Shallow holes (0.5 x 0.5 x 0.5 m) are dug in the corners of the barn, filled with sand and compacted. Then the brick columns are laid out.
Sometimes logs or sleepers soaked in waste oil are used.
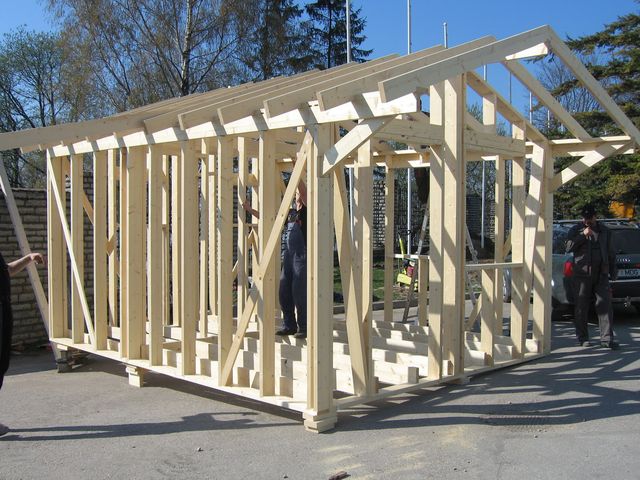
- Then the frame is built. To do this, timber is laid on the posts bottom trim, vertical posts are installed on it and secured at the top with the same beam.
To quickly build a barn with your own hands, no one builds a complex rafter system. At first, it is enough to build a shed with a pitched roof.
To do this, the posts of one wall, usually the front one, are made higher than the back one. The rafter beams are attached to the posts and connected to each other by lathing made of unedged boards. It is advisable to fasten the boards with a continuous flooring so that the roofing material can be preserved longer.
- Building a shed inexpensively is the second requirement. To save money, unedged lumber is used for both walls and roofs. The doors and windows of a simple barn should not be made to order; you can use used ones or make them yourself. The greatest savings come from building a barn with your own hands. To properly build a shed, you don’t need any special knowledge and skills; you can save money on craftsmen.
Using the same technology, you can build a shed from corrugated sheets. Such a barn has both positive and negative aspects. Large sizes sheets allow you to quickly cope with this task, appearance corrugated sheeting cannot be compared with a wall made of boards. It does not need to be protected from rain and snow, unlike wood. But building a shed will cost more - this is a minus.
As the dacha plot is developed and developed, the plank shed, which until recently was an essential building, becomes a burden and does not at all decorate the appearance of the plot.
The location for the new building has already been determined, and it’s time to think not only about how to build a barn in the country. With the rise in price of materials used, the cost of construction comes to the fore.
It is much cheaper to build a shed from boards, sleepers or corrugated sheets than a shed from bricks or foam blocks. Liability for technology violations is also increasing. Without a quality foundation, the walls will crack, and it will be impossible to answer the question: “How much does it cost to build a shed?” Simply because every year you will need to invest money in wall repairs.
How to build a barn from timber
A barn made of timber is a different level of prices and responsibility. It cannot be built by eye simply because the cost of the timber is incomparable with the cost unedged boards, and all work, from the foundation to the roof, requires certain construction skills.
You can build a shed from timber with your own hands only by strictly following the work technology at all stages.
- For such a barn, and this is practically small house, a project is needed. There is no point in ordering it from specialists; it is enough to determine the size of the building, its location, the presence of partition walls, roof material, etc. yourself.
- Having decided on the dimensions, they begin to build the foundation. Since the timber has large linear dimensions, and walls made from it and similar materials (logs, sleepers) do not crack, you can choose any type of foundation depending on the characteristics of the soil, freezing depth, groundwater level, and the preferences of the owner.
Columnar foundation is the most popular choice. In addition to being easy to do yourself, it allows you to build a shed inexpensively, since the cost of materials for such a foundation is minimal. You will need sand, cement, crushed stone and reinforcement.
As formwork, you can use roofing felt rolled into a cylinder ( budget option) or asbestos-cement pipe (more reliable).
Construction sequence:
- We remove the plant layer and mark the location of the pillars: always at angles and at the intersections of the walls, then evenly every 1.5 - 3 m.
- Using a garden drill, we make holes to a depth slightly below the freezing level.
- We make a sand cushion about 20 cm.
- We lower a cylinder of roofing felt or an asbestos-cement pipe into the well.
- We insert a pre-welded or wire-tied frame of 3 reinforcement bars and fill it with concrete. Fill all the other columns in the same way. The foundation is ready.
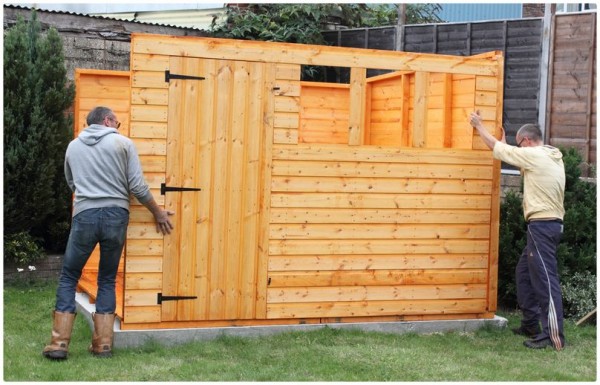
1. The assembly of timber walls begins with laying the strapping crown. Waterproofing (ruberoid in several layers) and antiseptic-impregnated beams are laid on the posts.
At the corners they are connected “in half a tree” and secured with dowels. Then insulation (jute or tow) and the beams of the next row are laid on the beam. In the corners, the bars are connected in several ways, most often “in the paw”. This allows you to additionally insulate the barn and cover it with siding in the future without any problems.
The crowns are connected to each other with dowels. To do this, several holes are drilled through three beams in each crown and wooden “sticks” with a diameter of 3-4 cm are inserted. Their length should be less than the depth of the hole so that no cracks form during shrinkage.
2. Having brought the height of the walls to the desired size, lay the beams and lay the floor, even if you want to build a barn with a pitched roof.
You can make it steeper and create a small attic space for storing garden tools in winter. But a gable roof is more practical.
We build a shed from sleepers
In a similar way, sheds are built from logs and sleepers. To build a shed from sleepers, and they can also be considered as beams, you will have to work hard. Sleepers do not have such strict dimensions as sawn timber. It is unlikely that it will be possible to assemble an even wall from them. It will be necessary to select sleepers of the same thickness for each crown; they are difficult to mark for corner joints.
Sleepers impregnated with creosote are durable, but the smell will not disappear very soon. In addition, they are difficult to process: saws become dull quickly.
It is clear that sleepers have an unsightly appearance and require additional finishing costs.

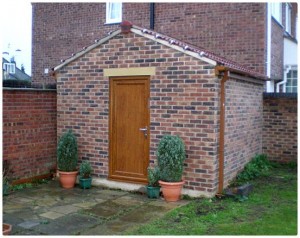
Unfortunately, before we build a shed in our country house, we have to think about its ability to resist burglary. This is especially true for those who visit the dacha irregularly. The best option in this case it will be the construction of a brick or block shed. The construction process is the same in both cases, but building a shed from foam blocks is much cheaper and easier.
Building the foundation
A solid shed requires a solid foundation. You can no longer lay blocks or bricks on posts. Strip foundation in this case, this is the most suitable option.
It is done as follows:
- We remove the fertile layer and mark a trench 0.4 -0.5 m wide. Maintain right angles!
- We dig a trench at least 0.8 -1 m deep and fill it with sand to 30 - 40 cm. We spill it with water and tamp it.
- We install the formwork. Its height above the ground is at least 20 cm.
- We lay a reinforcement cage, consisting of at least two rows of longitudinal bars, at the bottom and top of the foundation.
- We concrete the entire foundation strip in one go.
After waiting until the concrete hardens (3 weeks), we begin building the walls. Brickwork complex process, it is better to entrust this work to a professional. And it’s quite possible to lay foam blocks with your own hands. You can build a shed inexpensively and acquire useful construction skills. It’s not a problem to find a description of the process with step-by-step instructions on the Internet.
It is better to complete such a barn with a mansard-type roof: sloping or gable. It would be a shame if the attic space was empty. There you can arrange everything that your imagination tells you.
How to build a barn with your own hands video