At the moment, there are few hollow trees in big cities, and it is difficult for birds to find a home. Let's help them and make a birdhouse with our own hands. In this way we will save the birds from the cold. In this article we will look at: how to make a birdhouse with your own hands?
- Use linen gloves to avoid driving the splinter.
- Wear safety glasses to prevent sawdust from getting into your eyes.
- The working tool (knife, saw) must be sharp. Remember that a blunt tool can easily injure you; it is poorly fixed in the wood and tends to slip off.
- Check the functionality of power tools.
- Use a ladder when hanging the finished birdhouse.
- If you want to paint the birdhouse, use odorless, water-based paint bright colors. Try to make the bird house invisible to predators.
The best material for making a birdhouse is natural hardwood, for example: oak, aspen, linden, birch. Also suitable for a birdhouse are fiberboard (fibreboard), chipboard (chipboard), and plywood. You can use thick cardboard, but such a birdhouse will only last a couple of months. You should not use coniferous wood, as it produces sticky resin and negatively affects the health of the birds.
You will need: untreated hardwood boards, nails 4 cm long, impregnation or odorless, non-toxic water-based paint (optional), hacksaw or jigsaw, tape measure, hammer, pencil, drill with a 5 cm cutter, brush.

Birdhouse drawings
We present to your attention options for drawings of future birdhouses. When assembling the birdhouse, do not neglect the safety rules described above.
Drawing No. 1 Birdhouse with a slope to the back wall
Drawing No. 2 Birdhouse with a pitched roof
Drawing No. 3 Birdhouse with a gable roof
- Connect the front wall to the side walls, hammer nails along the edges and center of the board. (You should get a U-shaped design).
- Assemble the back wall and bottom of the structure using the same method.
- Nail a wooden bead to the bottom to round the internal corners.
- Do not forget to fix all the elements of the future birdhouse with nails.
- Make a removable birdhouse roof for future cleaning of the birdhouse. It should consist of two parts: the main part and the bushing.
- The roof of the birdhouse should protrude beyond the dimensions of the birdhouse itself from the facade, so that precipitation does not get inside the birdhouse.
- Place a board or perch in front of the entrance to the house.
- Choose a place to install the birdhouse; it can be a tree, a pole, or the roof of a house.
- The mounting height of the birdhouse must be at least 3 meters.
- When securing the birdhouse, tilt it forward to prevent moisture from getting inside.
- It is better to attach the birdhouse to a living tree using wire or rope.
- You can attach the birdhouse to other surfaces using nails and a hammer.
- The birdhouse should be in the shade so that it is not exposed to direct sunlight and the birdhouse does not heat up.
- The tap hole should be directed in the opposite direction from the wind.
- Do not install birdhouses nearby - starlings do not like neighbors.
Ideas for birdhouses made from scrap materials
It’s hard not to appreciate a birdhouse made from wine corks! To create such beauty you will need: a ready-made birdhouse, wine corks, a glue gun, a sharp knife. Glue the wine corks horizontally to the walls of the birdhouse, then vertically - in the center where the entrance hole is located. Cut wine corks into thin circles and glue them to the roof of the birdhouse like tiles.
Paint the birdhouse with waterproof paints, and it will look stylish, bright and exclusive!
A birdhouse made of wicker is the most interesting house for birds!
Don't rush to throw away your old shoes! After all, even from it you can make a house for birds.
Remove the pulp from the pumpkin, dry it and make a birdhouse!
You can decorate the birdhouse in any way you like, the main thing is to show your imagination!
Making a birdhouse from cardboard is not difficult. And for birds, such a house will last a whole season. Protect the birdhouse from moisture by coating the cardboard with varnish.
Don't rush to throw away plastic bottles and make a birdhouse. It won’t take you much time to create such a birdhouse! Imagine and create nice house for birds of any shape. Create with passion and love, then everything will work out!

Our interest in birdhouses awakens in the spring along with raindrops, bright rays of the sun and the ringing voices of birds. I really want nimble and cheerful birds to settle in our yard. It's nice to watch the family activities of birds and listen to their trills. It’s equally nice to know that birds will help protect your garden from pests.
Birdhouses for birds: what are they?
We have all observed a considerable number of different birdhouses. You might get the impression that these are just small houses with a hole different shapes and coloring. In fact, bird houses can be made from various materials and must have certain parameters for different types birds. There are certain requirements for their design and placement.
Especially for you, we have grouped the existing options into an easy-to-read form. Of course, before you start assembling a bird house, you need to see what they are like.
Birdhouses made of wood - classics of the genre
There is no doubt that wood is best suited for making classic birdhouse. The reason is in the whole complex of its characteristics:
- good thermal insulation;
- acceptable sound insulation;
- sufficient strength;
- environmentally friendly;
- well processed;
- affordable.
We have prepared for you photos of 40 types of wooden birdhouses, arranging them in order of increasing complexity and quality of design.
 Here are images of the simplest designs. As you can see, they suit the starlings themselves. Unless they suspect that the lifespan of an untreated house is limited. If appearance doesn't matter, choose one of these options.
 If you spend a little more time, you can make a much nicer house for the birds. Perhaps you use another type of lumber for this purpose. Definitely, it will take a little more skill and effort.
 In these designs, fantasy played the main role. Moisture-proof impregnation and a tin roof will definitely increase the service life of the crafts. The products are somewhat more complex than ordinary bird houses.
 As you can see in the photo, the birdhouse can be decorated by cutting a hole in the shape of a bird’s silhouette. At least the roof can be painted. To assemble a bird house, you can use clapboard treated with a blowtorch.
 The photographs above show the application of paints. In principle, one color is enough to decorate a craft. Several bird houses painted in different colors look great.
 If you try, paints will help turn a bird's home into a fairy-tale house. The design itself is not complicated. Imagination and diligence are the main tools of the presented success.
 A few more options for successful and simple solutions. Small cross-section sticks allow you to complement the craft with a fence, trellis, and so on. On two bottom photos Using a jigsaw helped a lot. The use of wood of different colors and unusual shapes of the bird house ensured the exclusivity of the work.
 The photos presented above say: don’t limit your imagination! Of course, to assemble an airplane and helicopter you will need parts manufactured at lathe. However, the locomotive and the tiger are made from ordinary planks using a simple tool. Can be repeated!
 The two elegant bird houses pictured above were crafted with great taste and care. It's not easy to repeat this. To create something similar and your own is even more difficult.
 We present four more examples that will decorate a site of any level. Of course, wood carving is not for everyone. Note that the two lower options are quite realistic for copying. It will take a lot of time and effort.
A birdhouse made of logs is a separate topic
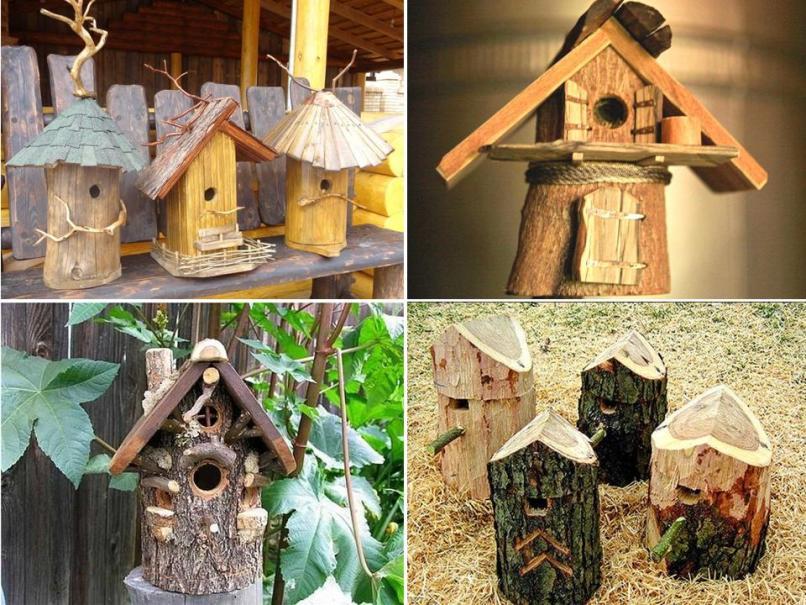 A great idea is to use an ordinary log for a birdhouse at the dacha. This is also wood, but untreated. Please note that an old tree trunk with a rotten core - best option. Such housing for birds resembles a hollow and is called a nest box. As you can see, the design of the product can be very different.
 For many, an old log is more affordable than an edged board. Birds don't care what their home looks like. A simple deck or palace made of birch will do. You make the choice.
 The nest can be decorated with branches, boards, and mushrooms. Again we are talking about the manifestation of imagination.
In any case, those who decide to make the house more complex and interesting must definitely link its design with the place and environment where the birdhouse will be located.
They also make plywood bird houses.
 It is believed that plywood is not the best choice for a bird house, as it has an unpleasant and harmful smell of glue. However, the starling in the picture likes the plywood housing. You probably shouldn't use products that have a noticeable glue smell. It can be assumed that the slight odor will subside over time. Plywood is more expensive edged boards, but stronger and will last longer.
 Here is a factory kit for assembling a bird house. Its main advantages are its interesting design and high assembly speed. Thin plywood has reduced heat and sound insulation. This type of bird house is best used in warm regions and will not last long.
 Several more design options for birdhouses made of plywood demonstrate the wide decorative capabilities of the material. The use of paints will ensure a flawless appearance. It is probably better to use such crafts for decorative purposes.
 Here are the simplest plywood bird houses. They are best used in relatively warm regions. They won't last long in this condition.
 The use of 20mm thick plywood and paints greatly improves the position of plywood houses. Experiments with the shape of the craft are encouraged.
Birdhouses made of cardboard - it's possible
 Cardboard birdhouses are difficult to take seriously. As follows from the pictures, such products exist. At the same time, they are made at enterprises producing corrugated packaging.
 Of course, such a bird house is inexpensive, can be assembled quickly and even looks decent. Obviously, they will last one season, and in those areas where it will not be soaked by rain. However, we decided to overcome the identified shortcomings of the material and further in the text we offer a diagram for assembling a fairly reliable bird house made of corrugated cardboard.
Birdhouses made from plastic bottles - a backup option
 At first glance, plastic containers are very suitable for a bird’s nest: they cost nothing, are durable, and are not afraid of rain. Note that birds do not like to sit in a transparent room with poor heat and sound insulation. In addition, the slippery surfaces of the bottle make it difficult for the bird to move around in the house.
However, these shortcomings can be combated. Note that the assembly of such a product does not require a hacksaw or drill and can be done by a woman or child. A plastic bottle can be painted, covered with an opaque material and lined with fabric on the inside. It is better to use five-liter eggplants.
To prevent the lightweight structure from being swayed by the wind, it must be securely fastened to the tree, for example with tape. Obviously, in this situation there is wide scope for decor and decorations. Below we offer a practical way to use plastic bottles for a bird house.
Bird houses made from scrap materials
 A very interesting house for birds is made from a pumpkin. The internal contents of the plant are cleaned with a spoon through the future entrance. The craft is dried, decorated and hung on a tree.
 Options for “finishing the room” outside can be very different. Note that even in its simplest form, the product has a certain decorative value. Often it is for this purpose that such crafts are made.
 A wooden barrel or pebbles and cedar cones, as well as beer cans, are suitable for building a bird house. Almost any material will do, from beer cans to shoes.
At the same time, it is important to comply with the conditions for comfortable living of birds, which we discuss further in the text.
 An old boot is a wonderful home for birds. By the way, the leather version will last quite a long time. The convenience of living in an old snag with a hollow for birds definitely doesn’t need to be explained. Nothing prevents us from adding our human decorations.
 An old bucket is perfect for birds. It is especially convenient to use a segment for arranging a bird house plastic pipe. Very simple and durable. The possibilities for decoration are, as always, unlimited.
Multi-family houses or townhouses for birds
 Maybe, apartment buildings first mastered by birds, and then by people. There are a great many options for execution. Just like people apartment building can be beautiful.
 These examples look more like townhouses. Probably, next to a “high-rise building” for a large number of birds it will always be possible to observe at least one of them.
At the same time, we must not forget that a cheerful company of birds can harvest your entire garden in one sitting.
Decorative birdhouses
 Decorative birdhouses also have a place. They are designed to decorate rooms. Often decorative crafts are placed in the garden.
 Bird houses can be made by children from paper, cardboard boxes, plastic bottles and beer cans. Of course, in this case no dimensions need to be observed. We have selected for you images of the most typical products that are suitable for a child.
Dimensions of birdhouses and other requirements
There are general requirements for bird housing, regardless of what specific birds they are intended for:
- The bird house must have sufficient thermal insulation and be protected from noise, moisture and drafts. To do this, a wooden birdhouse is made from boards at least 20mm thick. The seams and cracks of the house are sealed with clay, plasticine or tow.
- The structure should not have sharp protrusions that could injure feathered inhabitants. The protruding parts are treated with emery cloth.
- The configuration of the birdhouse should allow birds to easily get in and out. In a birdhouse made of planed boards, the front wall from the inside is roughened using a hacksaw and a drill. A birdhouse made from a plastic bottle is trimmed from the inside with a coarse cloth.
- The material of the bird housing should not emit unpleasant odors. Laminated chipboard and OSB board contain formaldehyde and are not suitable for birds. For the same reasons, the use of plywood is also discouraged. Inorganic adhesives should not be used to assemble the birdhouse. It is better to paint the product with acrylic paints.
- You should not use too bright colors to decorate the house. Birds distinguish colors much better than people, and in nature they are not used to showing off their nest to everyone. It's better not to create a tip-off birds of prey and cats. Good paint will significantly extend the life of your product.
- The design and placement of the birdhouse should provide sufficient protection from cats and woodpeckers.
- The birdhouse should not be too large so as not to provoke the female to lay too many eggs. Large quantity It is difficult to provide the chicks with food and they will not survive.
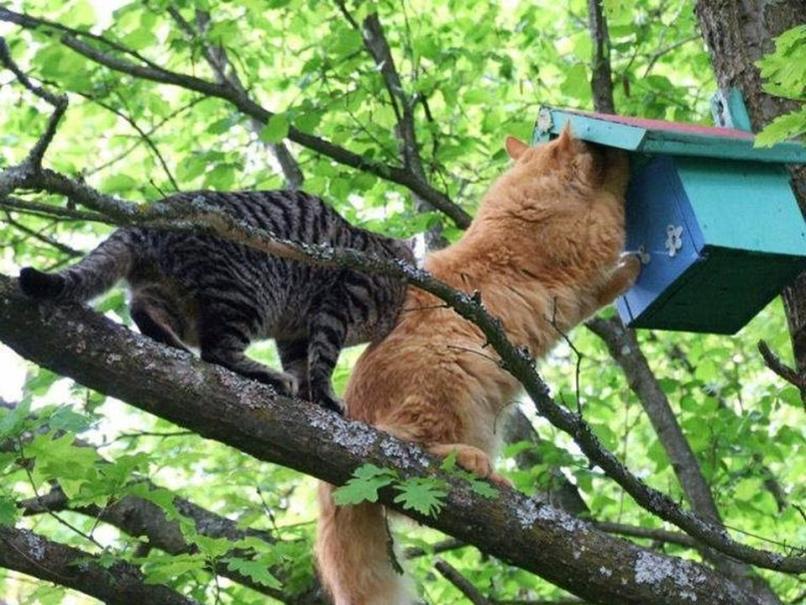 Let us add in more detail a few more significant comments on the “architecture” of bird houses. To protect against feline organized crime groups (organized criminal groups), the birdhouse should be positioned so that it is impossible to climb into it from nearby branches.
It is better not to make a support under the entrance, as the entrance to the bird’s house is called: branches are enough for the bird if the birdhouse is on a tree, and the cats will definitely take advantage of the additional opportunity for criminal purposes. To protect the chicks from attack from above, the overhang of the birdhouse canopy is increased to 70-80mm. The greater the angle of inclination of the roof, the more difficult it is for cats to commit a dirty deed.
 To prevent cat gangs from reaching the birdhouse along the support from below or above, it is wrapped in tin in accordance with the image. The cat slides on the metal and will not reach the chicks. To protect against the claims of a woodpecker, the bird entrance is reinforced with a metal or thick wooden overlay, as in the photo. Then he will not be able to expand the entrance and get to the eggs.
Quite often birdhouses are made of wood coniferous species. Resin released from wood can ruin the plumage of birds. It is better to use birch or alder for a bird's nest. As a last resort, you should choose pine boards without knots.
Different birds have their own characteristics and choose their “apartments” according to their needs. When planning to make a house for certain birds, use its standard GOST dimensions from the table below.
 The bird house mentioned in the table, called “half-loop,” is intended for birds that are accustomed to nesting not in tree hollows, but in the recess between the branches. These birds prefer a certain amount of light, and a slit-shaped entrance is suitable for them.
Please note that it is difficult for a wagtail to move on vertical surfaces, and it is better for it to arrange a comfortable area in front of the entrance 8-12 cm wide. For small birds, like pikas, two entrances located opposite each other are organized. It is believed that starlings do not live in green houses.
Choosing a location and methods of attaching bird houses
 Ornithologists recommend placing one birdhouse on an area of 20 m2. In practice, one birdhouse in the garden is enough, since a larger number endangers your cherries and even tomato seedlings. If you install several bird houses, ensure a distance of more than 15 meters between them.
Usually the birdhouse is installed at a height of 2.5-3.5 m from the ground. If there are objects nearby where people often appear and will disturb the birds, increase the height to 4.5-5.5 m.
It is necessary to think about the optimal orientation of the bird's house relative to the cardinal directions. If the entrance to the open space faces south, the house may overheat. It is better to place it in the shade. It is also incorrect to point the entrance towards the most frequently blowing winds, since rain will enter through the entrance to the birdhouse. Also, to protect from rain, you should use the wall or roof of a building, tree foliage, etc.
Often the birdhouse has a special bar for attaching to the support. It can be fixed to inanimate objects with nails and screws. Flexible clamps are used for fastening to trees. Reliable and durable cords and ropes are suitable. In this case, the fasteners should not pinch the tree as the trunk thickens. If the birdhouse you installed is not occupied by residents, try moving it to another location. This circumstance will probably influence the birds' decision.
Workshops on making bird houses
Drawings, dimensions and photos of assembling a wooden birdhouse with decorations
We invite you to familiarize yourself with the drawings of three options for the most common birdhouses made of wood. Let us repeat that it is better to make them from deciduous wood or use pine boards without knots with resin. If you check the size table, you will find that for starlings and other birds the house may have different dimensions than in the drawings. Next, we describe a diagram for assembling a bird house with a pitched roof, following which you can carry out any of the three projects yourself.
 Here is a drawing of a birdhouse made of boards, which is the simplest. A special feature of this design is the removable lid. In order for it to be securely fixed, a 120x120mm insert is provided, attached to the lid from the inside. If you do not plan to remove the cover, the liner is not needed.
 The gable lid looks more interesting, but the design is a little more complicated. Pay attention to the accuracy of the connection of the roof parts with the side walls. Additional compaction with plasticine, clay or hemp may be required in these places. The design does not provide for a removable cover.
 This drawing shows a design with an inclined removable cover. You should pay attention to the careful execution of inclined cuts of the side walls. We present a master class on assembling a birdhouse in two stages: first we make a birdhouse according to the description, and then we decorate it at our own discretion.
 This is what the finished birdhouse will look like
 Let's consider the sequence of actions step by step:
- To make the birdhouse, I used a pine board with a section of 160x20mm. The knots are very small, so the resin will not interfere with the birds.
- For parts 120mm wide, I cut the board lengthwise to this width. I used a 40mm wide scrap as a pole for attaching the birdhouse.

- I used a square to mark the parts. Otherwise, cracks in the craft cannot be avoided.
- I marked the length of the insert under the lid “in place”, it’s more convenient.
- I carefully marked and made a bevel cut on the front and back walls of the product.
- First, I drilled the tap hole with a feather drill.

- However, I didn’t have a feather drill of the required diameter, so I finished the job with a jigsaw.
- I scratched the inside of the front wall with a hacksaw to make it easier for the birds to get out of the house.

- The result was a set of parts shown in the picture.
- The entrance was cleaned with sandpaper for the convenience of the birds.
- To assemble the house, I drilled holes with a diameter of 2 mm for screws. On long walls, three screws are enough, on short walls, two.
- I fastened the side walls with 3.5x40mm screws; 3.5x35mm screws were used to assemble the lid.

- The result is a birdhouse without cracks or gaps. For those who want to extend the life of the craft with the help of paints and at the same time make a funny birdhouse, we follow further.
- First, let's turn the canopy over the entrance into the visor of an improvised cap. We carry out the markings using a compass.

- The cut along an arc was made with a jigsaw and the sharp edges were treated with emery cloth.

- I also used sandpaper to smooth out all the sharp edges of the craft. For this type of work, it is convenient to wrap the sandpaper around a wooden block.
- Next, I cut out templates for the eyebrows, eyes, lips and ear of the “Cyclops” from paper. I tried them on for a craft project and remade those that didn’t fit the proportions.

- For false ears I used 16mm plywood, for the mouth – 10mm. I pressed the corresponding templates onto the plywood and outlined the outlines with a marker.
- I cut out all the complex shaped parts with a jigsaw.

- The nose has a geometric shape, so I marked it out using a ruler. I cleaned the cut parts with sandpaper.
- I painted the ears, nose and lid of the birdhouse with brown paint in two layers. For the lips I used red color.
- The body of the “Cyclops head” was painted yellow acrylic paint. To mark the whites of the eyes and eyebrows, I attached the corresponding templates to the front wall and outlined them with a marker. I did the eyebrows and eyelashes with a black marker. The white of the eye was painted over with white paint.
- The ears, nose and mouth were secured with screws. I invited a cheerful bird – a fashion model – especially for photography.
New technologies for assembling a birdhouse from cardboard and bottles for women's and children's hands
Not everyone who wants to build a birdhouse with their own hands has the ability to saw boards, drill and drive screws. On the other hand, plastic bottles and cardboard boxes are available to everyone. Both materials are not suitable for creating a bird house.
 We came up with the idea that a wonderful result would be obtained if these available materials were used together: plastic protects from moisture, and corrugated cardboard provides thermal insulation. We bring to your attention an original project of a bird house made from improvised materials, which can be implemented by anyone at home. Look how we did it in the picture.
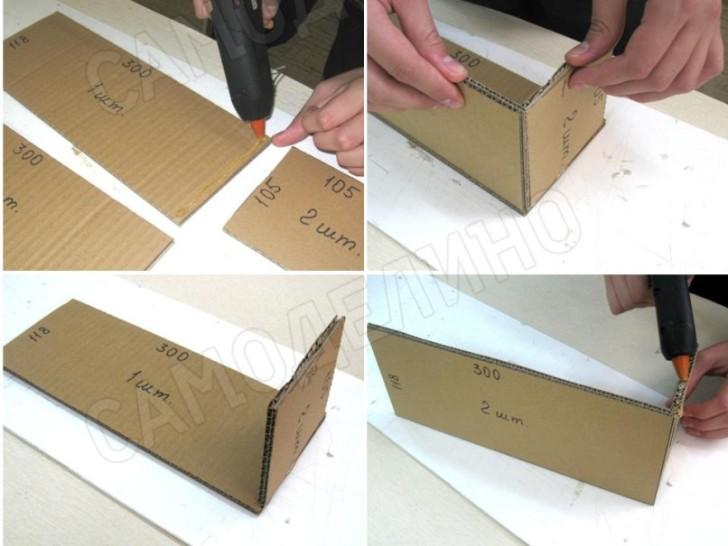
 Here is a presentation of a master class on making an apartment for birds from plastic bottles and corrugated cardboard. In this case, a drawing is not required, since the dimensions are marked on the parts:
- To start, you will need two identical five-liter bottles. We cut one of them from the bottom along the line marked with a marker. The cut is below the protruding part so that the second container can be inserted into the first.

- Corrugated cardboard is best suited two-layer 6mm thick. The marking should be done in a rectangle. We cut the cardboard with a stationery knife using a metal ruler.
- First, we cut out one piece 118x118mm and check how it fits inside the cut container. It is ideal if it clings a little to the walls of the jar. If it passes with a large gap or passes into the container with difficulty, you will have to choose other square sizes. In the case when the size of the bottom and roof is changed or cardboard with a thickness other than 6mm is used, the drawings of the parts will be different. The height of 300mm will not change, the width of the front and rear walls is equal to the size of the bottom and roof, the width of the side wall is equal to the width of the front, minus double the thickness of the cardboard.
- We mark the entrance with a marker in accordance with the image. To obtain a circle, it is convenient to trace the lid of the container with a marker. Cut the hole with a narrow knife.

- We cut out all the details from corrugated cardboard in accordance with the image.

- Using a glue gun, apply glue to the bottom of the back wall.
- We install the bottom liner on the glue. To ensure proper assembly, temporarily install and hold the side wall with your hand. You need to hold the parts until they are fixed with glue.
- The result will be an assembly in the shape of the letter “G”.
- Apply glue to the end of the bottom.
- Apply glue to the edge of the side wall.
- After installing the side wall and the glue has cured, you will have an assembly of three parts.
- Apply glue to the upper parts of the side and back walls.
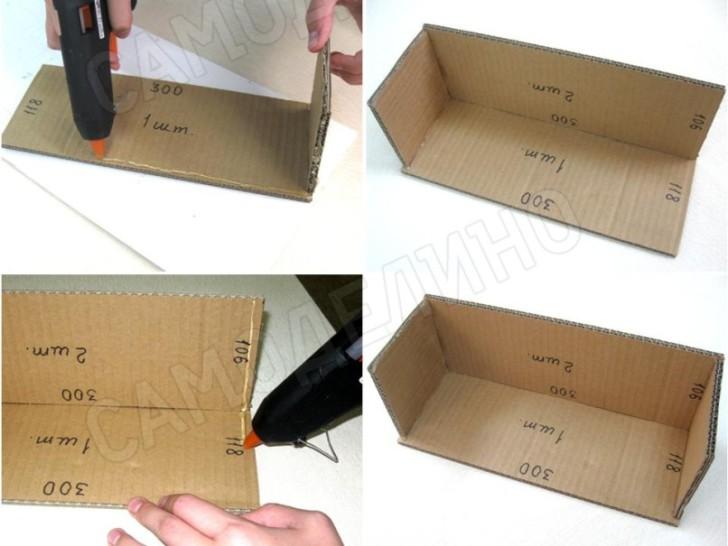
- Once the roof liner is installed and the glue has cured, you will have a four-piece assembly.
- Apply glue for the second side wall.
- We install the second side wall and get a box without a lid.
- Apply glue to the ends of the four parts and install the front wall.

- The base of the craft is ready.
- At the ends of the craft, remove the exposed glue to glue the bottom and roof.
- Apply glue to the four ends of the walls and the bottom liner.
- We install the bottom of the birdhouse.

- Now we have a bird house with an insulated and reinforced bottom.
- This is what the finished cardboard capsule looks like after gluing the roof.

- Carefully insert the cardboard insert into the bottle and mark the tap hole on the bottle with a marker.
- We cut out the tap hole in accordance with the markings.
- We prepare corrugated cardboard parts for insulating the bird house in accordance with the image.

- Everything worked out for us, and the “insulation” is in place.
- We push the parts into place. If they do not fit well, the parts can be trimmed or the cardboard can be crushed at the edges of the long sides.
- After adjusting the size of the second bottle and assembling it, mark the holes for the wire staples on the sides of the birdhouse with a marker. We punch holes at a distance of 20mm so as not to perforate the walls of the product.

- We make two brackets from copper wire with a diameter of 0.5-1 mm in accordance with the holes.
- We move the bottom eggplant down and insert staples into it on both sides. We bend the ends of the staples so that they easily fit into the top bottle.
- We move the lower bottle into place and insert the staples into the holes on the upper bottle.
- We push the bottom part of the plastic container into place.
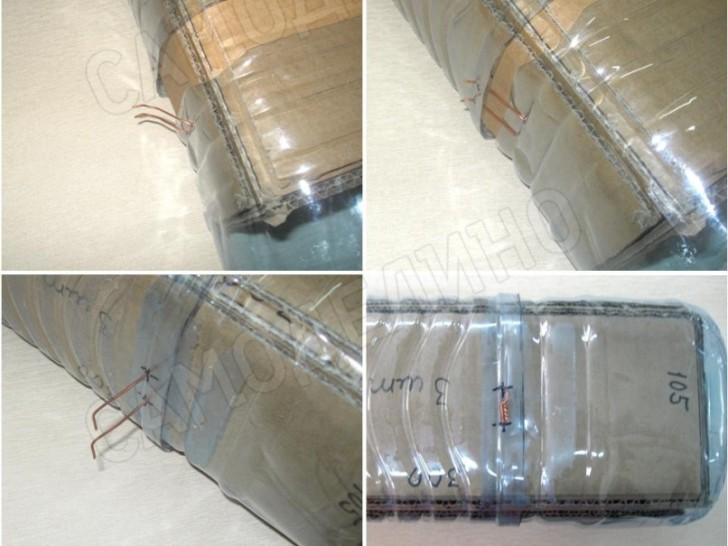
- We twist the wire and bend the twist.

- This is what an almost finished birdhouse looks like. We received impeccable thermal insulation and protection from moisture of the bird house.

- We painted the top of the house with brown paint, and the bottom with yellow paint. The sharp edge of the plastic can injure the bird. We took a piece of corrugation, cut it lengthwise and put it on the edge of the tap hole. You can color the product at your own discretion. The craft resembles a castle tower, so you can create a pattern of battlements from below.
How to make a birdhouse from a log easier
We have already given examples of arranging an original birdhouse made of logs. Birds will definitely like this project, as it resembles a hollow bird familiar to them: it has no cracks and blends in with the surrounding environment. Now let’s look at a master class on assembling such a bird house yourself.
Taking a family of birds under your wing is a noble and pleasant task. And the first step towards this is the construction of a bird house. You can easily make a birdhouse familiar from childhood with your own hands, but for each type of bird there are design and placement features that must be taken into account before inviting new neighbors to the site.
Classic wooden birdhouse
A birdhouse of the simplest design consists of a square bottom with a side of 13-15 cm, side blanks 30-35 cm high with a slope in the upper part are cut end-to-end to the size of the bottom, the end and back parts should be 2-4 cm wider for fastening.

The difference in length between the back and front walls of the birdhouse should be calculated so that the slopes fit tightly to the lid. Another piece is cut to size and attached to the inside of the removable roof, providing a seal and the ability to open the birdhouse for cleaning.

Another option is a house with a pitched roof. Two identical blanks are overlapped on the trapezoidal façade and rear wall. Such a roof should not be nailed tightly to ensure access to annual cleaning and disinfection.

A round entrance hole is made with a distance of 5-6 cm from the top edge and a diameter of 4-5 cm. There should be sufficient space (10-15 cm) for the nest in the lower part of the structure, protected from the wind.
The birdhouse parts are fastened together using nails or self-tapping screws and wood glue.

The roof slopes protect from excess moisture; they should protrude slightly from the sides to protect the walls as well. The joints should fit neatly, without gaps, adjacent to each other. You need to avoid unnecessary decorative elements on the walls and facade, which can become a place for moisture accumulation.

The building material used is boards of pine or deciduous trees with a thickness of 2 to 4 cm. Fibreboard and chipboard are not recommended, since the smells of chemicals contained in their composition can scare away birds.

For the same reason, the internal surfaces of the birdhouse are not treated with varnishes or paints. The outside can be sanded and made into a waterproof coating.


Wooden birdhouses are a good object for realizing creative abilities. They can be painted and decorated, but it is better not to use glass or other light-reflecting materials. Photos of ready-made birdhouses of different styles will help you choose the most suitable option.

Duplyanka
In order to cut a birdhouse from a wooden block, it is more convenient to use a chainsaw. Brief instructions for creating such a birdhouse are as follows.
To begin work, you need to firmly install the deck in a vertical position. The proposed cut is divided into three equal parts: the upper one for the roof slopes, the middle one for the hollow and perch, and the other third for the nest.

First, the upper slopes for the roof are cut at an angle of 45 degrees. Then, as smoothly as possible, the core is removed along its entire height and an entrance hole is cut. And only after this the birdhouse is cut off from the deck along the bottom line.

Bird houses made from scrap materials
Boots, bags, lamp shades, similar-sized containers with necks, dried pumpkin - can become building material for a bird house.

Before you make a birdhouse with your own hands, you need to remember to maintain the correct proportions to accommodate the nest.


You also need to take into account that the entrance hole should allow the inhabitants to pass through, but not be too large, for the sake of their safety. A homemade house should provide protection from moisture and wind.

Birdhouse installation
The ideal place for a birdhouse is a tree trunk free from branches. A wooden beam or pole of triple length is attached to the back wall, which is fixed by wrapping it with wire.

Then you need to give the birdhouse a slight forward tilt using a small piece of wood placed between the trunk and the house. This will protect the chicks from falling and make it difficult for enemies (cats and crows) to get to them. The entrance, and as it is also called, the entrance, should face south or southeast to avoid cold winds.

Another option is to attach it to the facade of buildings. But you should not hang or place the house on the branches; it must be stable and securely fastened. For comfortable living, you also need shade to protect from direct sunlight. 
The bird house must be mounted at a height of 2.5 to 5 meters, out of the reach of cats and other hunters. It is worth taking care that there are no steps or branches that will help them get to the nest.

Often, a traditional perch in low-mounted birdhouses becomes a support for unwanted guests to enter. 
Photo of a birdhouse with your own hands


When the house for the owners of the site is built, it’s time to think about the other inhabitants of the surrounding area. Our helpers, birds, also need housing. What it will be depends on the type of birds that need to be attracted to the garden.
"Building standards" for a birdhouse
When choosing housing, birds are guided not by the beauty and elegance of the structure, but by its safety and functionality. Birds are guaranteed to settle in the garden if a number of conditions are met:
- the birdhouse is made of hardwood;
- the thickness of the walls of the house is at least 2 cm;
- During assembly, no glue or materials based on it were used: plywood, fiberboard, OSB.
Fresh wood coniferous trees unsuitable because it releases a resin that glues the feathers together. In addition, birds do not accept strong odors, so instead of glue, nails or screws are used to hold parts together.
You can make a birdhouse from an old pine board without resin pockets
The parameters of the house determine which species of birds will choose it. Most birds recognize their future home by the size of the entrance hole. Taphole diameter:
- for starlings - 4.5–5 cm;
- for redstarts - 3.5 cm;
- for tits - 2.8–3.5 cm.
If you cut the entrance too wide, the nest will be easily accessible to predators. There is also a high chance that squirrels or large birds will settle there.
Squirrels are funny neighbors if the owners of the property don’t mind treating them to their berries and nuts
Try not to exceed standard sizes birdhouse:
- height - 30–35 cm;
- bottom inside - 12–17 cm.
Otherwise, the birds will hatch too many chicks, some of which will die due to underfeeding. Let the parents better raise 2-3 healthy cubs.
Birdhouses are home to not only starlings, but also sparrows, flycatchers, swifts, all types of tits and redstarts.
Every bird has a favorite house design
It is not necessary to make a perch on the birdhouse. Magpies can sit on it and destroy the nest. The thresholds on the house also do not attract birds. Due to the structure of their paws, it is uncomfortable for them to stand on a plane.
Birds do not need thresholds on birdhouses
Gallery: drawings and diagrams of birdhouses
Restless sparrows are the most common inhabitants of gardens A birdhouse with a flat roof can be made in a few hours A birdhouse with a raised roof is not the safest option for birds A house with a bottom of 12x12 cm is suitable for tits  A birdhouse with a hole diameter of 3 to 4 cm is suitable for the smallest birds. After cutting out the birdhouse parts, sand the cut areas. The simplest birdhouse for redstarts is with a square hole. Wagtails and flycatchers often nest in houses with a hole the full width of the wall.
Birdhouse decoration
The less attention the home attracts, the better for the birds. It is advisable not to paint it or add bright details. A house made of untreated wood is the best option. As a last resort, use odorless paint to match the color of tree bark - gray, brown or dark burgundy.
Birdhouses made of thin plywood that are too brightly colored are used only for decorative purposes - to decorate the garden, birds are unlikely to settle in them
Another thing is decor natural materials. Pieces of bark, twigs, and moss will decorate and camouflage the nesting area.
Bark and branches hide the home from the watchful eye of predators
Gallery: birdhouse decor
A birdhouse decorated with pebbles may scare away birds due to glare  Small tree cuts decorate the house and do not irritate the birds
  A birdhouse in the shape of Baba Yaga's house will decorate any tree. Wine corks will additionally insulate the walls of the house. The gift birdhouse is covered with carvings. Birds are unlikely to live in a birdhouse made of branches due to the numerous cracks. By gluing the planks onto a birdhouse painted white, we get a half-timbered house
  By gluing the birdhouse with saw cuts, the cracks are sealed with moss. You can stylize the birdhouse as a country house. When making a birdhouse with children, draw cartoon characters on the walls. The birdhouse is often stylized as a fairy-tale house. An interesting solution is to use a perch instead water tap Sometimes bird houses are made in the form of animal heads
  The decor in the form of a tree trunk on the facade really decorates the birdhouse. Garden designers have figured out how to combine a flowerpot and a birdhouse. If you don’t know how to draw, draw a birdhouse with lines using a ruler and paint it
Birdhouse made of wooden planks with a flat roof
Spring is coming soon again and my husband and I decided to make the right birdhouse for our winged friends. Our last house was chosen by squirrels and turned into a nut warehouse; it turned out to be too big for the birds.
Now the choice fell on the simplest design of a birdhouse with a pitched roof.
Tools:
- hammer;
- screwdriver;
- drill and drill bits;
- jigsaw or saw.
Materials:
- meter board 10 cm wide - 1 pc.;
- meter board 15 cm wide - 1 pc.;
- nails and screws.
Step by step instructions:
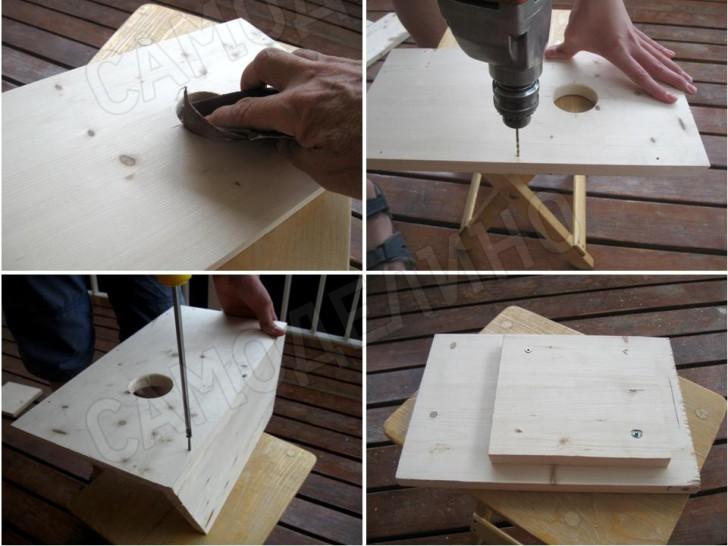
1. Mark the boards according to the drawing.
The drawing is needed so that all the details of the birdhouse fit together
2. We cut out all the parts except the bottom and the roof tenon. Using a chisel, we make notches on the inside of the facade so that the chicks can climb to the exit.
When cutting the board, press it firmly against the surface so that it vibrates less
3. We get 2 sides of the birdhouse measuring 10x30 cm, the front and back - 15x30 cm, the roof - 15x25 cm. We deliberately increase the roof overhang to protect from predators.
There is no need to sand the surfaces of the boards
4. On the front wall, with a pencil and a ruler, we mark an entrance with a diameter of 3 to 5 cm, depending on the type of birds expected in the garden.
Measure the middle of the bottom and sides of the facade, draw lines and mark the entrance at their intersection
5. Drill a hole inside the tap hole circle.
First, a hole for the jigsaw knife is drilled in the facade
6. We insert a jigsaw knife into it and cut out the tap hole.
Move the jigsaw slowly to prevent the knife from flying off
7. We hammer nails into the outer walls at the fastening points so that the points stick out a little.
If you hammer the nails in early, they are less likely to bend.
8. We assemble the body from the 4 walls of the birdhouse in the following order: facade, side walls, back.
The nails are hammered into the walls slowly so as not to bend
9. Take a board 10 cm wide, apply it to the place where the bottom of the birdhouse will be and mark the cut line. We do the same with the roof spike.
Do not cut out the bottom in advance, first assemble the body and measure the actual dimensions
10. Saw off the listed parts. We insert the bottom into the body and fix it with nails.
11. We nail the tenon to the roof from the back side.
The roof spike protects the birdhouse from precipitation getting inside
12. Place the roof so that a canopy is formed over the entrance. We drill holes for the screws and screw the roof on.
After a year, the roof can be unscrewed to clean the birdhouse
13. The birdhouse is ready.
A birdhouse made from untreated boards will merge with the tree bark and will not attract the attention of predators
Master class on making a birdhouse - video
Duplyanka
Birds include birdhouses made of logs into the category of luxury housing. To make a nest box, the middle of a log 30–50 cm long and 30–35 cm in diameter is hollowed out using a chisel. After drilling the tap hole, boards or saw cuts are nailed to the bottom and top of the body.
Starlings and tits happily settle in nest boxes
Making a nest - video
Birdhouse made of plywood with a gable roof
If you have scraps of moisture-resistant wood-laminated board, you can make a birdhouse from it. However, due to toxic fumes from plywood, most likely, the house will only be a decoration in the garden.
Tools:
- screwdriver;
- drill;
- the drill is slightly smaller than the diameter of the screws;
- core drill with a diameter of 50 mm;
- saw or jigsaw.
Materials:
- plywood;
- self-tapping screws
Step by step instructions:
1. Draw a drawing.
A birdhouse with a gable roof is still better made from boards
2. Mark the plywood and cut it.
3. Drill a taphole hole on the façade using a crown. Drill a hole for the perch 4 cm below it. Make holes for self-tapping screws on all parts.
The house is assembled in the following sequence: facade, side walls, bottom, back wall, roof, perch, plank
4. Assemble the case without the back wall.
5. Place the structure with the tap hole down, install the bottom and back wall, and fasten it together.
6. Assemble the roof.
Holes for self-tapping screws are drilled in advance so as not to split the plywood when screwing them in
7. Insert a perch on the facade.
8. If desired, glue the decor and paint.
Birdhouses are painted with odorless products
How to make a birdhouse with a gable roof - video
Gallery: interesting birdhouse ideas
Any birdhouse will be transformed if you cover the roof with tiles. A birdhouse in the form of a barn with a sloping roof will decorate the lawn if you install it on a pole. Making multi-apartment housing for birds is a great temptation, but they will not be able to live together. Old license plates often cover roofs abroad. A birdhouse looks stylish with an irregularly shaped roof Eco-friendly tiles for a birdhouse can be made from wood The shape of the birdhouse does not have to be strictly rectangular Birds love round houses, as they follow the shape of the nest To make an unusual birdhouse, change the shape of the roof Modern birdhouses have strict geometric shapes It cannot be guaranteed that in two families will live in a double birdhouse Birdhouses with a gable roof leak, so it’s better to cover the ridge with tin A plot with a modern house will be decorated with a birdhouse with a sharp roof You can try to scare away cats by placing a plywood specimen on the birdhouse An unusual solution - a roof made of two cuts A rectangular entrance is also suitable for birds Sometimes decorative birdhouses are shaped like “dancing” houses  A modern birdhouse can be very convenient for birds. A wicker birdhouse is very beautiful, but cold due to the cracks
Where and how to hang a birdhouse
The bird house is placed on a tree with a slight forward tilt to make it convenient for the chicks to get out of the nest. The entrance is oriented to the south side so that cold winds do not blow inside. The hanging height is not lower than 4 m above the ground. To prevent cats from getting to the chicks, increase the roof overhang by 5 cm from that indicated in the drawings.
Birds need to be protected from their natural enemies - cats
To protect against feathered predators:
- cover the entrance with tin;
- do not mount a perch on the birdhouse;
- make an entrance under the roof itself.
A long overhang and the absence of a perch are necessary protection measures against predators
To properly secure the birdhouse to the support, strips are screwed to the back wall. For them, the house is tied to the trunk with wire or synthetic cord.
To prevent the harness from growing into the bark, a wooden or rubber pad is placed under it.
You should not nail a birdhouse to a living tree. This causes great harm to it, especially during sap flow.
Pieces of pipe are driven into the ground, into which a pole with a birdhouse is placed
If you decide to place a birdhouse on the roof of your house, do it with an eye on the cats. Attach the bird's "cottage" to a two-meter pin covered with tin. But best place- under the eaves of the roof, perhaps under the ridge. Screw in a screw there and screw a metal eyelet to the house. There should be no objects around that the cat can get caught on.
For fastening strength, the metal eye for the birdhouse should have a pear-shaped cutout
There should be an open space in front of the birdhouse for birds to fly. Only tits love houses hidden deep in the tree crown. Usually they hang 1 birdhouse per 10 m2 of garden. If you place them more often, they will be empty.
Do not hang more than one birdhouse on a tree, the birds will conflict
Decorative birdhouse made from a plastic bottle
Birds very rarely nest in houses made of artificial materials. So-called birdhouses made from plastic bottles are used only for decorating the garden and feeding birds.
Materials:
- five-liter plastic bottle - 3 pcs.;
- strip of burlap;
- perch;
- glue;
- paints;
- leg-split;
- branches.
Tools:
- knife and scissors;
- marker;
- brush.
Step by step instructions:
1. Cut a tap hole at the top of the bottle.
The entrance can be easily cut with sharp scissors
2. Cover the area under the tap hole on the inside of the bottle with burlap.
The burlap is needed to make it easier for the birds to get out of the bottle.
3. Under the taphole, 4 cm, make a cross-shaped cut for the perch.
4. Cut out the template for the tiles in the form of a trapezoid. Attach it to a two-liter bottle, outline it with a marker and cut it.
To cut out tiles, it is better to use bottles with a smooth surface; they are easier to glue.
5. Glue the tiles at the top of the house in rows from bottom to top. You will need 3 rows.
In order not to wait a long time for each row of tiles to dry, you can use a heat gun
6. Paint the house: the roof is brown, the walls are white.
7. Cover the bottom of the birdhouse and the space around the entrance with twigs. Insert the perch.
 Share with your friends!