Bindings are an important element of ski equipment. As a rule, the installation of bindings is done by the store, but some skiers prefer to do it themselves. Let's find out how they succeed.
Types of ski bindings
There are three types of ski bindings:
- Hard (welt) – Nordic Norm 75 mm.
- Semi-rigid – straps, elastic bands and buckles.
- System:
- SNS Salomon
- NN Rotofella
Since the first two types are gradually going out of use due to their total imperfection and moral obsolescence, there is no need to talk about them. It is much more interesting to talk about system fastenings.
It is worth noting that if a skier decides to install the NN 75mm, the installation instructions below will suit him.
Systems from Salomon and Rotofella
These fastening systems have a different number of longitudinal components, functionality and boot stabilization indicators, and are also available in various modifications. They are great for cross-country skis, the most common type in skiing.
- Rotofella system NNN appeared a little later than NN 75mm. The boots are fastened and stabilized here thanks to two longitudinal guides. The functionality of these mounts is not inferior to NN.
- In the Salomon SNS system Only one hinge mount is used. Due to the peculiarities of the sole of the boots designed for such bindings, the athlete can control the ski while performing any move. This is the most modern version ski bindings.
There are no significant disadvantages or advantages between these systems. They are more convenient, more practical and more modern than their predecessors, so they cost a little more.

How to install bindings on cross-country skis yourself
To install the fasteners, you will first need the following equipment:
- Cross-country skis and bindings for them;
- A paper template for marking or a jig;
- Screwdriver (cross bit + drills 3.4 – 3.6 mm);
- Marker;
- PVA glue;
- Ruler;
- Awl.
Installation instructions
Installation of ski bindings occurs in several stages.
Step 1: Center of Gravity
The first step is to determine the center of gravity of the skis. To do this, the ski is placed on the edge of the ruler and moved along this surface until the skis freeze, like balanced scales, parallel to the floor.
The center balance lines must be marked with a marker. The marked line will coincide with the axis of fastening the bracket.
Step 2: Marking
The next step is to mark the holes on the ski area. This action is carried out using a paper template, which is usually supplied with the fasteners. If you don’t have it on hand, it doesn’t matter, you can download it from the Internet, or mark the ski using an awl, attaching the assembled mount so that the center of gravity coincides with the axis of fixation of the shoe.

In this case, in the NNN system the holes are located in front of the axis of the center of gravity, and in the SNS the axis lies directly under the mount. For professional marking, a conductor is used.
Step 3: Drilling Holes
Before drilling, you should check the distance between the holes located on the mount with the distance between the points marked during marking.
Holes for Rottefella are drilled with a drill with a diameter of 3.4 mm, and for Salomon - 3.6 mm. The depth of the holes is 10 mm. Drilling is performed at medium speed with light pressure. To ensure reliable fixation, the finished holes are blown and then filled with glue.
Step 5: Assembly
Now that the holes are ready, you need to attach the fasteners and tighten the screws tightly. After which the ski is left to dry (about 10-12 hours).
The cross-country skis are now ready for use. As you can see, there is nothing difficult about this. The main thing is to be careful and attentive, as well as to have all the necessary tools.
Ski bindings- the most important elements of an athlete’s equipment, on which his safety will depend. It is very important to install them correctly. This can be done either with your own hands or in a workshop. This article provides information about the main types, provides instructions on how to remove bindings from skis, and how to install bindings on skis yourself.
According to design and purpose, there are 4 types:
- Soft.
- Tough.
- Semi-rigid.
- Mountain.
Soft (simple) is a loop made of leather or fabric into which the foot is placed in ordinary shoes - a boot or felt boot. Sometimes, for a more secure fit, an additional strap is used that wraps around the heel. Such loops are usually installed on skis for children or on hunting skis.
Semi-rigid consists of metal cheeks, a sling that holds the boot on top and a strap that wraps around the heel. Previously, they were part of the winter equipment of military personnel. Currently, they are often installed on children's models.
Semi-rigid ones come in three types: cable, spring, and with swinging cheeks. The third type is the most convenient. Unlike the first two, they do not damage shoes, are reliable, and are easy to fasten and unfasten. Well suited for long hiking trips. They do not require special shoes, but they fix the boot much more rigidly than simple ones.
The most popular are the hard ones. There are three systems of this type:
- Nordic Norm 75 (NN 75).
- Salomon Nordic System (SNS).
- New Nordic Norm (NNN).
Nordic 75 is a design that is a welt system with a spring-loaded shackle and a locking mechanism. The boot has 3 or 4 holes on the sole, with which it is installed on protruding rods. Then the edging of the boot is pressed with a metal arch. The NN 75 is usually mounted on wooden cross-country skis.
Since this design does not fix the heel at all, it cannot be used for skating.
NNN and SNS are the most common designs designed for plastic cross-country models and roller skis. They have various models and modifications designed for any level - from amateurs to world-class athletes. Installing SNS and NNN ski bindings yourself will not take much time. The difference between these types is the number of longitudinal guides for fixing the boot.
Both systems can be of three types:
- Mechanical.
- "Machine".
- "Semi-automatic."
New Nordic Norm was developed by Roteffella. Due to the fact that the front bracket is moved back, this design is more suitable for skating.
The device is a plate with a double profile that holds the sole. Fixation is carried out using a transverse rod. The boot rests against a rubber stop. The rigidity of the stop determines the rigidity of the entire structure. The stops are painted in different colors (white, green, black, red), which determine the degree of rigidity.
There are several upgrades to NNN. One of them is NIS (Nordic Integrated System). It is characterized by ease of installation and the ability to move the boot along the longitudinal axis.
Salomon Nordic System was developed by Salomon. This device has only one guide. In the front part there is a rubber stop, the rigidity of which can also vary. There are two main types:
- SNS Profile
This type is universal. It can be used for both skating and classic skating. - SNS Pilot
Usually used for skating.
Alpine ski boots differ from other types in that they completely fix the shoes and are also able to come off when the athlete falls.
There are 4 main types:
- Alpain.
Suitable for skiing on prepared trails. - Frame.
The front part is connected to the back using a frame. Allows you to fully secure your foot on the descent and unfasten the heel for going uphill. - Pins.
The boot is secured using 4 pins. - Telemark.
Frame and pin ones are suitable for both skiing on prepared trails and freeride.
Installation instructions
For installation you will need the following tools and materials: marker, screwdriver, drills, ruler, glue, awl.
Center of gravity
Installation of all structures begins with determining the balance line. The leading edge of the shoe should be on it. Sometimes the center of gravity is already marked by the manufacturer, but it is better to determine it yourself. To find it, you need to place the ski on a narrow object and move it until it reaches an equilibrium position. The balance line should be noted. This line will be the axis of the bracket for NNN and SNS type devices. For NN 75 it will determine where to install the screws.
Marking
Marking can be done using a special conductor, or, if it is not available, using a paper template.
Be sure to check the correctness of the markings by measuring the distances between the marks. In NNN systems, the fastener is located closer to the front end relative to the balance line, and in SNS systems directly on the line.
Drilling holes
It is recommended that you follow the instructions included with the kit to determine the required hole diameter and depth. For SNS and NNN systems, holes are usually drilled to 10 mm. You need to remove dust from the finished holes, then fill them with glue. This will provide more reliable fixation screws.
Assembly
After this, the device should be applied to the marked holes and begin to tighten the screws evenly. Care must be taken not to displace it relative to the longitudinal axis. For NN 75, it is recommended to check the alignment accuracy before screwing. You can go out on the track after 12 hours, when the glue has dried.
If you need to install old fasteners on new equipment, it will not be difficult to remove them. Disassembly should begin from the rear. First you need to carefully remove the plug from the screw and unscrew it. Then remove the bar and unscrew the two bolts underneath it. The last bolt is also located under the plug.
How to install a mount on skis of mountain modifications?
Installing bindings on such skis is practically no different from installing them on cross-country skis. This work is performed in several simple steps.
First, the center of gravity is found as described above. Then you need to lay the fastener so that its leading edge exactly matches the balance line, place the boot in the clamp and align it. After this, you should carefully mark the holes with a pencil or awl and drill them. Then attach the front part with screws. The back part is installed in the middle position and the holes are marked. Holes are drilled and the back is secured with screws. The installation ends with configuration.
Recently, some models have been released with advance installed platforms, on which it is easy to install latches without fixing them with self-tapping screws. This makes it possible to reinstall for a different shoe size, as well as the possibility of displacement along the longitudinal axis.
The choice of bindings depends on the skiing style, as well as on the level of preparedness of the skier. It is recommended to buy products from trusted well-known companies such as Salomon, Fisher, Atomic. The products of these manufacturers are reliable and high quality.
), all that remains is to install the fastenings and train. The installation process is simple, but requires some skill. Therefore, we recommend contacting service center, where professionals will install fastenings quickly and efficiently. If you still want to do it yourself, then let's start.
Installing bindings on roller skis is practically no different from installing bindings on skis. To install bindings on roller skis you need the same set of tools as for installing on regular skis:
1. Special jig or template for installing fasteners
Conductors under various systems mounts are different, be sure to pay attention to this (SNS and NNN). The jig for installing mounts on roller skis is shorter than for installing skis.

2. Drill for installing fasteners
On sale you can find special drills with a stop, for example Rottefella 3.7 mm drills for skis and 4.1 mm for metal roller skis. If you don’t have a special drill, then a regular metal drill will do. Many sources recommend installing fasteners with a 4 mm drill, but from experience we recommend 4.5 mm. Screws fit into such holes more easily and hold tightly. If there is only a standard Rottefella 3.7 or 4.1 mm, then it is better to widen the holes by placing the drill at an angle. You can lubricate the screw with any household grease or machine oil; some recommend using ski grip wax. Otherwise, it will be very difficult to screw in the screw.
Please note that NIS platforms come with screws larger size and it is better to drill 5 mm holes for them.

3. Screwdriver and screwdriver for tightening

On the left is the PH standard, on the right – PZ

1. Unlike skis, you don’t need to look for balance on roller skates. The mounts are placed so that the heel of the boot is close to the mudguard of the rear wheel.

2. We attach the fasteners to the frame of the roller skate and mark the front hole or axis of the boot. If it is more convenient, you can mark the hole for the heel and set the template along it.
3. Install the jig according to the markings and drill the required holes.
4. Screw in the mount. The screws go into the metal very tightly - this is normal..
Advice:
On the bindings it is better to change the flexor to Hard, and on the SNS pilot increase the spring force so that the roller does not sag too much from the heel of the boot.

For the winter season 06/07, Salomon has prepared a number of new products.
The main and most interesting innovation is the appearance of new bindings for classic skiing, and the updating of the Pilot line of bindings for cross-country skis.
Salomon ski bindings
Classic fastenings.
The bindings are the next step forward in binding technology for the classic ride. The mounting mechanism for the classic ride is based on the existing platform Pilot. This made the fastening more effective and stable. You can have better control of your ski during long rental periods.
"For me, the SNS Pilot Classic bindings give me a better, harder kick. It creates a real cohesion between the boots, bindings and skis. The whole system gives me more stability and control. I have more power transmission. All of my energy is used efficiently. If I have one thing to say: The best kick ever!"
("The SNS Pilot Classic bindings give me the best, tightest push. They create a true connection between boot, binding and ski. Overall the system gives me more stability and control. I transfer more energy. And all my energy is used efficiently. In short: Every push is better!")
Anders Aukland, Norway.

 2 axes with flexible connection.
An additional axis on a flexible link provides greater amplitude, better push transmission and better control.

Setup.
The new system has the ability to adjust the spring stiffness to suit a specific skier and terrain.

Low weight.
The design of the fastenings allowed us to reduce the weight to 260 grams per pair.

 New lid shape.
The mounting cover has a new design.
Skate SNS mounts Pilot Skate.
The skating mounts also changed their design, retaining all best qualities SNS Pilot Skate bindings.
"With the SNS PILOT Euqipe Skate, I have more control and power transmission. The Salomon PILOT 2 ax technology really uses all my energy. It is best system I have found for skating that allows me to win."
("With the Euqipe Skate's SNS PILOT bindings, I have more control over the energy I transfer. Salomon's two-axis PILOT technology truly harnesses all my energy. This best system, which I found for skating, and which helps me win")
Mathias Fredriksson, Sweden
Basic concepts of SNS Pilot Skate bindings.
 2 rigid metal axles.
The 2-axle binding design provides enough torsional rigidity to transfer energy to the ski's edge.
 Profile along the entire length of the boot.
The high profile holds the boot along the entire length of the sole.
Types of Salomon ski bindings.
Salomon produces 3 lines of ski bindings:
- - bindings for racing skis used in elite sports.
- - wide range of ski bindings. SNS Profil bindings can be used from cross-country skiing competitions to light ski trips.
- SNS X-ADV- specialized ski bindings designed for ski trips.
Classic bindings for top level athletes Flexor adjustable - 85-105 Weight 260 g/pair Opening mechanism - manual |
|
Skating bindings for top level athletes Flexor - 115 Weight 320 g/pair |
|
Skating bindings for top level athletes Flexor - 115 Weight 320 g/pair Opening mechanism - manual |
|
Classic bindings for athletes high level tested at World Cup level competitions Flexor - 85 Weight 254 g/pair Opening mechanism - manual |
|
| SNS PROFIL EQUIPE SKATE Free-wheel bindings for athletes and people leading an active lifestyle who often ski Flexor - 115 Weight 254 g/pair Opening mechanism - manual |
|
Combined bindings can be used for both classic and free riding styles. Flexor - 105 Weight 242 g/pair Opening mechanism - manual |
|
 |
SNS PROFIL AUTO MEN / WOMEN / UNIVERSAL PM12 Ski bindings for recreational skiing with automatic opening system Flexor - 105 / 95 / 100 Weight 284 / 274 / 284 g/pair |
Junior mounting model designed specifically for young athletes Flexor - junior stiffness Weight 246 g/pair Opening mechanism - manual |
|
Junior bindings for recreational skiing with automatic opening system Flexor - junior stiffness Weight 266 g/pair Opening mechanism - automatic |
|
Children's bindings with an unusual, fun design Flexor - children's rigidity Weight 184 g/pair Opening mechanism - a special mechanism that a child can open independently |
|
Abstract. Detailed description of installing bindings on cross-country skis. Video at the end of the note. You can download a markup template for installation.
It so happened that my old ski boots with 75 bindings broke. Naturally, I wanted to move to a new level of progress and install modern ski bindings. And then my son had some good extra Salomon boots for SNS bindings. I didn’t have to worry about choosing fasteners and they were purchased for 800 rubles. The exact name is Salomon SNS PROFIL AUTO MEN.
These bindings are marketed as: “Comfortable touring bindings with flex characteristics targeted at male skiers.” Just what the coach ordered.
Because I remembered that I had drills, a drill, an awl and a screwdriver at home, so I politely refused the offer to install the fasteners in the store. Moreover, the box contained instructions in 10 languages.
We install ski bindings ourselves.
At home, when I started studying the instructions, I discovered an interesting point:
Installation of fasteners.
“Your bindings must be properly installed on your skis by a certified technician at an Authorized Salomon Dealer shop or service center in accordance with the instructions and recommendations in the latest edition of the Salomon Cross Country Ski Technical Manual. Failure to follow this rule increases your risk of injury while riding.“.
That's it, not a word more about installation. I also read from this manual useful advice that when fastening on uneven terrain, you should tie the ski to your right or left leg to avoid losing it. By the way, very wise.
The remaining points, as usual, are complete reinsurance of the manufacturer from various legal claims spoiled Western consumer.
Based on the lack of that same manual, I had to remember my carpentry and plumbing skills from labor lessons and install the fasteners myself. Who worked hard at school and then managed to consolidate the skills of marking, drilling and driving screws in everyday life, he must cope.
Here is a set of tools that we will need. You can use a Phillips screwdriver to drive screws. But it’s much better to have a special PZ3 bit that costs 35-40 rubles. The bit has a blunt tip and fits tightly into the cross of the screw. When driving screws with a regular Phillips screwdriver, you need to press it firmly so that it does not slip.

The RZ3 bit will make it easier to drive screws
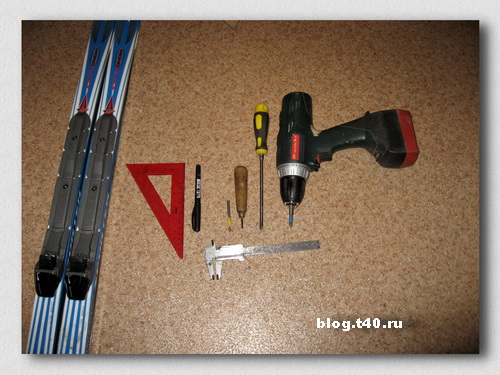
Tool kit for self-installation of fasteners
Our main task is to establish the axis of attaching the boot to the ski strictly at the center of gravity of the ski. Professionals can move the mounts to one side or another from the CG. Fans of Sunday ski trips have no need for such troubles.
First of all, I dismantled the old 75 mounts. There were three holes left from them, which did not interfere with the installation of SNS mounts.

Find the center of gravity of the ski. To do this, we use the thrust bearing from the fasteners themselves. After several unsuccessful attempts, this center will be found. We make a line with a felt-tip pen.

Using a square, we draw a perpendicular to the side edge of the ski.
Above this line there should be a rod that is on the sole of the shoe.

Draw a perpendicular through the center of gravity
We apply the mount so that the clamping point of the boot shaft is above the center of gravity of the ski and carefully use an awl to prick the center of the front hole. We do this maneuver very carefully. One day, I was installing a mount and drilling three holes at once. As a result of inaccurate drilling, the heel of the boot was slightly shifted from the center of gravity and nothing could be corrected.

So now, I decided to drill the front hole in the center first. Screw the mount onto one screw, try on the thrust bearing and then mark the other two holes.
The front hole should be located strictly along the centerline of the ski and at a distance of 35 mm from the center of gravity. I found this out later, having found this markup template from Salamon on the Internet.
We select a drill. We take the screw from the kit and use a caliper to measure the diameter of the screw shaft.

This is the drill you need to use to drill the hole. There are tips to drill with a 3.6 mm drill. http://www.skiline.ru/sport-technology/169-ski-binding-mounting. But it's somehow risky. Too much tension in the hole can lead to cracking of the ski. According to classical carpentry canons, the diameter of the hole should be equal to the diameter of the screw rod. I decided to go 50/50 and drilled with a 3.8 mm drill. In order not to drill through the ski, we place an emphasis on the drill using insulating tape.

You should first make sure that the length of the screw is not too long and it will not come out from the sliding side of the ski.
We drill a hole, trying very hard to keep the drill perpendicular to the ski. Here a screwdriver or electric drill is preferable to a hand drill.
When drilling, do not press too hard on the drill. We remember that a ski is a layer cake and its filling is not very strong.
We place the mount on the first screw. We apply a thrust bearing. Carefully align the mount. Holding the front part, remove the thrust bearing and mark two other holes.
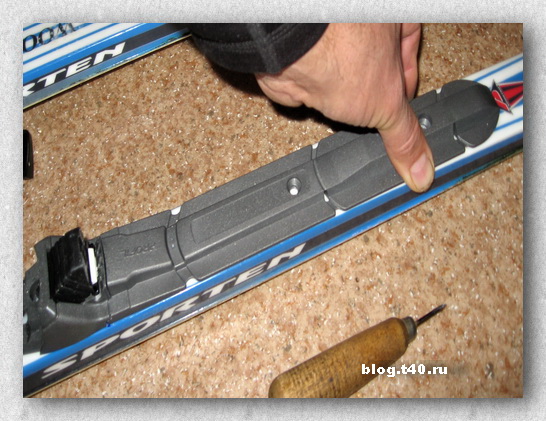
Do not snap the front mounting bracket. The front screw is located under it. The fasteners are in the box with the bracket not latched. As a rule, everyone starts turning the mount and snaps the bracket.
If the bracket is accidentally snapped, then we do this. We insert one screwdriver with a rod diameter of 4 mm into the groove where the boot rod is inserted, and with the second screwdriver we carefully pry the bracket up. It is better to remove it and put it aside until the end of installation.
I install the screws without glue. The tension in the hole is very good and in my opinion there is no need for glue.
We do the same with the second ski.
The process of installing the ski binding is shown in more detail and in dynamics in the video. Here I installed SALOMON mounts SNS SKATE for skating on new skis.