Installation and adjustment of bindings on alpine skis is often performed by specialists who know how to do it correctly. But, if you wish, you can carry out the preparation yourself. To do this, you need to approach the process with full responsibility, without violating safety rules.
To install the fasteners yourself, preliminary preparation is required. Need to:
1. Take into account the parameters of the skier for whom you need to prepare equipment;
2. Stock up on the necessary tools:
- the skis themselves, bindings for them, as well as ski shoes;
- roulette;
- screwdriver;
- screwdriver;
- pencil or marker;
- drill;
- screws.
Installation stages and types
The bindings are a lever through which the foot transmits a command to the ski. Their second function is to ensure safety for the feet. In situations where there is a high probability of injury, the bindings free the foot from the ski.
- The design of the fasteners consists of a front head and a rear heel. Each of these parts allows you to adjust the actuation forces;
- The actuation force should be understood as the maximum load indicator. Once it is reached, the fastener is triggered and opens, freeing the leg. The scale on the mounts helps you set this indicator;
- The higher the scale division, the greater the load required to operate;
- The presence of brakes on the bindings prevents the skis from rolling far if they come unfastened;
- Manufacturers often sell skis with rails on them. This allows both fasteners to be moved and adjusted.

There are two types of installation of fasteners:
- Using drilling;
- Using already built-in special rails or platforms.
Let's talk about each method in more detail.
Using drilling
Installing fasteners using drilling is when fasteners are mounted with screws. The advantages of this type are:
- Possibility to choose any equipment to your liking;
- Installation without gaps or backlash. Thanks to this, ski control is as precise as possible.
Disadvantages of this type of installation:
- Availability of tools for installation;
- Experience and skills in this type of work;
- Inability to use skis if the difference in boot length exceeds 2 cm.
Important: When reinstalling fasteners using drilling, the number of screw holes in the ski increases. This has a bad effect on the durability of the equipment. Reinstallation using this method is not recommended.

The installation process itself consists of several stages:
- The first step is to determine the center of gravity of the ski. To do this, you can install it on a small hill and find the point at which it balances. Mark this place with a marker;
- All mechanisms are accompanied by instructions when sold. If it is not there, then you should take into account that for classic skis the top point of the foot should be at the previously found mark. If the skis are skating, then 8–15 mm closer to the nose;
- The pin location (top point) is where the hinge attaches;
- Then the fastener is shifted so that it is on the longitudinal axis of symmetry of the ski;
- Now you can drill the front part of the fastener onto the center screw. If there are guides, then you need to center them together.
If not, then a shoe is inserted into the installed element and also installed in the center. This will help determine the correct heel position. Now the boot can be removed and the necessary holes can be made for the remaining fasteners;
- When using a rigid fastening, the heel of the boot should cover the heel pad by 10–15 mm. System bindings (with rails) require an installation where the boot is completely on the rail.
Use of already built-in special rails or platforms
Installing mounts using built-in rails or platforms greatly simplifies the entire process and has the following advantages:
- The simplest possible installation and adjustment of ski bindings, without resorting to the help of specialists and without using tools;
- Opportunity self-adjustment ski bindings for boots of a different size or manufacturer;
- Possibility to shift the center of the boot.

The disadvantages include:
- Mounting choices are limited (since it's already integrated);
- All such fastenings give a small gap over time, which affects the accuracy of ski control;
- Increasing the weight of sports equipment in general. This is an obstacle to performing some elements, especially for experienced skiers.
Rules for setting up the mount
After installing the fasteners, they need to be adjusted. This is done for comfort and safety. Proper adjustment of alpine ski bindings allows you to:
- Take into account the skier’s parameters: weight, foot size;
- Confidently hold and maneuver while riding;
- Consider the load placed on your legs and ensure their safety.
If skis were purchased with bindings installed on them, the adjustment is often made by the seller himself. Some manufacturers do not allow self-adjustment. This is a prerequisite for the warranty to be valid for their products.
Under adjustment should be understood correct location front head and rear heel for the skier. It is important to consider:
- The experience and skills of the rider, as well as his physical condition;
- Driving style (calm or aggressive);
- Condition and difficulty of the ski slope.
Skier parameters and corresponding actuation force on the scale on the bindings:
| Weight/kg | Height/cm | Boot sole size/mm | |||||
| 255 or less | 250-270 | 271-290 | 291-310 | 311-330 | 331 or more | ||
| 10-13 | 0,75 | 0,75 | |||||
| 14-17 | 1 | 1 | 0,75 | ||||
| 18-21 | 1,5 | 1,25 | 1 | ||||
| 22-25 | 1,75 | 1,5 | 1,5 | 1,25 | |||
| 26-30 | 2,25 | 2 | 1,75 | 1,5 | 1,5 | ||
| 31-35 | 2,75 | 2,5 | 2,25 | 2 | 1,75 | 1,75 | |
| 36-41 | 3,5 | 3 | 2,75 | 2,5 | 2,25 | 2 | |
| 42-48 | 148 or less | 3,5 | 3 | 3 | 2,75 | 2,5 | |
| 49-57 | 149-157 | 4,5 | 4 | 3,5 | 3,5 | 3 | |
| 58-66 | 158-166 | 5,5 | 5 | 4,5 | 4 | 3,5 | |
| 67-78 | 167-178 | 6,5 | 6 | 5,5 | 5 | 4,5 | |
| 79-94 | 179-194 | 7,5 | 7 | 6,5 | 6 | 5,5 | |
| 95 or more | 195 or more | 8,5 | 8 | 7 | 6,5 | ||
| 10 | 9,5 | 8,5 | 8 | ||||
| 11,5 | 11 | 10 | 9,5 | ||||
In this table you need to find your indicators. When they are on different lines, you need to select the one located above.
Then the required column is determined by the corresponding sole length. The cell at the junction will determine the appropriate actuation force. This method is suitable for beginners or skiers with a cautious riding style.
- If the skier feels confident and has certain skills, then the indicator from the line below should be used.
- In the case where aggressive driving is practiced on difficult routes, an indicator 2 lines lower would be correct.
There are some things to keep in mind when working with fasteners:
- Don't adjust the mounts too much. This increases the likelihood of injury;
- Too much weak tuning will also not allow you to enjoy the ride. Skis will jump off with any, even harmless, fall. This is inconvenient even for a beginner, especially for a professional;
- Please note that the length of the boot sole may vary depending on the manufacturer. This means that skiers with the same foot size may not necessarily use the same skis with adjusted bindings.
We also invite you to watch a video on how to install bindings on alpine skis at home without the use of special tools and devices:
Interesting too
Often skis are sold already installed fasteners. But more often, fasteners have to be purchased separately and then installed. In this case, inexperienced skiers are often advised to contact a workshop or pay for the installation of the binding in a store. But their grandfathers did an excellent job of this task at home, and although the design of the fasteners has changed somewhat since that time, the principle of their installation remains the same.
Almost everything needed for installation is included with the mount. In your home workshop, you may need to find a drill and screwdriver. Sometimes it is recommended to use a screwdriver, but you can “overdo it” and ruin the ski. If the skis are wooden, you will also need glue (such as epoxy resin); For plastic skis, glue should only be used if it is included with the bindings and the instructions recommend its use.

Preliminary actions
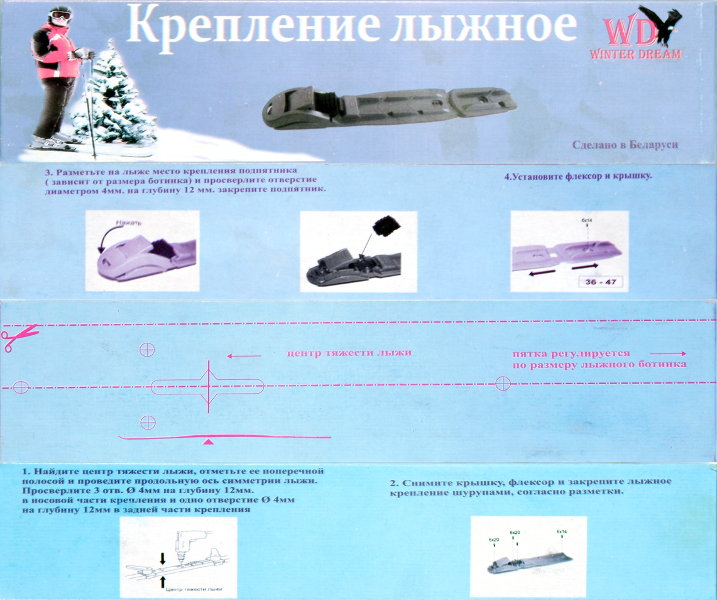
To properly attach ski bindings, you first need to determine their center of gravity. The ski can be balanced using the principle of scales on any object (the back of a chair, a ruler placed on the floor, and even on a second ski placed on its edge). You can even do this on your hands, gradually moving them. The found center of gravity must be marked with a transverse line using a pencil or marker.
Then the clamping bracket should be removed from the mount, since it will interfere with screwing it. You will have to install the bracket in place after the front part of the mount is securely fixed to the ski.
Correct installation
 Stores usually offer instructions on how to attach bindings to skis. If it is not there, you should use general rules. Many modern fasteners come with a special template plate, which marks the location of the center of gravity and where the screws are screwed in. Otherwise, you can determine the location approximately. On cross-country skiing, the toe of the boot should protrude slightly forward beyond the center of gravity, and on mountain skiing, it should fall exactly on it.
Next you need to apply the fastener and mark the places where the screws are screwed in. You can drill holes for them with a drill using a thin drill, but if the screws in the fastening kit are self-tapping screws, you can only mark the holes with an awl. It is usually proposed to fasten the heel of the fastening with a special pin, but many skiers also recommend attaching it to a screw. The location of the heel is determined by placing the boot on the binding.
After installing the mounting platform, the clamping bracket is put in place. You can check the correct installation by clamping your boot into the mount and lifting the ski by it. It should be slightly outweighed forward.
Some precautions - instructions
In order to correctly install ski bindings yourself, it is important to remember some mistakes that inexperienced skiers often make. The main one is that the ski, preparing holes for mounting screws, is drilled through. To avoid this, it is important to measure the required hole depth and use a drill with a stop. If this is not the case, you can make a temporary stop by wrapping several turns of electrical tape around the drill. It’s even easier not to drill holes at all - self-tapping screws can be screwed in just like that, and the fasteners are equipped with products of a suitable length.
The second mistake is the widespread use of glue. It is poured into the holes intended for screws. This must be done if the skis are classic, wooden. But today plastic skis are more common. Glue may not have the best effect on them. Therefore, in this case, it is better not to glue the fasteners or use only special glue, if it is included in the kit or recommended by the manufacturer’s instructions.
And we made the purchase we had long dreamed of. And now you can’t wait to ride them! There is only one small problem - you need to install bindings on the skis. How to properly install bindings on skis? Let's figure it out.
Installing ski bindings
- First, decide on the type of skis and bindings. You can have classic or skate skis. The installation of the bindings on them will be the same, but some people on skate skis shift the position of the bindings a little back so that the skis “run” faster. If you are not a pro in this matter, then it is better not to take risks and install the bindings relative to the center of gravity of the skis. Whether you will use old or new fasteners is your personal choice, but it depends on what means are best to use to secure them.
- Read the instructions. If it is clear to you and no questions arise, then act strictly on it. If not, then read the article further.
- How to properly install bindings on skis? Determine the center of gravity of each ski. How to do this? Turn your ski over sliding surface up and place it on the sharp edge of some object (knife, ruler, etc.) so that the edge is in contact with the middle of the ski. The ski should be in a position parallel to the floor. By carefully moving the edge along the ski, find a position where the ski will be in balance. Secure it with a pen, marker or something sharp on the outside of the ski (opposite the sliding one). The center of gravity has been found.
- Usually, along with the mount, a template is included in the kit, which is used to determine the holes for the fixing screws. However, recently manufacturing companies have been moving away from this. Therefore, when purchasing mounts, check if these templates are available. If not, they can be purchased separately. Consistent with the center of gravity, attach the template to the ski and mark the places where the screws are attached.
- Drill small holes, slightly smaller than the length of the screws. In the resulting holes you need to pour a little epoxy resin or special glue, which is included in the kit.
- After this, the fasteners can be screwed on. To make the mount fit the size of the boot, you can remove the extra sections of the mount. If the thrust pad is screwed on separately, then determine its position based on the size of the ski boot.
- If the thrust bearing is attached with a plastic pin according to the instructions, it can be replaced with a self-tapping screw for reliability. If you are using new fastenings, the heel can be glued with special glue, which is included in the kit. The most important thing is to press it well. If the fasteners are old, it is better to use a more powerful glue. For example, "Uranus". In this case, both the mount and the place to which it will be attached must be thoroughly cleaned of dirt and grease and warmed up thoroughly. The glue should be spread in an even layer on both sides and wait 1-1.5 minutes until a sticky thick surface forms. After this, the mount must be firmly pressed against the ski.
- When you have finished installing the fasteners, wait at least a day. And then you can start riding!
Here are the basics on how to properly install ski bindings.
If you are afraid of ruining your skis and bindings and are not sure that you will do everything correctly, it is better to contact a specialist. Some stores offer on-site installation of fasteners for an additional fee; as a rule, this is not particularly expensive.
The performance characteristics of the skis depend on how to install bindings on cross-country skis, as well as on the quality of their execution. Skis presented in modern stores have a special platform that ensures reliable fixation of sports shoes. Even if you are perfect, improper installation can damage the structure of the skis, reducing the lifespan and strength.
What tools are needed to install the fasteners?
Everyone can handle installing cross-country ski mounts with their own hands. To do this you will need the following set of tools:
- template for perfectly accurate drilling of holes;
- ruler or corner to determine the center of the ski;
- drill with drills 3.4-3.5 mm;
- marker or pencil;
- special glue or simple PVA;
- screwdriver or screwdriver.
How to place the mount correctly?
For cross-country skiing today there are several most popular systems for attaching boots to cross-country skis:
- SNS - produced by Salomon;
- NNN - produced by Rottefella;
- NIS - they are produced by Madshus and other companies.
The methods for installing different mounting systems on skis may be different, but there are certain requirements that are always the same:
- ski boots must be securely attached to the skis;
- the system should provide high maneuverability and ease of control when moving;
- the fastening should increase the strength of the ski at the place of its installation.
Use a ruler to measure the center of the ski and mark it with a pencil. To mark the holes for screwing in the mounting bolts, use a template or a special jig - this is very convenient and quick. Install a conductor that matches the type of fastening you have chosen - SNS or NNN. The carefully measured and marked center of gravity must coincide with a special mark on the conductor.
If there is no conductor, make a template from cardboard or thick paper(sometimes fastenings are sold with a ready-made template). If it is missing, attach the mount to the ski so that the center of gravity mark on the ski aligns with the mark on the template. The same applies to the axis of attachment of the boot bracket. The holes present on the template must be marked with a pencil or pressed with an awl. This marking option is not the most accurate, so it is better not to use it.
Modern mounts may have shifting elements, so the holes for the screws that hold the platform should be marked when the mount is assembled and closed. Otherwise, the holes will shift by about a centimeter.
Once the holes for the ski bindings are marked, we begin drilling them. You can make holes with a drill with adjustable speed and special drills of a suitable diameter and with a depth limiter. A special drill has an extension that centers it in the hole of the jig and stops when it reaches a certain depth.
Holes should be drilled at low speeds with light pressure. For installation NNN mounts a hole with a diameter of 3.4 mm is required, and for SNS - 3.6 mm. In both cases, the hole depth is exactly a centimeter.
Procedure for installing bindings on cross-country skis
If you're wondering how to install bindings on cross-country skis, keep the following information in mind. Before installation, you need to fill the holes with glue, which fills all the cracks, providing strength and protecting internal structure skis from the water. Without proper protection of the holes, moisture will seep into them and be absorbed into the cavity of the ski, causing rot from the inside. This usually happens with products that have a honeycomb structure or are made from natural materials.

You can buy a special branded glue, but regular PVA will also work. Apply epoxy resins This is not possible, as the solvent can damage the structure of the ski. The mount is screwed to the ski as efficiently as possible so that there is not the slightest play. After this, the glue should dry within 24 hours.
NIS ski bindings
Every skier should know how to install bindings on cross-country skis. The use of NIS bindings significantly simplifies the work process and allows you to adjust the position of the platform under the boots on the ski.
NIS bindings can only be installed on special skis that have a special platform. Similar models are produced by Madshus and some others. When installing, the ski mount should be guided along the guides until a characteristic click occurs. A thrust bearing is also installed along the guides, which is fixed in a suitable position with a special key from the kit.
Mounting the thrust bearing on inexpensive models ski bindings do not require special tools. The NIS system makes it possible to select the correct location for the ski mount, taking into account the characteristics of the route and weather. You can change your position before each ski trip or workout.
If you have a modern NNN or SNS type mount from Salomon, then you are terribly lucky. So, as they themselves can determine the center of gravity of the ski. It is enough to take a ski, find its thinnest part (like a ruler) and place it edge-on on the floor, then take the second ski and place it across, it is very advisable to place it at a right angle. After which we observe the process of how the scales work (the front and rear ends of the ski should hang in the air at the same height). But if you purchased a mount that is quite heavy, then you should measure the center of gravity a little differently. Everything is so accurate with the first ski, but the second one needs to be placed through the boot fixation groove.
After the skis are in the desired position, you will need to mark a perpendicular line on the top side of the ski and always above the mount itself. Repeat this procedure with the second ski. Read on and answer the question: how to properly install bindings on skis?
So, now you need to determine the center of gravity of the boot. It is important to understand whether it is old or modern. The first ones should be attached at the very cut of the boot, and for the second, the center of gravity is set along the cut of the boot. But we are guided by SNS standard mounts, don’t be alarmed, there is absolutely no difference for others. Other than that, it doesn't matter what style you use when running. Find a rod on the boot that will fit into a special groove in the mount; it is this groove that should be where the center of gravity of the ski is.
By the way, under this groove, in the center, there is another groove in which the middle part of the mount is attached. Then we take the fastener, apply it to our markings, and in the places where the screws should be, we use an awl to make small holes. Once marked, you can remove the mount and check that the center mark is aligned with the center and the back marks are equally spaced from the edges. We repeat the operation with the second one so that we can install the bindings on the skis.
We take the core and measure how deep the screw will go into the ski - this is done so that later we don’t drill through the ski. When we have measured it, we take a drill with a diameter of 6-4 mm, smaller if possible, and drill. Important: after measuring the depth, mark it with electrical tape, or even better if there is a ruler on the drill.
Now that we have 3 holes ready in each ski we can remove the plastic clip that releases the ski. Then we fix the fastening in it with a screwdriver. You don't need to tighten it all the way, about halfway. By the way, don't use glue. Previously, skis were made of wood, but glue has a detrimental effect on modern skis.
Replace the removed bracket. We assemble the mount and install it end-to-end, while closing the previous screws until they stop. Don’t forget to mark the holes on both skis, and then tighten the bolts (you definitely won’t need glue here). After all this, close the “heels” with plugs. That's all, I hope it worked for you.