Content
Chestnuts are planted not only in gardens and parks, they are increasingly used for landscaping garden plots. This tree is beautiful not only at the moment of flowering, when its inflorescences, like candles, stretch towards the sun, but also at the moment of ripening of the fruits, in early spring and autumn, when its foliage changes color and begins to gradually fall off.
This plant grows successfully in parks and squares; it is planted in the front garden in front of the house. Recently, chestnuts have increasingly begun to be planted on garden plots. How to plant these trees on your plots and how to care for them will be discussed below.
Species
There are about ten chestnuts different varieties, but they are divided into two types:
- horse chestnut, which is grown in almost all regions of our country. These trees grow almost everywhere. This species is characterized by a large rounded crown and large foliage, similar to a human hand. The fruits of this tree are round, spherical, green, strewn with thorns, inside which there is an oval brown seed;
- a noble type of chestnut whose fruits are commonly eaten. This tree from the beech family is very thermophilic, grows and bears fruit in warm tropical or subtropical climates. The crown of this tree is more elongated than that of horse chestnut. The foliage is also somewhat different. And the fruits are enclosed in a reddish capsule, inside of which there may be two or three seeds. The climate of our country is too cold for growing this type of chestnut.
Rules for planting at home
At home you can grow a chestnut seedling from its ripened fruits. To do this, you must follow the following rules:
Any intact fruit that falls from a chestnut tree is quite suitable as planting material, since only ripe chestnuts fall from the tree. It is necessary to separate the seed from the thorny capsule and soak in water. This water must be changed several times a day.

Typically, a seed in water sprouts 12 to 16 days after the start of soaking. The soil for planting chestnut seeds should consist of equal parts of humus, turf soil and rotted manure. The pot is filled with the resulting mixture, the chestnut seed is buried 3 - 5 cm into this soil. Then the container with the planted chestnut is put into the cellar until the onset of warm spring days. The temperature in the room where the chestnut pot is located should be about 4 - 5 degrees Celsius.
At the beginning of spring, a container with chestnuts is brought into the house, where the sprouted seedling continues to grow and develop. 10 - 12 days before planting the seedlings of this tree, they are taken out to the balcony for an hour or two to harden the plant before planting in open ground.
Planting seedlings
Pits for planting chestnut seedlings must be prepared a week or two before planting. They must be placed at a distance of at least 300 cm from each other so that during the growth process the chestnuts do not interfere with each other’s development. After all, the crown of an adult chestnut can reach 2.5 - 2.8 m in diameter.
The size of the prepared “holes” for planting should be 50x50x50 cm. You should also prepare a mixture to fill the hole when planting chestnut. This mixture should consist of 2 parts soil and one part each of coarse river sand and humus. To this fertile soil you need to add 1 cup of complex mineral fertilizer, which includes nitrogen, phosphorus and potassium. In addition, 500 g of dolomite flour and slaked lime are added there.

The bottom of the pit is “covered” with pebbles or crushed stone mixed with sand to increase soil drainage. Then the hole is filled 2/3 full with the resulting nutrient mixture and watered, adding 10 - 15 liters of water to each hole. And only then a seedling is carefully placed in each hole, spreading the roots over the entire diameter of the hole. The roots of the tree are covered with the remaining nutrient mixture, compacting it with your hands.
The planting mound should not be level with the soil level; it is usually made higher, because the soil will subside the first time after watering or rain. The root collar of the tree should be above ground level.
Usually a metal or wooden stake is dug next to the seedling, to which the seedling is tied so that it does not break from the wind.
This tree is planted either in spring or early autumn (so that the seedling has time to take root before the onset of frost).
Walnut planting
This tree can also be planted from seeds directly into open ground. They can be planted in the ground both in autumn and spring.
In the spring, chestnut fruits are planted, the fallen seed pods collected last year. They should be stored in containers with sand. These containers are usually stored in the cellar for the winter. A week before planting these nuts in open ground, they should be soaked in warm water. This procedure activates the embryo, which, under the influence of water, is formed inside the chestnut fruit. After 6 - 7 days of soaking, the chestnut fruits are ready for planting in open ground.

The holes for planting seeds are prepared in the same way as for seedlings of this tree. Typically, during the first season, the seedling grows up to 20 cm in height.
Before planting the nuts of this tree in the fall, they should be kept for 14 - 15 days in a cold basement, the temperature in which does not exceed 5 degrees Celsius. After such a “cold test,” chestnut fruits can be planted in open ground.
Usually in the fall, nuts are planted in special furrows at a distance of at least 10 cm from each other. They are buried no more than 6 cm. They can be sprinkled with leaves on top. In the spring, when the first shoots appear, they should be thinned out, removing weak seedlings.
Care
When young trees are planted, caring for them consists of regularly loosening the tree trunk and timely watering. Chestnuts should not be watered too much, since their root system grows more and more every year, and is itself able to extract moisture from the soil.
The southern handsome chestnut came to us from the Balkan Peninsula. Most gardeners try to decorate their summer cottage with a flowering tree that provides good shade and withstands weather surprises. How to grow a chestnut from a walnut is the topic of our article.
How to grow chestnut from a nut
First of all, you need to decide which chestnut to grow - edible (for sowing) or decorative. The fruits of a tree from the beech family are eaten. “Horse chestnut” (aesculus) with luxurious candle-shaped inflorescences, decorating parks, squares and streets, belongs to the Sapindaceae family and produces inedible fruits.
Sowing species are not particularly popular. They begin to bear fruit only after 25-30 years; such chestnuts are planted and grown with a long-term future. “Horse chestnut” tolerates short frosts down to -35°C, while the seed variety is more delicate and cannot withstand the cold. Growing and caring for seed chestnut and horse chestnut are no different. Let's consider whether it is possible to grow a full-fledged tree from a shiny nut.
Growing methods
In the fall, cuttings can be cut from a chestnut branch and then planted in the country house. If this is not possible, collect fruits and nuts and germinate them. Planted in two ways:
- Directly into open ground.
- Having grown a walnut seedling at home.
Selection of planting material
When independently collecting nuts for subsequent planting, they are carefully inspected. Fruits with damaged shells and spots of rot are subject to rejection. Buying planting material, pay attention to the frost resistance of the selected variety.
For growing in middle lane Russia is suitable for jagged (American), Japanese, seed and Chinese types of noble chestnut. In Siberia and the Urals, it is extremely difficult to cultivate chestnuts; only varieties that are highly resistant to frost are selected from among shrubby or medium-sized varieties (up to 10 m).
Remember! Frost-resistant zoned varieties may not survive particularly harsh winters. At best, the result will be a decrease in yield.
Requirements for landing conditions
Chestnuts are undemanding to cultivation conditions; even infertile soil is suitable for them.
Landing
Chestnut fruits can be planted in the spring, after stratification at home, and in the fall - in open ground or for seedlings.
At home
Fruits collected or purchased in the fall are kept at home at a low temperature, packed in a cotton or linen bag. Plastic bags do not allow air to pass through, the seed material suffocates and becomes unviable. When winter finally sets in, the nuts are transferred to a container and sprinkled with wet sand or sphagnum. Then the container is placed in the refrigerator until the end of February.
Important! To germinate chestnuts, it is necessary to maintain humidity, but not to “drown” the nuts in water.
By the end of winter, the fruits swell, the shell of the strongest ones bursts. Beak sprouts appear from seeds at a temperature of 4–5°C. The nuts are immediately planted in cups 7–8 cm high with soil so that the layer of soil mixture below and above is at least 2 cm. Next, the seedlings are placed on a lighted windowsill, protected from direct sunlight.
Chestnuts can be planted in a permanent location when the leaves unfurl. However, experienced summer residents recommend holding off and letting the tree grow stronger for a year or two at home. With this option, the plants are given a cold winter: the pots are moved to a cool place with moderate lighting. In the spring they are placed on window sills, in the summer they are placed outdoors.
In open ground
Nuts are planted in autumn or spring, having previously prepared them. Algorithm for autumn planting chestnut fruits:
- Stratification of seed material. Fruits placed in cardboard box or a wooden box, cover it with sand and put it in the refrigerator for 2 weeks.
- Planted on school beds in grooves 5–6 cm deep.
- The grooves are spilled with plenty of water, the nuts are placed in increments of 12–15 cm, and they are covered.
Shortly before spring planting, the nuts are placed in a suitable container and filled with warm water. Change the water 1-2 times a day. The swollen fruits are planted in the furrows.
Interesting! From the advice of a summer resident: “We germinate chestnuts like this: between the roots of large trees, where the soil is loose, we cover the fruits with fallen leaves. In the spring we find several with sprouts.”
General rules for caring for seedlings
Caring for seedlings is not burdensome. In the first year, drying out of the soil is unacceptable, then - moderate watering and after each procedure - weeding and loosening the soil.
Advice: “Mulching with peat, humus or tree bark will help moisture remain in the ground, keep the soil loose, and protect the plant from weeds.”
Seedlings are fed only leaf by leaf. It is preferable to use biological products “Mycorrhiza”, “Trichodermin”, “Fitosporin”, which protect against pests and prevent diseases.
Transfer to the street
Transplanting a sprout from a seed to the street does not require additional knowledge and skills.
Transplant timing
The second half of May is considered optimal for replanting for temperate climates, when the risk of return frosts is negligible. In the south, where spring comes earlier, sprouted nuts are planted already in April, focusing on the current weather. It is not recommended to plant seedlings in the fall; they do not always have time to take root in a new place before the onset of winter.
Selecting a location and preparing a hole for planting
Mature tree It is distinguished by a wide crown - with a diameter of five or more meters, depending on age. It is recommended to allocate a spacious area for the future tree in the garden, where there are no light-loving plants at a distance of 3 m.
In the first few years, young trees need light shade and protection from the wind. Therefore, a place can be chosen, for example, among plantings of early flowering perennials - hellebores, primroses, tulips and other bulbous plants. For normal development of the tree, loams with a slightly alkaline reaction are most suitable. The pit for planting a seedling is prepared as follows:
- Make a hole with a diameter one and a half times larger than that of the seedling container, adding 10–15 cm for drainage.
- Sand and humus (2:1) are added to the excavated soil to make it more loose and nutritious. You can add a little complex mineral fertilizer.
- For drainage, pebbles or crushed stone are placed in a layer of at least 10 cm.
- Pour in the prepared soil mixture.
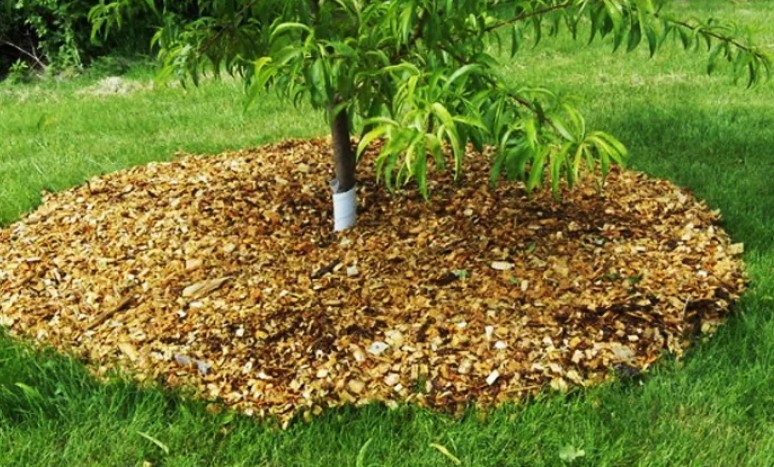
The seedling is carefully removed from the cup, being careful not to damage the tap root, which is responsible for growth. Having placed it so that the root collar is above the surface of the earth, the hole is filled with soil and compacted. Upon completion of planting, the sprout is watered abundantly, the tree trunk circle is mulched with organic matter (peat, bark, wood chips, humus).
Important! For the first few days, the seedlings are covered with a paper bag to mitigate the effects of shock caused by the change in growing conditions.
If the place chosen for the chestnut is blown by winds, the seedling is surrounded by a low fence in the first years, and a support peg is installed in the 3rd–4th year.

Layout
If you plan to plant a chestnut alley or picturesque groups of trees on a lawn for recreation, you need to place the seedlings at a distance of at least 4 m from each other. Since caring for them is difficult under such circumstances, summer residents act differently:
- allocate space for a garden bed for growing seedlings;
- plants are planted in rows at a distance of 1–1.2 m from each other, step – 0.8–1.0 m;
- When the trees reach 2–3 years of age, they are moved to a permanent location.
Note! Bonsai lovers grow and shape a tree in their apartment. However, this requires a spacious room. But you can try to form a chestnut tree in an exotic style directly at the dacha.
Seedling care
Decorative and noble chestnuts are undemanding in care.
Watering
Until 5–6 years of age, trees need to be provided with regular watering, not allowing the soil to dry out, but also not making it waterlogged. They take settled water, and choose the time taking into account their own capabilities: morning hours or after sunset. Regular renewal of the mulch layer will protect the trees from lack of moisture. After watering, be sure to loosen the soil and weed the plantings.
Feeding
Seedlings are fed once a year. In the spring, after the snow melts, add the following mixture per 15 liters of water:
- potassium-phosphorus fertilizer – 25 g;
- ammonium nitrate – 20 g;
- urea – 20 g.
If growth is weak, you can add nitroammophoska in the fall.
Disease and pest control
For a young tree, fungal diseases pose the greatest danger. The main sign of the disease is red, drying leaves. Treatment is carried out by spraying with Bordeaux mixture or Fundazol.
At the same time, cultivate the soil within a radius of about a meter. The main pests that threaten young plants are aphids and spider mite. Seedlings are treated against aphids with folk remedies (infusions of garlic or onions, tansy, Caucasian chamomile) or “Fitoverm”. Tick prevention is carried out every 2 weeks with solutions of karbofos or Fitoverm. From folk remedies Infusions of dissected hogweed or black henbane help.
Pruning and crown formation
The first pruning is carried out when the chestnut tree reaches 3 years of age. To form a lush, spreading crown, the seedling is cut to a quarter of its height. Side shoots are shortened. Formative pruning is carried out annually until the crown of the desired shape is obtained. Afterwards, broken and dry branches and shoots frozen in winter are regularly removed.
How to prepare for winter
A correctly selected chestnut variety will allow it to overwinter without shelter. But for the first few years, teenage trees grown from cuttings or nuts need additional protection. It consists of the following: mulching with a thick layer of peat or compost and wrapping the stem with burlap or other fabric in several layers.
Note! If the tree trunk has been damaged by frost, in the spring the affected areas are disinfected and covered with a layer of garden varnish.
Horse chestnut is widespread in many European countries. Starting from the 17th century, they decorated palace parks, gardens and alleys of the city. Considering that the tree tolerates sub-zero temperatures well, chestnuts gradually began to be grown in Russia; it is especially popular in the southern regions. How to grow horse chestnut personal plot and is it possible? The tree is tall, with a spreading crown, however, if you select a decorative variety from a nursery, you can enjoy the beauty of a flowering chestnut even in a small summer cottage.
Choosing a horse chestnut variety for growing in the country
The wild form of horse chestnut is a tall tree up to 30 m high, and its powerful and well-developed root system can occupy a plot of land up to 5.5 m in diameter. Therefore, for lovers landscape design Breeders have bred several decorative low-growing varieties, the height of which does not exceed 5 m. The most popular species are those presented below.
- Horse chestnut common Aesculus hippocastanum. A tall tree (up to 25 m), it looks most impressive in single plantings and serves as an excellent decoration for parks and squares. The flowers are large and white.
- Horse chestnut Aesculus carnea (pink). Not a very tall tree (up to 9.5 m), used for landscaping parks and squares. The foliage is a rich dark green color, the flowers are small, pale pink.
- Horse chestnut Aesculus carnea Briotii (pink). An unpretentious tree with a spherical crown, reaches a height of 15 m. The flowers are large, collected in inflorescences, the color of the petals ranges from red-pink to rich crimson.
- Horse chestnut Aesculus parviflora Walt (small-flowered). When wondering how to grow horse chestnut in a summer cottage, you should give preference to this particular species. It has the shape of a bush and reaches a height of only 5 m. The inflorescences are small, snow-white in color with stamens that are decorated with a bright pink “pea”. The plant is thermophilic and requires special attention.

Choosing a site for growing horse chestnut
When planning a planting, the site is prepared in advance. A tree needs space and enough sunlight. It is best to plant a seedling on the southeast or southwest side of the garden, at a distance of 5 m from other trees or buildings. The soil should be moderately loose and nutritious. Clay and sandy areas should be avoided. If the soil does not meet the requirements, it is diluted with a substrate of suitable composition. For example, river sand is added to heavy loam.
How to grow horse chestnut and properly prepare the planting hole? Considering that the root system grows several meters over time, a large hole is prepared, about 100x100x80 cm, where 80 cm is the depth. To make the soil more nutritious, rotted manure, compost or humus is added to it (2 garden buckets are enough). Preparatory work carried out in the fall, over the winter the soil will settle, organic matter will partially begin to decompose, and in the spring it will be possible to start planting chestnuts.

Growing horse chestnut from nut
In nurseries you can select a suitable seedling and plant a small tree directly on the site. However, some gardeners prefer to start from scratch, growing a seedling themselves from a nut. This process is fascinating, but requires a lot of effort and time.
It is known that chestnut fruits are enclosed in a dense, prickly shell. In autumn they fall to the ground and overwinter under a layer of snow. In the spring, when it gets warmer, the seed germinates, the outer shell bursts and a green sprout breaks through. So the process of reproduction occurs in nature, but how can a gardener grow horse chestnut? In the fall, you need to stock up on planting material. If there is a park or square with chestnut trees nearby, you can collect nuts there. Otherwise, seed material will have to be purchased in specialized stores or ordered online. It is better to take 10–15 nuts in reserve, in case some of them do not germinate or die at the seedling stage.

Purchased planting material should be carefully inspected. Deformed, burst and rotten specimens are not suitable. Next, the nuts are placed on a damp cloth and covered with a similar piece of cloth on top, after which they are placed on a flat plate. The container is placed in the cellar or in the refrigerator on a shelf for storing vegetables. As soon as the sprouts appear, the nuts can be planted in individual pots with soil mixture for growing seedlings or on a peat tablet.
How to grow horse chestnut from a nut? In winter, it is better to store pots with sprouted seeds in a dark and slightly cool room, remembering to moisten the soil. In spring, the pots are moved to a lighted room, and with the onset of warm days - to the garden or balcony. It is better to grow young seedlings at home for the first 2 years, storing them in a cellar or on an insulated loggia for the winter.
Planting a chestnut seedling
Seedlings grown at home or purchased from a nursery are planted in open ground in the spring. The most favorable time is the second and third weeks of May. Knowing how to grow horse chestnut from a nut, all that remains is to familiarize yourself with the technology of planting in the garden. A hole is dug in the prepared soil, which should be one and a half times larger than the root system of the plant. In order not to injure the young chestnut, it should be removed from the container along with the earthen lump. After planting, sprinkle the remaining space with soil and lightly compact it. At the end of the work, the ground is watered and mulched with wood chips, humus or peat.

To protect a young, immature chestnut from gusts of wind, you should drive 3 strong pegs around it and carefully tie the trunk.
Features of caring for horse chestnut
Only young specimens need special care; mature trees are already able to take care of themselves. How to grow horse chestnut from a seedling? At first, the tree needs to be watered regularly; adult specimens require watering only if the summer is dry and hot. After watering, the soil must be loosened and weeds removed if necessary.

- in the spring, prepare a solution based on 5 liters of clean water 500 g cow dung and 7–10 g of urea;
- in the fall they use nitroammophoska - 7–9 g diluted in 5 liters of water.
Regular application of fertilizers will ensure good growth and lush flowering for the tree.

In order for the crown to form a beautiful, regular shape, trees are pruned at a young age, leaving 5–7 skeletal branches. However, radical pruning should not be carried out, since the procedure slows down the growth of the tree for some time. Further pruning is only for health purposes. Every spring, dry and broken branches are removed, and the crown of ornamental tree species is adjusted if necessary.
Despite the fact that horse chestnut nuts are not edible, the tree will bring many positive emotions to its owner. Chestnuts are especially beautiful in spring, at the height of flowering. These amazing trees can completely change the appearance of a garden, giving it sophistication and sophistication.
Video on how to plant horse chestnut
I have always believed that every person should plant at least one tree in their life. I decided not just to plant, but to initially germinate the chestnut tree, which in principle turned out to be quite simple.
For germination we need:
Several chestnuts;
- several dense bags;
- about half a kilogram of sand.
So:
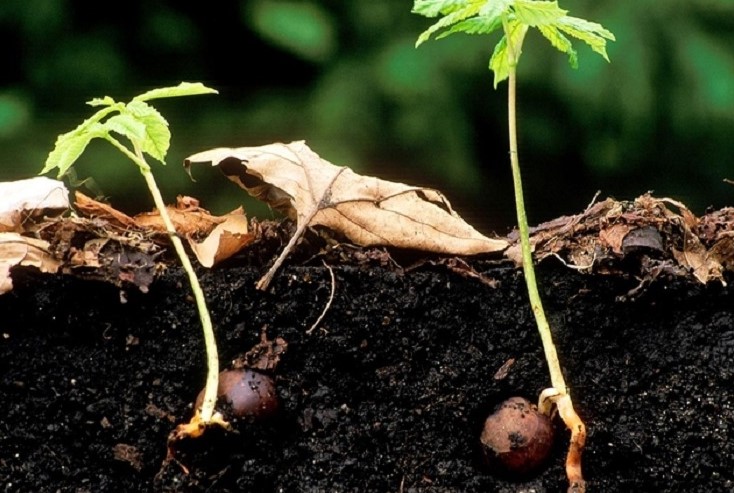
1. First you need to collect several chestnuts so that everything will definitely work out; it is clear that this is done in the fall, just when the chestnut flowers turn into fruits. It is necessary to collect only whole chestnuts, preferably from the ground, so they will definitely be intact both inside and outside.

2. Now we pour sand into a double bag, add water in such an amount that the sand is wet, but nothing more. We put the chestnuts in a bag and tie it very tightly so that the moisture does not evaporate. Next, place the bag of chestnuts in the refrigerator for 2-3 months.

3. It is best to check after 2 months whether your chestnut has sprouted. I got such a miracle of nature :-). Now all that remains is to plant it in a pot if it is not yet warm enough. To do this, it is best to take a plastic pot, then it will be easier to replant. We fill the bottom with drainage and some soil, put the sprout in the pot and carefully dig in.

4. That's all, there is one tree, keep up the good work!)))

From personal experience:
It is better to plant the chestnut as soon as spring warming arrives, otherwise it will not survive in your pot for long.
On our planet, chestnut is one of the most ancient plants. Its main features:
It should be noted that not all varieties of chestnut trees can be grown at home. Today there are at least 30 known and widespread types of chestnut. However for home grown Only a few are recommended.
| Variety | Brief characteristics |
| Japanese | Famous for its high growth rate. Produces large edible fruits (about 100 g in weight). Fruiting begins already in the third year after planting. |
| Gorodchaty | There are no shrub forms. The tree grows thick, with a trunk 1–1.5 meters in girth. |
| Chinese softest | Grows up to 15 meters in height. Has beautiful small leaves with edge. The fruits, as in the previous case, are edible. They are popular among gourmets for their exquisite taste. |
| American | Resistant to adverse atmospheres and cold. A mature tree reaches 28–30 meters in height. Varieties adapted to Russia delight with sweet and large fruits. |
| short | Shrub 1–2 high or tree up to 12–15 m with a rounded crown. Unlike most of its “brothers”, it is quite unpretentious to soils (it can grow even in conditions of moisture deficiency). |
| Sowing | If agricultural techniques are followed, you can grow a tree 35–37 meters high. It has been established that this chestnut is a long-liver; the tree lives for 400–500 years. The nuts ripen with a soft shell. And although the fruits do not have an exquisite taste, they are still suitable for eating. |
How to choose the right nut for planting

For successful planting it is important to choose the right chestnut nut
- Only fallen nuts are suitable for planting.
- Since not all of them will germinate, it is recommended to harvest at least 2 times more (for example, 1-2 trees will grow from 5 pieces).
- The material is suitable for use only if there are no soft spots, cracks or other damage.
- Only beautiful-looking, hard and even chestnuts will germinate successfully. It is recommended to take them from trees with a strong, massive trunk. Pay attention to the size - planting unripe small nuts will not lead to success.
When to plant and in what conditions to store chestnuts before planting
A good time for planting chestnuts is spring, or rather the end of February and the first ten days of March. The seed storage process has a number of nuances:
- usually occurs with losses, which is better to take into account in advance and make a safety stock of planting material;
- Some of the nuts will dry out by spring. Store seeded chestnuts in a bag filled with damp sand to prevent the fruits from losing their viability.
Seed chestnuts should be kept in the sand for at least 2–5 months before planting. If you kept them in regular paper bags all winter, take them out closer to spring and place them in wet sand. Close the container tightly, periodically opening the lid for ventilation, or make small holes. Some gardeners place chestnuts in a box of sand and dig it under the snow in late autumn.
And yet, even with proper storage, the seed coat hardens, and this will complicate the emergence of the young shoot. Artificial stratification will help solve the problem:
- seeds are immersed in warm water;
- kept for 5–7 days before planting;
- Be sure to change the water once a day.
The hard peel will soften after soaking, which will increase the chances of nut germination. The chestnut is ready for planting if a white sprout appears. The embryo is activated, now it is easier for the sprout to germinate.

To facilitate germination, it is necessary to keep chestnuts in water for 5–7 days before planting.
Sometimes nut seedlings are planted in the fall. This method also has its adherents. The advantage of autumn planting is that the chestnuts do not have time to dry out and there is no storage stage in the sand. However, stratification is still necessary to ensure the emergence of sprouts.
Landing
Requirements for the pot and soil composition
Chestnuts begin to be sprouted in pots with a capacity of 300–500 ml. Minimum rules that it is advisable to follow at the initial stage:
- there are no special requirements for the composition of the soil - almost any soil will do, just buy a regular garden soil mixture at a gardening store and fill the planting container with it;
- place a thin drainage layer at the bottom of the pot;
- When planting seeds, the substrate must be well moistened.
At what depth to plant
Given the small volume of the pots, the prepared seeds should be located approximately at the level of the upper third of the container. Chestnuts should be planted to a depth of 3 to 5 centimeters. Be sure to follow the recommendation, otherwise:
- with deeper embedding, there is a possibility that the sprout simply will not come to the surface. The deeper into the substrate, the less oxygen and the colder the temperature of the environment. This means that the young shoot will not be able to overcome the thickness of the soil;
- with high embedding, the nut will dry out.
If all the rules are followed, shoots will appear in 2–3 weeks.
Conditions for normal nut germination
Fruit chestnuts have been grown in Russia for many years. During this time, the plant acquired immunity and resistance to harsh climatic conditions. But the initial requirements for landing conditions remained key:
- a sufficient amount of light - in dark places the seedlings will grow stunted, and the base of the trunk will also be weak. It is advisable to place pots with planted seeds on sunny side apartments;
- protection from drought;
- moderate soil moisture;
- warm. Protect pots from hypothermia, and plants that have broken through from drafts. The best temperature for seedlings is +17…+26 °C.
Transplanting chestnuts into open ground
For successful transplantation, it is necessary to take into account many nuances, including the depth of the hole.
May is the right time to transplant chestnuts from pots into the ground. Every year the May air temperature fluctuates, so to choose the right time it is necessary to take into account additional details of transplantation:
- as soon as smooth, warm weather has established itself and the threat of frost has passed, begin to act;
- a little earlier, in April, it is sometimes useful to take pots with seedlings outside so that the plant adapts to the street air and begins to acquire immunity.
It is necessary to pinch the taproot, then in open ground the plant will quickly develop a powerful root system.
Selecting a location and preparing a planting hole
- Keep in mind that the roots of the plant are shallow and then grow horizontally, so you should not deepen the plant too deep. The depth of the hole for seedlings depends on the degree of development of the root system.
- The tree prefers moderately moist soils - aridity, as well as swampy soil, is unacceptable for chestnuts.
- In terms of soil composition, chernozems are preferred.
- A mature tree will acquire a tent-shaped crown, which will provide dense shade - this is one of the reasons why there is no place for other (especially light-loving) plants near the chestnut tree.
- Remember that chestnut is a tree of powerful growth, so an abundance of small “neighbors” in the root zone is undesirable. Close proximity to other plants will lead to impoverishment of the soil; the chestnut will lose a significant part of its nutrients.
It is advisable to plant chestnut seedlings near fences, leaving access to it from two or three sides. If there are underground wine cellars, chestnut trees are often placed on top - the roots grow shallow, and the shade received from an adult tree will subsequently protect the surrounding soil from drying out and overheating.
Precautions
If you plan to eat chestnuts, plant the trees away from:
- railway tracks;
- motorways;
- industrial facilities;
- radiation sources.
Chestnut trees have a high ability to absorb toxic substances. Ideal places for growing are a country house, a country estate, a quiet city center in the absence of heavy traffic.

Planting chestnuts along the path
Planting scheme
- Since we are talking about large trees, even the “smallest” species require sufficient space around them. Check in advance the descriptions of the characteristics of the variety of chestnut that is supposed to be planted. The minimum distance between seedlings is 3 meters.
- If you plan to plant the grown trees in a couple of years, then in the first summer place them at a distance of 60–85 cm from each other.
- Provide young plants with protection from direct sunlight.
- The depth of the planting hole should correspond to the root system of the seedling, on average from 35 to 60 cm.
- The width of the pit is about 55 cm, cubic in shape.
- Trees are planted mainly in groups in one line. Usually this is the perimeter of the territory or the contour around garden paths and city sidewalks. Spot planting of plants is possible according to the interests of the landscape design composition on the site.
- It makes no sense to place chestnuts in pairs, or even more so in the form of a plantation. Their shadows will overlap each other, interfering with the full development of first seedlings and then adult trees.
Step by step instructions
In order to properly plant chestnuts in open ground, you must strictly follow the instructions.
- The bottom of the excavated holes is covered with a drainage layer ~10–15 cm thick. Sand, crushed stone, and pebbles are used in approximately equal quantities.
- The near-root substrate is prepared from humus, sand and “native” hole soil (proportions 1: 1: 2).
- In soil with increased acidity slaked lime will improve root growth at the initial stage; just add 0.5 kg to each hole, after mixing with the substrate. In the absence of lime, dolomite flour will give the same effect (it is sold in gardening stores).
- Immediately the plant will need potassium and phosphorus-containing fertilizers, literally 1-2 handfuls of an adult per 1 root.
- Holding the young plant by the stem, its root is immersed in the hole, and the root collar should be at the level of the ground surface. At this time, the substrate is covered with hands from all sides. Lightly compact the top layer near the growth point of the trunk.
- To protect the fragile seedling from the winds, it must be tied to a peg. Prepare them in advance, install them at a distance of 5–7 cm from the root.
- The height of the planting hole needs to be slightly increased so that when the soil shrinks, the plant trunk is not exposed.
Care
On average, chestnut seedlings gain strength during the first 4–5 years. If the above requirements are met, by the next season the tree will grow by 20–25 centimeters, but then it will begin to rapidly grow in all respects and reach one and a half meters in height in the fifth year. Fruiting is expected in the 6th–8th year of planting. But a lot depends on proper care.
Watering and fertilizing
- Initial watering. Water will be needed immediately after planting the seedlings. Pour 3-4 buckets into each hole.
- First season watering. To ensure that young seedlings take root well in their nests, water regularly. Pour enough water so that it gets wet 10 cm deep, but does not become waterlogged.
- Mulch once a week. At the same time, the degree of moisture in the soil around the roots will be visible. Make sure that a hard earthen crust does not form around the trunk, the danger of which is that the aeration of the root soil worsens and the risk of bacterial infections increases.
- Regular watering of the growing chestnut tree. Excess moisture is just as dangerous as drought. Against the backdrop of dry weather, a growing tree needs 1 bucket of clean water per 1 square meter. m area. Frequency - as the soil dries out (it should be kept moderately moist).
- Autumn feeding. Nitroammofosk diluted in water (15–20 g per 10 liters), 1 time per autumn.
- Spring feeding. An aqueous solution of urea (10–15 g of powder is needed per 10-liter bucket), 1 time per spring season.
- Mullein in summer. 1 bucket of raw materials is diluted with 5 buckets of water, mixed thoroughly. For seedlings 2–5 years old, 1 liter of liquid is applied at the root 3–5 times a year; older trees require 2–5 buckets of the mixture over the same period of time.
- Strong mature trees are mulched. This is done immediately after watering. For mulching, sawdust or garden humus is recommended.
Crown formation
The crown of young chestnuts begins to form from the age of 3:
- it is cut to a quarter of its height in the spring;
- in this case, you need to slightly trim the side branches and shorten the central “conductor”;
- then the scheme is repeated regularly;
- from the age of 8–11 years, the crown of a mature tree needs more close attention- it grows, the length and thickness of the branches increase. At the same time, frequent pruning helps stimulate its growth. The plant acquires unprecedented aesthetic beauty and becomes a leading player in landscape design.
Preparing for winter
Mulching chestnut with dry leaves
If chestnuts do not need special preparation beyond the age of 7–10 years, then a special approach is taken to seedlings on the eve of winter. What must be done:
- As soon as the first cold weather sets in, the seedling needs to be mulched with dry leaves - they will protect the root system from freezing;
- adding humus will enhance the effect, a thick layer of organic matter will become reliable protection from frost outside, and will also nourish the roots before hibernation;
- the outside of the young tree is wrapped with insulating materials. Dry felt and an outer film covering are suitable for this purpose (otherwise the fabric will get wet and cause the bark to rot).

Insulation of chestnut with dry felt and film
In regions with a temperate climate, insulating the trunk with materials is not a mandatory measure. This recommendation applies to the conditions of Siberia and Far East. And also for situations where there is an abnormally cold winter with high air humidity.
How to grow chestnut bonsai at home
The home "bonsai" is originally a dwarf, low-growing, small-leaved variety of chestnut tree. Information about the genetic properties of the plant can be found in encyclopedias or consulted with specialists at the botanical garden. They will tell you whether the project is worth starting and whether it will be successful.
Please note that the fruits decorative varieties chestnuts are inedible. In addition, homemade chestnuts rarely grow to the point where the nuts ripen, because bees do pollination, and they are inappropriate in an apartment. Self-pollinating varieties have not been bred by breeders because they are not of particular interest (the whole “zest” is in the crown, and not in the fruits).

Dwarf chestnut grown at home
Standard care:
- prepared seeds are planted in pots in the fall;
- plants are kept on the sunny side in a warm room;
- within a year the crown begins to form;
- pruning should be done twice a year (spring and autumn), interseasonal adjustments are also permissible - only if the plant grows vigorously;
- fertilize according to recommendations for a specific type of bonsai;
- Regular watering, avoiding excess water.
Diseases and pests
Growing chestnuts is greatly complicated by diseases and pests. Threats are present even in cases where the gardener takes care of his charges in good faith. The main thing is not to get lost when you discover a problem, but to take competent measures to eliminate it. First you need to know what pests and diseases can affect a chestnut tree.
Table: problems that chestnut may be susceptible to
| Problem | Which species are susceptible? | Symptoms | Control and prevention |
| Wood mite | Fruit, decorative | Leaves affected by mites turn red, dry out and become crumpled. Then they die off. | For prevention, the tree is treated with a frequency of once every 2 weeks with phytover (10–15 ml per 10 l of water) or karbofos (75–90 g per 10 l of water). In advanced cases, plants die. |
| Chestnut moth | Mostly decorative, less fruit-bearing | The insect infects the leaves, after which they fall off in the summer. By autumn, the tree arrives weakened and may not survive the winter period and die. | The fight is effective if you spray the affected areas with Lufox 105-EC. The concentration depends on the age of the plant; this information can be found on the packaging of the product. It destroys both larvae and adults. |
| Powdery mildew | Fungal disease. White, grayish or dark spots. Sometimes with a hint of “rust”. The leaves dry out, turn yellow or black, and fall off. | Prevention: inclusion of wood in the diet phosphate fertilizers, treatment of plants with fungicidal compounds. | |
| Hole spot | Fruit, less ornamental | Occurs due to fungal cultures. Many small holes appear on the leaves, the greenery darkens, and the leaves die. | The remedy is Bords liquid with a strength of 1–3%. 10 days after the start of flowering, the plant is sprayed every 2-3 days until the signs of the disease disappear. |
Do not use toxic drugs that can harm pollinating bees. Otherwise, the tree will not bear the expected fruits. Regarding chestnut fruit species, toxins are dangerous in any case, because ripe nuts should be safe for humans. Damaged fallen leaves must be burned.
Photo gallery: chestnut pests and diseases
Growing chestnut trees requires a lot of effort. But all of them are more than rewarded if you properly care for the plant. While in favorable conditions, decorative chestnut seedlings will delight you with a stylish exterior, and fruit species will delight you with delicious nuts rich in nutrients.