The need to build a compact house may arise due to various reasons. For example, such a small structure is perfect for placement on a summer cottage that is not used for permanent residence. In a small house you can conveniently change clothes, put your things and spend the night.
Of course, ready-made cabins are sold on the market, but the quality of their execution often leaves much to be desired, and the cost is definitely overpriced. For the same money you can put together a great little house on your own.

There is nothing complicated about building a compact structure yourself. Follow the guide and everything will definitely work out.
Any construction must begin with planning, without which construction will take much more time, money and effort. There is a possibility that the finished structure, built without a plan, will not meet your needs and expectations.

For a small house it is not necessary to draw up detailed documentation with many drawings. Even a simple sketch indicating the main dimensions, communications and other design features will be sufficient.
Preliminarily think through the order of the internal organization of the future small house. Will it have only one room, or will there be enough space for a small kitchen and a small bathroom? At this point, focus on your personal preferences and capabilities.
For example, many prudent owners use a very interesting technique: they raise the ceiling and arrange sleeping place in the attic. This solution allows you to significantly save useful space.

It is recommended to pay special attention to the experience of the Japanese. Even on a few square meters they manage to place everything necessary to create a comfortable and cozy environment, because even a mini house is still a house in which it is definitely more comfortable than on the street.

The following guide will give instructions on how to build a fairly simple small house. Approximately 75% of the space will be occupied by living quarters, and the remaining space will be used to accommodate a storage room and dry closet.


If things are very difficult with free space, you can make separate entrances to the mentioned premises from the street. If there are no such problems with free space, and you don’t want to constantly go outside, arrange an entrance to the technical room from the living room.
If desired, make your own changes to the plan. For example, instead of a pantry, you can arrange a mini-kitchen with a table, a couple of folding chairs or small stools and a compact stove.

After approval of the plan, proceed directly to construction activities. Start by laying out the foundation.
Foundation
For the construction of a small house, a simple foundation made of blocks is perfect. Western private developers came up with a very interesting solution. They create a foundation block with four channels. A reinforcing bar is inserted into each of these channels. The rods themselves are driven into the ground. As a result, the block is securely attached to the ground.


In the project under consideration, the foundation will consist of six such blocks. You will place four blocks in the corners of the future building, the remaining two - under the internal partition.
You can make the blocks yourself from concrete or buy them ready-made.
Dig a hole 200 mm deep with sides corresponding to the dimensions of the blocks.
Fill the hole with a 20 cm layer of sand and gravel mixture. Pack the pillow thoroughly.
Install blocks and introduce reinforcement in accordance with the previously given recommendations.

Cover the blocks with a layer of roofing felt.
Make sure that the blocks are installed evenly and proceed to further planned activities.
Floor installation

First step
Mount the bottom trim. Make it from timber with a cross-section of 15x15 cm. To connect the strapping beams, use a convenient fastening option. You can, for example, connect them using the tongue-and-groove method with additional reinforcement with glue and bolts.
Second step
Place a platform pre-assembled from a 15x5 cm board on top of the frame.
Third step
Cover the platform with plywood.

Fourth step
Turn the resulting box over and place insulation inside it.
Fifth step
Sew the insulation with a double layer of plywood. Lay plywood 1.2 cm thick along the box, and 0.9 cm thick across it. As a result, the floor will have a thickness of 2.1 cm. Use PVA glue to fasten the layers of plywood.
Sixth step
Sew the platform with roofing felt on all sides.
At this point the floor is ready. If you wish, you can additionally decorate it with other material to your taste.
Linoleum is perfect for finishing the floor.

First step
Treat timber and boards intended for wall construction with an antiseptic.

Second step
Assemble the frame of the planned dimensions.

Third step
Arrange top harness.
Fourth step
Cover the entire structure with plywood.

Fifth step
Attach windproof film to the outside of the walls. At the same time, this material will perform waterproofing functions.
During the construction of walls, do not forget to leave openings for installing doors and double-glazed windows.
Arrangement of the roof structure

The roof structure must be such that in the future, when opening the door, the roof overhang will not be affected. To comply with this rule, the slope of the roof slope must be 25 degrees.
First step
Install the rafters. To do this, use 10x5 cm boards. To fasten the boards, use corners and screws.

Second step
Mount the roof ridge. To make it, use a 15x5 cm board.
Third step
Additionally, fasten the roof rafters with ties 10x2.5 cm.
Fourth step
Attach 0.9 cm thick plywood to the rafters.

Fifth step
Lay your preferred roofing material over the finished base. Flexible tiles work well. This is a relatively lightweight material with good performance properties. At the same time, the roof of a small house will have a small area, so you won’t spend a lot of money on finishing material.

Doors and double glazed windows
To create a healthy microclimate in a room, even if it is very small, you need to install windows. It is better to provide places for placing double-glazed windows at the stage of assembling the frame.
To determine the optimal total window area, divide the floor area of your small house by 5. Divide the resulting value by the number of windows you need.

If you are planning to equip your small house with a bathroom and a kitchen, think in advance about the order of furniture placement so that the windows do not interfere with the normal use of the house in the future, but are a useful addition.
If possible, windows should be placed oriented towards the south-east direction, since on the north side sunlight very few, and low western sun rays bad for the eyes.
You can buy doors ready-made or make them yourself. It is enough to assemble the frame, fill the voids with thermal insulation (mineral wool is perfect), cover the frame with plywood and upholster it with the desired material.

Wall decoration

External
Proceed with the exterior wall decoration.


Internal
Proceed with interior decoration.
- Secure a layer of thermal insulation material.
- Cover the insulation with a layer of vapor barrier.
- Cover the walls with clapboard.
At this point the wall decoration is ready. After this, it is recommended to start arranging the ceiling and making a porch to your taste. It is better to carry out these activities before the construction of the roof structure begins.
Furnish and technical equipment of a small house according to your taste.


Ceiling finishing
- Cover the ceiling with a vapor barrier material.
- Secure the insulation material.
- Cover the ceiling with insulating layers with clapboard.
You can lay boards in the attic. At this point, focus on the specifics of your situation, taking into account exactly how you will use your attic.
Necessary communications
If necessary, install electrical wiring, sewerage and water supply into the house.

For heating a small house, both an electric heater and a gas convector are well suited. Such gas convectors use as fuel liquefied gas. To ensure the most efficient heat distribution, the system should be equipped with a galvanized steel reflector.


A gas convector must be equipped with a smoke exhaust pipe. The chimney is carefully insulated to prevent fires. To protect the chimney from snow, rain and various debris, install a special protective canopy on its street end.
Small on this one country house ik ready. You did an excellent job without involving third-party specialists, which allowed you to save a significant amount of money, and you were convinced that there is nothing complicated in the construction of such structures - you just need to follow the manual in everything and adhere to the advice of professional builders. You can start using the house you built yourself.


Happy work!
Video - DIY small house
Projects country houses from the construction company Mir Dach. Noisy city life eventually begins to tire you with its dynamism and speed. But not everyone has the opportunity to go on vacation abroad or at least to their native sea coast. And, to be honest, modern city dwellers rarely find a minute even to go to a barbecue in the nearest forest or to a lake with their children. Therefore, for many, a small country garden house becomes a real panacea from the hustle and bustle of the metropolis.
Many of us have looked with longing more than once country houses photos of which can be found on the pages of fashion magazines or on the Internet and dreamed of getting this little piece of country happiness. But there is an opinion that no matter how attractive the country houses of which you looked at the photos may be, reality hits you hard, preventing you from achieving what you want. Although these are just excuses, they are actually modern construction companies have long been offering fairly budget-friendly country house designs designed for middle-income people.
Free drawings and photos of country house projects you can look at the company's website. It would seem, why contact a construction company to build country houses, photo projects, which can be easily found on the Internet, and even pay fabulous sums for it. You can download it yourself required project or a program for its development, plan the construction and hire a team of cheap, low-skilled builders. Of course, in the end you will get yours country house for permanent residence. But the question is what quality will this construction be and how much money will you have to spend on materials purchased based on advice from the Internet or from a nearby foreman. Therefore, it is better, after all, not to tempt fate and build a turnkey country house.
What are the advantages of country houses whose projects are developed by specialized companies with a full staff of qualified employees?
- During the development of the project, both the wishes of the future owner of the house and the technical recommendations of a specialist are taken into account. Thus, you can be sure that the end result will not only have a beautiful country house for which you approved the design, but also properly installed communications, reliable foundation etc.
- Speed of construction. Firms that have been in the construction services market for a long time try to complete all the tasks set by the client in the shortest possible time. After all, they don’t have to look for a store with cheap building materials, transport for their delivery, workers.
- Guarantees. Large firms are concerned about their reputation in the market and are ready to confirm the quality of the work they do by giving legal guarantees. Having such paper in hand will make it much easier for you to prove that errors were made during construction and to demand compensation if any.
Having taken possession summer cottage plot, almost everyone dreams of building a big house or even an estate. But if you only own a few hundred square meters, then the best thing to do would be to build a small garden house with your own hands.
Such construction will not require large investments, but upon completion you will have a wonderful building that can be equipped for temporary residence, storage of tools and for other purposes.
Garden house design
Even such “small-sized” construction should begin with the preparation of the kit project documentation. In the project garden house must be present:
- Floor plans indicating the overall dimensions of each room
- structural units at the junction of walls, floors and ceilings
- Drawings of roof and floor supports
- Vertical section of the building with the main marks (bottom of the foundation, ceiling height and finished floor)
- Schemes communication networks- electrical, water supply, sewer and gas, indicating points of connection to the mains
Drawings are made to scale with obligatory observance of proportions. It is better to indicate linear dimensions in millimeters. To the project of building a garden house with your own hands, you should include explanatory note with a description of the solutions developed, indicating the building materials used and their quantities.
Space planning
 When choosing a location for a garden house, you must take into account that lowlands where water accumulates are not suitable for this. The best option there will be the highest point on the site in its northern or northwestern part at least three meters from the boundary.
One-story buildings with an attic are considered the most convenient as garden houses. which can be used to store household supplies and equipment. If you also build a terrace, you can equip it with a real dining room.
When choosing a two-story house to build, it is best to build the second floor in the attic. On the ground floor it is customary to equip a kitchen with huge windows and a room with a staircase.
Having a basement is not the best solution for a garden house. It will contribute to freezing of the room in winter time, which will negatively affect thermal protection. In addition, the basement is often flooded by spring waters.
Construction materials and tools
 You can build a small garden house with your own hands from brick, foam concrete or aerated concrete blocks and other materials.
But the main building material for load-bearing structures is a pine beam of square section 100x100 mm with one planed side, forming the outer surface of the building. The edges of the timber must be chamfered.
For all other elements of the house (ceiling, floor, beams, rafters, doors and windows) you can use pine lumber.
All materials require mandatory preliminary drying, and their level of humidity must be the same so that there is no shrinkage and deformation of the house when the wooden elements dry unevenly.
Also for construction you will need:
- Thermal insulation materials and available insulation materials
- Asbestos cement slabs
- Antiseptic for wood
- Ruberoid
- Nails
- Polyurethane foam
- Plaster
- Dye
- Floor slats
- Finishing materials
You can build a garden house with your own hands only using timber, slats, boards, doors and windows.
To work you need the following tools:

- Cordless drill
- Hand-held circular and miter saw
- Hammer
- Pencil
- Ruler
- Marking cord
- Flat brush
- Adhesive tape
Garden house construction technology
To simplify it yourself, you should use the principle of modular design, which consists of the following steps:
- Laying the foundation
- Construction of wall elements
- Creating a rafter system
- Roofing
- Installation of windows and doors
The facade of the house can be supplemented with a canopy, which is useful for shelter from rain or scorching sun.
Laying the foundation
 The foundation is laid below the soil freezing depth, taking into account the level of groundwater.
A heavy garden house (made of concrete, stone or brick) requires a backing strip foundation along the entire perimeter, a columnar one is more suitable for wood. It is also recommended to install it in regions with large freezing depths.
Suitable as foundation material natural stone, concrete and rubble concrete. Below the waterproofing layer, it is recommended to use concrete, clay bricks and cement mortar.
 In the basement part it is necessary to install waterproofing at a height of 0.2-0.5 m from the ground. If the soil is dry, it is enough to make a cement-sand screed of 2-3 cm; if it is wet, then you need to lay roofing felt in two layers over the screed. You can also stick it to a dry screed using hot mastic.
If the house has a basement, you need to create a waterproofing belt in both the basement and the foundation. The basement waterproofing should be located below the floor joists. To ventilate the subfloor, small holes are made in the base and covered with a protective mesh.
A blind area of at least 0.7 m wide is made around the base, which should have a slight slope from the walls of the house and protrude beyond the overhang of the cornice. To create it, the top layer of soil with vegetation is removed, clay with gravel or crushed stone embedded in it is trampled down along this strip, and then covered with concrete or fine-grained asphalt.
Walling
 The basis of the walls is rough timber, laid along the perimeter of the foundation in one row and fastened with nails. Waterproofing strips of roofing material are placed under it.
To create the frame of the house, 4 pillars are dug into the corners, the lower part of which is pre-wrapped with roofing felt.
From below they are attached to the rough timber, from above - to temporary braces, which are pre-positioned vertically along a plumb line. The frame elements are fastened with long nails.
After creating a rigid frame, its internal and exterior decoration. Between the edges of the corners, pieces of timber are laid in advance, layered with layers of flax tow, which are fastened together with 150 mm nails. At the same time, the verticality of the walls is constantly checked using a plumb line.
As the work progresses, door and window frames are installed.
Floor and ceilings
 To create a floor, beams are first laid, a subfloor made of edged planed boards is laid on top, and then a finished floor made of slats.
A clay screed is made on this floor, covered with insulation and another layer of roofing material. After this, a two-centimeter cement-sand screed is performed.
Antiseptic impregnation of the appropriate color is suitable as a coating.
The ceiling beams on the first floor create the frame for the floor on the second floor. These coverings are made from planed edged boards, and the space between them is filled with large sawdust. The ceiling is covered with clapboard along with the walls, and the floor of the second floor is covered with lath. Attic floors are made in the same way. In this case, their beams will rest at their ends on the load-bearing walls.
Roof installation
The roof of a garden house built with your own hands should be one- or two-slope. It consists of a roof (covering) and rafters on which lathing or flooring is placed.
 The easiest way to construct inclined rafters. In such a system, the rafter legs are cut into the upper frame of the wall or into the mauerlat laid along the perimeter of the top of the wall. A sheathing of boards is attached to the rafters, nailing them staggered or end-to-end parallel to the ridge.
It is most rational to make the roof from corrugated slate. When laying, the edges of the sheets should overlap by one wave, and in a vertical position - by 10-15 cm on each other. Each side is secured with nails or screws. If the roof slope is small, then roofing material is laid parallel to the ridge under the asbestos-cement sheets with an overlap. Roof fractures and ridges are covered with special shaped parts.
In addition, you can roof with other roofing materials. For example, soft sheet tiles "". It is an alloy of rubber and plastic. In most respects it is superior to commercially available materials of a similar type.
Or metal tiles. It does not heavily load the rafter structure, as it weighs 4.5 kilograms per square meter. Mounted on roofs of any type with a slope of 14 degrees (ideal slope - 20-25 degrees). Used in all regions of the country, including the northernmost. The process of installing metal tiles with your own hands is discussed in detail.
Or, cover the roof with bitumen shingles. This material has unique performance characteristics and is used for roofing in all regions. The technology for installing flexible tiles is discussed in detail.
Final stage
After completion of construction, it is necessary to install door and window blocks, and then manufacture and attach architectural details - door frames, front boards of cornices and gables, porch pillars, etc.
It should be borne in mind that for the manufacture of these elements it is impossible to use material that remains after construction. Only selected high quality wood is needed.
Upon completion of construction, you can begin designing a garden house with your own hands, both internal and external.
Video about building a garden house with your own hands
Good day, dear users of the site. The warm season is approaching and we cannot sit at home. Either gardening or cleaning garden plot. And you never know what worries you have on your plot in a village, town or country house. Sometimes, after righteous labors, you just want to sit down and relax, drink tea or coffee, listen to music, and so on. In your yard, you can simply take out chairs and sit, or it is better to build a structure specially equipped for relaxation. Therefore, I would like to present to your attention another summer guest house. This building is ideal for summer holiday, and even in the cold season, if you install a stove in it, it will be quite cozy. The assembly process is quite simple and will not be difficult for those whose hands grow from the right place.
To begin with, the author of this building prepared a place for the construction of the structure. I started, as usual in such cases, from the foundation. The author made a columnar foundation. Each column required eight foundation blocks. This is what the finished foundation looks like. Easy to build and not very expensive. Bricks can be used instead of foundation blocks.

The author's next step is tying, i.e. erection of the foundation of a future structure on the foundation. For this, the author used a beam with a section of 150x150 mm. Before installation, treat the timber with fire protection.

After we have tied the foundation, we install more between the main bars. This is for the floor. Next, the author begins to lay the floor itself.


Please note that when making the floor, the author does not place it in the front part of the building, since there will subsequently be a small terrace with a porch there. The author decided to insulate it immediately, without erecting walls. For this I used Izospan B, 5 cm insulation.

Further, after the author has covered the “sub-floor” with insulation, he lays the main floor on top of it.

Next, the wall frame is assembled and installed on the base.


Next, the author installs ready-made doors, upholsters the frame of the walls on the outside with isospan and trims everything with imitation timber.

This is what the walls look like from the inside at this stage of construction.

The next step is preparing the roof. The author puts insulation and sews everything up with boards.

After the author has prepared the ceiling, he assembles and installs skates on the roof. He fastens them with construction corners.


Next, boards are nailed for subsequent installation of insulation and roof tiles on them.

After all the boards are filled, we insulate the roof on top with isospan-D

Now the author begins to insulate the interior of the future guest house. For this, materials such as Izospan A, insulation, and lining are used.
Where does landscaping of a suburban area begin? We suggest considering the option of building small house with amenities and a terrace, which, after the construction of a full-fledged home, will become an excellent place to relax, store household equipment, or even a cozy guest house.
Inside the house there is a separate bathroom (4), a relaxation room with good natural light (3) and a small shed with an entrance from the outside (1) for storing small items or setting up a mini-workshop. For a pleasant time in the fresh air, we will allocate a place in the plan for an attic (2), approximately 180x260 cm. The overall dimensions of the house are 6x6 meters, just the standard length of the scaffolding.


Foundation tricks
Our construction is based on 16 concrete pillars arranged in a 4x4 square at 2 meter intervals. The marking of the site is carried out with a grid stretched on stakes; from each of the 16 intersections, a mark is transferred with a plumb line to the ground. Four internal wells are dug strictly at intersections, twelve external ones - with an inward shift of 7 cm.
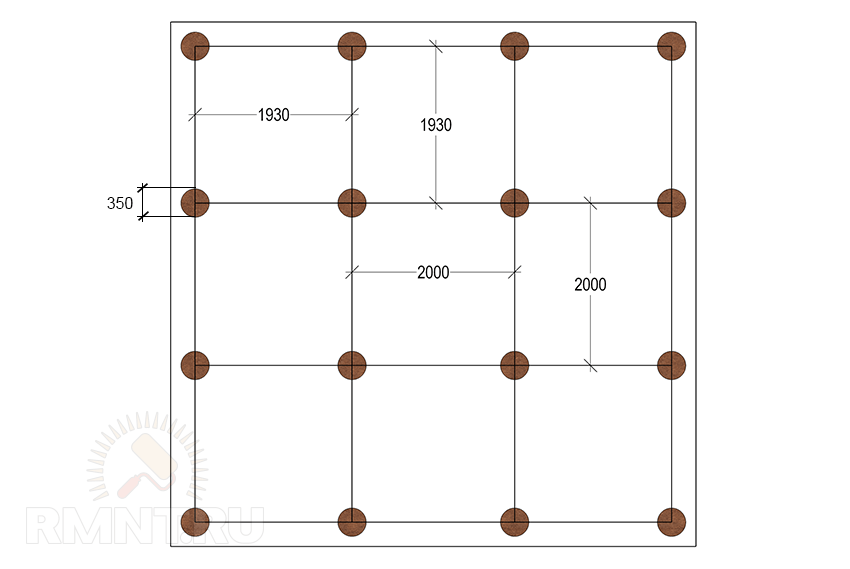
You can dig by hand, drill with a motorized drill, or use a crane-drilling machine. We drill wells with a diameter of 350-400 mm to the depth of soil freezing plus an additional 50 cm. At the bottom of each well we pour a bucket of crushed stone or river pebbles, then add two buckets (25 liters) of grade 300 concrete with a filler of fraction 5-8. We stick 110 mm plastic sewer pipes (gray PVC) into the solution that has not yet set. We orient them with the sockets up; for long pillars, the pipes can be made prefabricated. We align the pipes vertically, as well as at intersections and general level lacing, pour 1-1.5 buckets of sand into the pits, fill the rest with earth.

After the bases have set, we pour the same concrete into the pipes; they can be seated by vibration or pinning. The column is reinforced with a 14 mm profile rod the full length of the pipe; an M12 stud 200 mm long is welded to the upper edge. Such a foundation does not react in any way to winter heaving of the soil: a smooth sleeve around the pillar does not allow the soil to freeze to the concrete.
Grillage and frame floor
A week is given for the pillars to dry. On top you need to stretch a fine (15 mm) chain-link mesh, painted or galvanized, two meters wide. We stretch it on the studs of the pillars, and sew the edges with wire.

Then a grillage made of 150x150 mm timber is assembled on the foundation:
- at intersections we make a half-tree cut;
- use a brace to make 20 mm holes for the studs;
- fold the internal grid of the grillage;
- we place the outer bars horizontally, following the dressing scheme;
- tighten the nuts over the wide washers until the beam crushes the mesh;
- we finally draw out the general horizontal plane with linings made of roofing felt;
- cut off excess pins.

We attract the mesh to the grillage either with wire, or we hit it from below with galvanized nails. We put a windproof membrane into the cells and turn them high at the edges. Afterwards, the space between the beams is filled with a mixture of wood shavings and slaked lime 5:1 and covered with plastic film, the edges are fixed with staples.

A sheathing is mounted on top of the film: a 50x150 mm board is placed on edge in both directions to form cells of approximately 580x580 mm. There are eleven boards on each side, twenty-two in total. Along the edges and at intersections with grillages, the boards are drilled to 70 mm with a 10 mm drill, then pulled to the base with self-tapping screws. The intersections of the sheathing should be carried out as on the grillage - with trimming in half the tree, all cracks and junctions should be moistened and sealed with summer foam.

The floor frame, with the exception of cells located entirely under the terrace, is filled with mineral wool and covered with a semi-permeable (150 g/m) diffusion membrane. The floor is laid with edged tongue-and-groove boards over the entire surface. We make ventilation holes in the cells under the terrace in the frame boards.

Walls, corners, openings and junctions
Further work begins with two walls opposite the corner attic. First, on the flat base of the house, we lay out and assemble on self-tapping screws a frame of boards on edge with external dimensions of 570x240 cm. To the assembled frame we add 2.4 m of racks from 24x150 mm boards with an interaxial pitch of 60 cm. We do not throw away the short pieces from the racks, but cut them along 60 cm. We will use these short boards as horizontal crossbars in the frame for joining the sheathing.
We raise the wall vertically and temporarily attach it to the base with mitered boards. The bottom board of the wall frame is attached with 120 mm dowels to the ribs of the floor system every 40 cm. The second wall is assembled in the same way and installed perpendicular to the first, temporarily tied together with gussets.

Please note that the outer corner is “empty”. We cover it with foam, insert a 60x60 mm beam, and screw the outer boards of the two walls to it, having previously made holes for 100 mm self-tapping screws.

We assemble the remaining walls in the same way, the internal corner is processed in the same way as the external one. From the outside we sheathe the house with 12 mm OSB sheets 2400 long, so the vertical seams fall exactly on the centers of the racks. Place the sheets 200 mm above the wall frame; at the bottom, the sheathing goes down to at least the middle of the grillage. At the corners, the edges follow the frame of the adjacent wall.

When one side has been sewn up, we roll a 40x40 mm block along the vertical edge from the inside and fill the remaining space with foam. From the same corner we begin covering the next wall, screwing the edges of the sheets to the connecting bar.

To form doorways, choose a 50x150 mm board and knock down an installation box from it with internal dimensions of 100x210 cm for front door and 80x210 for internal ones (with a canvas width of 70 cm). Before installation, the vertical wall post is cut out completely (can be divided into 4 crossbars); after installing the box, 35 cm liners from boards are added on top of its vertical posts.

Window blocks with an opening width of less than 60 cm are formed by adding horizontal crossbars. The block for a wide window is assembled from a 150x50 mm board and inserted into the frame in the same way as a door, but in this case, fragments from at least two racks must be cut out for it, and the T-shaped junctions must be reinforced with gussets.

Everything you need to know about roofing and attics
To escape the cold and heat, the ceiling must have a layer of mineral wool insulation with a thickness of at least 200 mm. In this case, it is better to make the roof single-pitched and ventilated. There may be an attic, but only as a room for storing materials with usable height 40-60 cm.

From a 150x50 mm board we assemble trapezoidal single-pitch rafters with a height of 60 cm in the rear and 110 cm in the front. Two six-meter trusses are installed above the “full” part of the house, and five more will be installed above the attic.
To obtain sufficient rib width, a counter-lattice made of 50x50 mm timber is screwed onto the lower rafter boards with self-tapping screws. The top board of the truss turns out to be longer than six meters due to 40 cm overhangs in the front and back of the house. Therefore, you will have to either splice the existing timber with the overlays, or import a longer one. Vertical jumpers are installed one and a half meters from the low edge of the trusses. The rafters are also strengthened with similar posts in the front part, but they are placed exactly above the walls under the direct lining of the terrace from the floor to the roof. The entrance to the attic is located in its widest part - in the inner corner of the terrace.

Attach the rafters to the wall frame, adjusting the solution of the latter in the upper part. Then add intermediate floor beams between the rafters from 150x50 mm boards with 50 mm counter-lattice. Hem the ceiling with OSB 9 mm thick and screw the external cladding of the house to the ends of the ceiling. Fill all joint gaps with summer foam, then place a vapor barrier in the ceiling and mineral wool, nail a windproof, vapor-permeable membrane on top. Cover the attic floor with 12 mm OSB sheets, cutting grooves for the rafters. Along the vertical crossbars in the rafters, cover the vertical walls of the attic with OSB boards and insulate them as desired. Cover the rafters with plastic film and lay them cold roof from metal tiles or corrugated sheets.
Interior and exterior finishing
In conclusion, we will give recommendations for finishing works. Outside, you have a flat plane with hidden posts every 60 cm. Therefore, both plastic siding and the block house will fit perfectly.
For interior decoration Drywall suggests itself, but attaching it directly to the studs would be a mistake: the wooden frame will move a lot and cracks will appear. The walls can be sheathed with OSB, followed by upgrading with MDF panels or clapboard. If you still intend to use drywall, prepare the profile frame according to all the rules.