WP_Query Object ( => Array ( => 1 => rand) => Array ( => 1 => rand => [m] => [p] => 0 => => => => => 0 => => => => 0 => => => => 0 => 0 => 0 [w] => 0 => => => => => => => => => 0 => = > => [s] => => => => => => => Array () => Array () => Array () => Array () => Array () => Array () => Array() => Array() => Array() => Array() => Array() => Array() => Array() => Array() => Array() => => => 1 => 1 => 1 => 1 => => => 50 => =>) => WP_Tax_Query Object ( => Array () => AND => Array () => Array () => wp_posts => ID ) => WP_Meta_Query Object ( => Array () => => => => => => Array () => Array () =>) => => SELECT SQL_CALC_FOUND_ROWS wp_posts.ID FROM wp_posts WHERE 1=1 AND wp_posts.post_type = "post" AND (wp_posts.post_status = "publish") ORDER BY RAND() LIMIT 0, 1 => Array ( => WP_Post Object ( => 1827 => 1 => 2015-08-01 19: 28:15 => 2015-08-01 15:28:15 =>
Earthworks

Cellar base
Ceiling and cellar
 The roof of the cellar should be pitched and have wide overhangs - they will protect the cellar from rainwater entering it. Two layers of roofing material must be laid over the roofing shingles, after which the roof is covered with roofing material. The most common materials are suitable for this: slate, tiles, corrugated sheets, and even straw. => Dugout cellar: convenient vegetable storage => => publish => open => closed => => pogreb-zemlyanka-125 => => => 2016-01-18 17:04:02 => 2016-01-18 13:04:02 => => 0 =>?p=1827 => 0 => post => => 3 => raw => index,follow)) => 1 => -1 => => WP_Post Object ( => 1827 => 1 => 2015-08-01 19:28:15 => 2015-08-01 15:28:15 => Earthen cellar There are many ways to build a basement under a house, barn or garage, using the most durable materials and modern technologies production of work. And yet, many people prefer to build an earthen cellar with their own hands. Why not? If you need it solely for storing vegetables, and you know for sure that the groundwater in your area is deep, why not save money? We hope that the instructions we have proposed will help you understand the issue of arranging a dugout cellar and successfully cope with this work.
 Site selection and soil development
There are at least three structural types of cellars, the choice of which depends on the topography of the site and its hydrogeological situation. Like the ground floor of a building, a separately located cellar can also be completely buried, half buried, or even be above ground.- Much depends on the climatic conditions of the area and the level groundwater, but a lot also depends on the choice of location for the cellar. In no case should the basement be located at the foot of the slope - otherwise, rain and melt water flowing down it will fall into the cellar.
- Therefore, if possible, it should be built on a hill. In this case, you don't have to worry about flooding. What should those who have a flat landscape do? First of all, you should determine the groundwater level by drilling a three-meter deep hole in the ground and leaving a wooden strip in it for a couple of hours.
Groundwater level exploration - If after this time it remains dry, it means there is no water at this mark. Is the end of the pole wet? You need to measure at what distance. The minimum safe water supply for a cellar should be half a meter from the floor.
- This distance may well be reduced after the snow melts, or as a result of massive precipitation. Therefore, the depth of groundwater should be determined in the spring, when its level is highest.
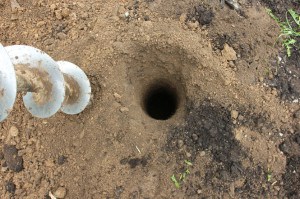
Earthworks
Earthen ones. The tubers are in their natural conditions and therefore practically do not dry out. It’s easy to guess that not every soil is suitable for building such a cellar.- It will simply crumble, which will create problems not only during excavation work, but also during the operation of the building. The walls of a cellar dug, for example, in sandy soil, will have to be lined with boards or asbestos cement sheets - so the cellar will not be entirely earthen.
- Of course, the cladding improves the cellar and makes its operation more comfortable. But the price of the cellar increases due to the cost of materials. In dense soils, such as clayey soils, there are no such problems, and you can completely do without unnecessary work.
Marking the contour for the pit - Before you start digging a pit, the site should be prepared. If necessary, uproot bushes and stumps, cut off a layer of fertile soil. After the ground surface is leveled, the outline of the future cellar can be laid out. You can hammer pegs in the corners and stretch a cord between them. If grooves are immediately cut along the contour, the cord and pegs can be removed so as not to interfere.
- A pit of regular geometric shape, with steep, non-crumbling walls, such as in the photo below - best option for an earthen cellar. His standard size: 2*2m, at the same depth. But if it cannot accommodate the entire volume of the harvest, nothing prevents you from increasing the size of the cellar.
- In principle, its configuration can be any. But what's the point of digging, say, a polyhedron or a cylinder? This only increases labor costs. A round pit is usually dug when a cellar is built from well wall rings - but that's a completely different story.
Cellar pit You can dig a pit either manually or mechanized - it’s up to you to decide. The main thing is that the result is satisfactory.
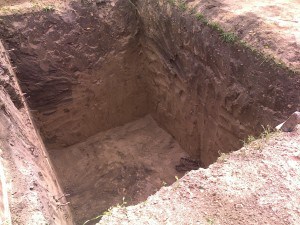
Cellar base
The bottom of the pit must be carefully leveled and compacted. If the water is far away and the soil is dry, the floor of the future cellar is lined with layers of fatty clay, 10-12 cm thick. Clay itself is a waterproof material, and its use provides natural waterproofing of the base. On top of it, the same layer of ordinary soil is poured and compacted.- What to do if the soil in the pit is wet, since the water does not lie very far? You still have to pour a concrete screed. But first, the base should be filled with a sand-gravel mixture. The thickness of this layer must be at least 15 cm, and it must also be well compacted.
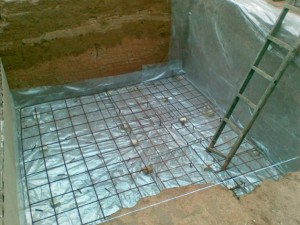
Waterproofing preparation of the base Next, the bottom of the pit must be covered with plastic film or any rolled waterproofing material. The canvases are laid over the walls and overlap, fastening the joints with tape. If you put it on the floor metal mesh, then the base will also acquire additional strength. Concrete is poured to a thickness of 8-10 cm - for an ordinary cellar this is quite enough. How to do this correctly, watch the video on this topic. Ceiling and cellar
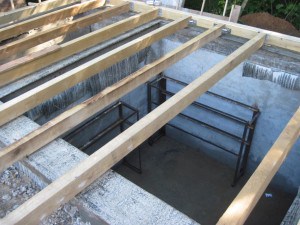
The walls of the cellar, if they do not crumble, are left without lining, and they immediately begin to arrange the ceiling. It will serve as a ceiling for the cellar, and a floor for the cellar - a building above the cellar, which serves to additionally protect it from cold and heat.- If the cellar is not built, the pit will be covered with a sub-cellar. This is timber, which is thin logs and poles of coniferous and hardwood wood
- This flooring is coated on top with a mixture of clay and chopped straw, allowed to dry, and a thick layer of insulation, for example, expanded clay, is poured on top. Finally, the ceiling of the cellar is covered with 40-50 cm of earth and covered with turf.
Frame for the ceiling of the cellar - Still, it’s better to make a cellar. She helps all year round, and can also be used as a storage room for storing gardening tools. This is a ground-based structure that can be erected from absolutely any materials used in construction.
- But in this case, the material should be light, since the walls of the cellar are earthen, and support, for example, brickwork, there will be nothing. If you want to make the walls of the cellar solid, from brick or stone, you will have to make a shallow strip foundation.
- In order not to disturb the walls of the pit, you need to retreat at least 50 cm from its edges. That is, the area of the cellar will be larger than the area of the cellar. Its covering is usually done like this: a frame of beams is built along the upper perimeter of the pit and sheathed with thick edged board, and even better - OSB boards. The ceiling must also have a hatch for descending into the basement.
- Then you can begin building the walls of the cellar. In the corners of the pit, with a slight indentation, wooden or metal posts are dug in, along which it will be convenient to carry out the cladding. When a cellar is erected over a cellar, the ceiling need not be insulated. But in this case, the walls and roof of the building must be well insulated.
Cellar for an earthen cellar - The easiest way is to mount slab insulation, for example, polystyrene foam, on top of the plank sheathing, secure it with a counter-batten, and cover it on top with cement-bonded or wood-polymer boards, corrugated sheets, or flat slate. If desired, you can use any decorative panels: plastic or composite. There's only enough money and imagination for that.
- You just need to remember that the walls or corner posts of the cellar must be recessed by at least 40 cm. Along their outer perimeter, a blind area with a slight slope should be built, made of several alternating layers of crushed stone and clay. Drainage trays can also be installed around the cellar.
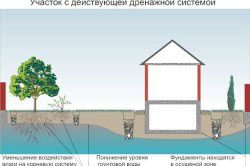
Draining water from the site increases the load-bearing capacity of the soil, eliminates the need for waterproofing basements or ground floors and improves the local microclimate of the landscape.
Therefore, deep and surface drainage systems are built by both the owners of houses that are still standing and the owners of buildings that are already in use. And in this article we will analyze the process of constructing bends on summer cottage.
There are two ways to rid the area of excess moisture, namely:
- Having constructed a surface outlet, problem solver recycling of atmospheric precipitation and runoff from the roof.
- By constructing a deep drainage that will “dry” the soil of the site itself.
Of course, draining rainwater from the site will cost much less than landscape reclamation. However, surface drainage does not solve the problem of excessively wet soil. Therefore, the possibility of using the first or second drainage arrangement scheme is associated with two soil characteristics: soil moisture and groundwater level.
Accordingly, if the level is critically close to the surface, and the humidity is very high, then the owner of the site will have to invest in deep drainage.
In the opposite case - with average soil moisture and a large depth of groundwater - surface drainage is quite sufficient.
|
|
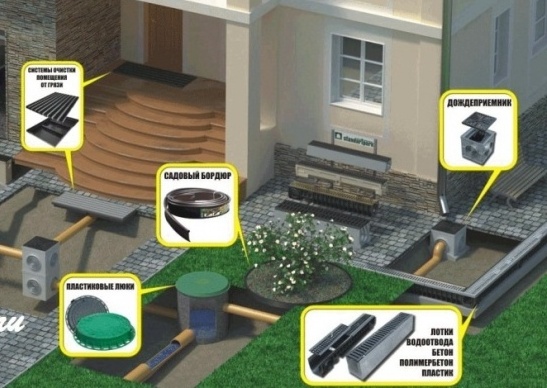
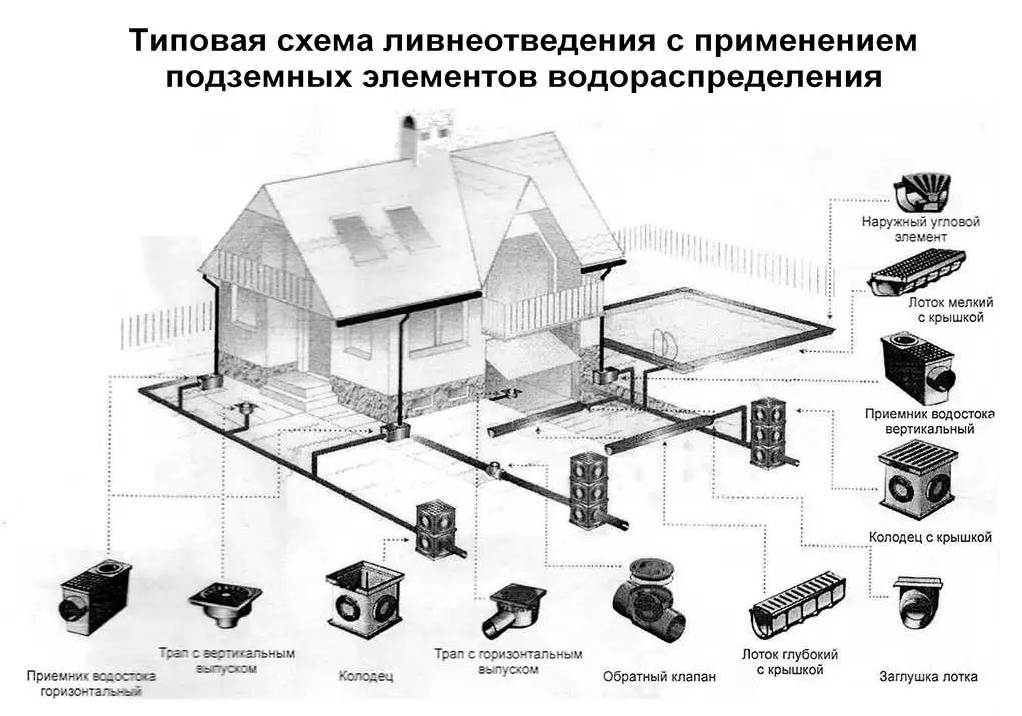
Surface water drainage: arrangement methods
Removing moisture from the surface layers of the soil is solved by building a point, linear or combined drainage system.
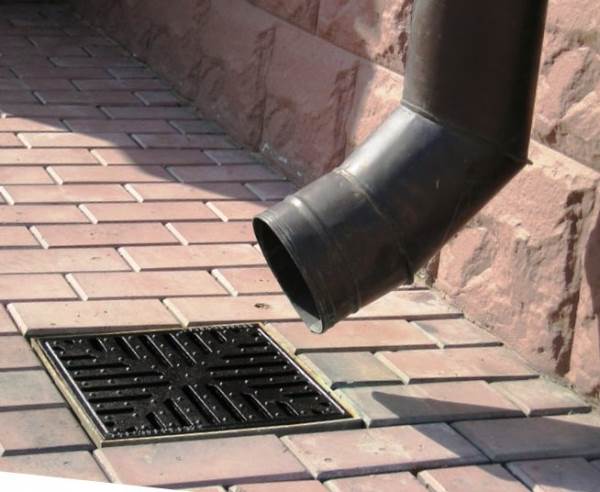
A point drainage system is an ordinary storm well that is installed under a drainpipe, at a place where water stagnates (puddles), under a watering tap, or in any other place. The well simply accumulates excess moisture and discharges it into the central sewer system or simply into a ravine.
The linear system involves the construction of drainage trenches that ensure the removal of ground surface water from a site of a sufficiently large area. However, the effectiveness of such a system depends on the carefully adjusted slope of the trench bottom. That is, with complex terrain of the site linear system diversion involves fairly extensive excavation work.
Therefore, most relatively dry areas are equipped with a combined surface drainage system - a network of drainage trenches connected to storm wells.
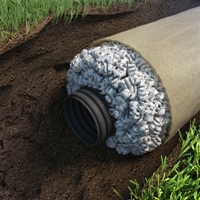
In this case, ready-made polyethylene structures are used as the latter, buried to a three-meter mark, and instead of drainage trenches, a Sofrock pipe system can be used. Such a drainage system is dug down to 50-60 centimeters and covered with special soil with high moisture permeability.
Moreover, the Sofrock drainage pipe is surrounded by a 10-centimeter filter layer based on polypropylene. Therefore, such a structure does not freeze and does not deform during seasonal soil movements.
Deep drainage - a solution to the problem of wet soil
Deep drainage is practiced when soil moisture is high or when soil moisture permeability is insufficient.
Moreover, these shortcomings can be determined even visually - if after rain the puddle does not dry out in a couple of days, then deep drainage will have to be built on the site.
The design scheme of deep drainage is similar to a combined surface type solution. That is, deep drainage involves the construction of drainage channels supplied to the catchment areas, which are connected to the central sewerage system.
Of course, these channels, as well as the drainage basin, will be laid at great depths - below 1-1.2 meters. Therefore, the deep system involves a fairly large amount of excavation work. However, the problem of high soil moisture can only be solved in this way.
Construction of deep drainage system - process overview
Installation of deep drainage begins with the construction of four intermediate catch basins, laid in the corners of the drained perimeter. Moreover, the catchment itself is built in the shape of a well, with a diameter of at least 300 millimeters, and sand and gravel bedding is added to its bottom.
The depth of the intermediate well (collector) is 3 meters. The best way Mine development - soil drilling. The best way to reinforce walls is casing pipes made of polymers or asbestos cement.
After the construction of intermediate collectors, they are connected by drainage trenches. Moreover, the bottom of the trenches should descend to the “last” corner well (which will be connected to the central collector) at an angle of 3-4 degrees. That is, the height difference per linear meter should be at least a couple of centimeters.
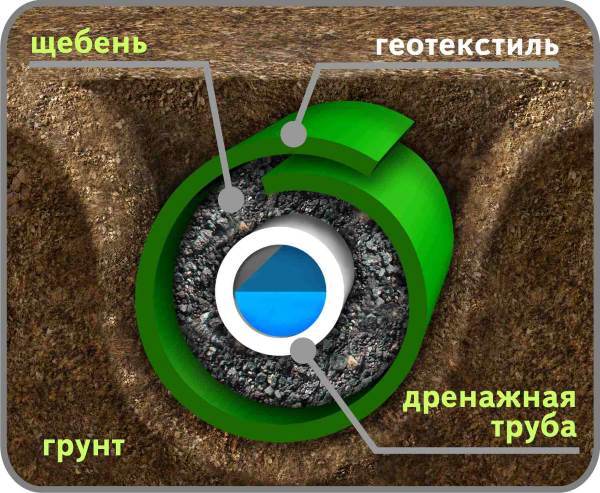
In this case, you will have to lay geotextiles at the bottom of the trench, and then add at least 5-10 centimeters of crushed stone or gravel. The drainage pipe is mounted on this bedding, after which the entire trench is filled with crushed stone (gravel) to a level - pipe diameter + 5-10 centimeters. Drainage pipes are inserted into corner collectors using tees.
Open trenches are filled with a mixture of gravel and sand, having previously protected the crushed stone bedding with geotextile, which protects the pipe from silting. A layer of turf is rolled out on top of the sand and gravel backfill or 10 centimeters of gravel (screenings) are added to form a walking path.
The outermost corner collector is connected to the central water collector with a deep gasket with a diameter of at least 150-200 millimeters. Moreover, the central water collector is designed in the form of a well, with a diameter of 0.5 meters, with sand and gravel bedding at the bottom.
The problem for many people who have land is excess water. Even at higher elevations and in fairly dry places in the spring, meltwater can flood the ground, albeit for a short time, but will manage to cause significant damage to the dacha. There are several ways to combat this scourge, either on your own or by turning to professionals.
How to remove excess water from the territory? Most often, two methods are used - changing the level and composition of the soil or planting plants that absorb a lot of moisture. The dacha plot may be swampy due to the topography; insufficient slope prevents water from leaving the plot on its own. In this case, doing it correctly will help. Having calculated where and what the slope should be, you can create it artificially with the help of brought earth. If the dacha is located in a low area, the area also needs to be raised and leveled. This method is one of the easiest; it is now possible to order machines with land, and in this way you can increase the fertility of the territory.
The most acceptable way is to plant moisture-loving plants. Under no circumstances should plants with a taproot system be planted; an increased amount of water puts pressure on them, cuts off oxygen to the roots, and they begin to rot. It is best to choose trees with fibrous root systems, these include oaks, birches, willows and maples. They will absorb excess water, and thanks to the modern large selection of species of these trees, this way you can transform your summer cottage. Not bad and simple option is digging a ditch, and, if desired, a pond, which will not only help put the area in order, but will also play an aesthetic role. This is not the most effective, but the most affordable method that can be used even by owners of small areas with a house in the middle.
Return to contents
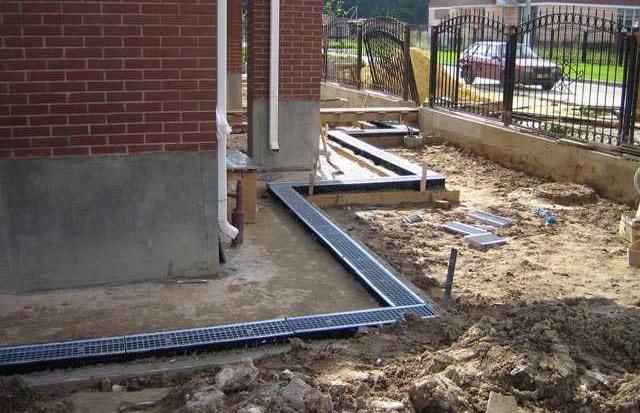
Preparatory work for drainage installation
A good way to remove water from a site is drainage; it will remove surface moisture, protect the basement and foundation from groundwater, thereby increasing the service life of all buildings in the country. But installing this system on your own is problematic. First of all, you need to correctly calculate the slopes and take care of the place for the catchment. Drainage is required if about 1 m, and it is advisable to lay it before building the house, taking into account its future location and, if any utility networks, even before they are carried out.
Then everything is calculated according to the scheme necessary materials, their quantity, pipes, tees, angles, couplings, plugs, saws for cutting pipes are purchased, and crushed stone and sand are also prepared. Usually, if the drainage is installed by professionals, then they have all the tools, but if the system is installed on their own, then they will have to be found or purchased. The most popular material now is geotextiles; it appeared on the market quite recently, but has already become firmly established due to its easy way connections and good characteristics. Since country house construction is becoming increasingly popular, and drainage, accordingly, is becoming a profitable business, and new pipes are being produced. Today, geotextiles have begun to replace corrugated plastic drainage pipes.
Return to contents
Installation of drainage system
After preparatory work installation of the drainage system begins. To do this, they dig a trench of the required depth, observing the required slope; usually, a construction level is used to check it, and if there is none, and the drainage is installed independently, then two glass tubes are taken connected by a rubber hose. They are filled with water, and the water level in them, according to the physical laws of communicating vessels, will be at the same level as the horizon. This is the easiest way to lay trenches level, and also to determine how level the area itself is.
Trenches are usually made from 30 to 70 cm wide, depending on the composition of the soil, the depth of the trench and the diameter of the pipe.
Drainage pipes are always laid with a slope of 2-3%, this ensures that the water will drain at an optimal speed - the tank will not overfill and the summer cottage will not dry out. If the drainage pipes are installed horizontally and evenly, the moisture will stagnate, and during heavy rains and the water level in the reservoir rises, the reverse process may occur and all the water will flow into the trenches. The bottom of the trench is made like a tray, compacted, smoothed, covered with crumpled clay, compacted again, giving the final shape. This will help the trench stay in position and not become deformed. The clay is covered with a thin layer of sand on top, which serves as a shock absorber, and pipes are laid on it.
After all the pipes are laid, they are connected to each other using couplings, thereby forming a single collector. Through it, an excess of water will flow at a speed of 2 m/s into the reservoir. The water collector must be equipped with waterproofing, have strong walls and preferably several compartments from which it is necessary to periodically pump out. Increasing the number of compartments will help prevent the area from flooding in the event of a drainage breakdown. To avoid frequent accidents and properly control the system operation process, there is a way. It consists of installing drainage wells at the junction of the collector with the drainage elements; if the area is large and the total length of the system is impressive, then one or two more wells can be installed at the bends of the pipes. These precautions are necessary for flushing in the event of a blockage. The walls of the wells are made higher, raising them to the top layer of the earth, so that, if necessary, it is easier to reach them, so that the wells themselves do not become clogged and are not washed away with earth, tight-fitting rubberized covers are put on them.
When the entire drainage system is installed, the pipes are covered with sand, then a layer of 20-30 cm of coarse crushed stone is laid. If pipe fasteners were used that are fixed to the walls of the trench, then they are covered with overlapping crushed stone. Afterwards, all the holes are filled with soil, compacted in layers. It may happen that country house has already been built, but the amount of water has not been adjusted, then the drainage is done almost the same way, only the depth of the pipes changes. Trenches are dug around the house 5-10 cm below the depth of the foundation to protect it from being washed away by water and destroyed.
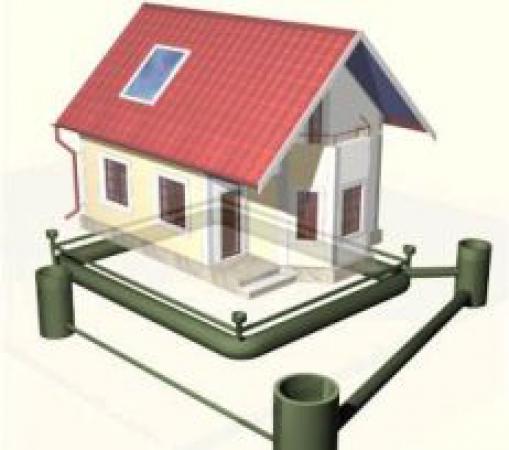
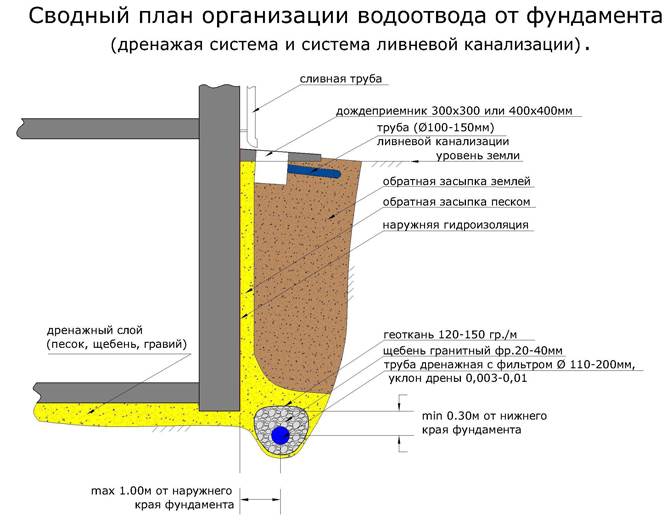
In any suburban area, draining water from the foundation of a house is important for cultivating garden crops and increasing the service life of underground structures. Comfortable operation of the site is usually hampered by groundwater - underground and surface water. Therefore, drainage and storm sewerage, roof drainage included in storm water inlets are necessary.
Depending on the topography of the cottage community, individual areas within it can rise, be level with neighboring land plots, or represent a closed closed zone without drainage - a saucer. The last option is the worst possible; draining groundwater from the foundation will require large investments. Water drainage using drains, trays, and stormwater pipes is relevant for solving the following problems:
- eliminating the danger of floating - the weight of light wooden buildings is not enough to balance the lifting force;
- destruction of the dynamics of rising groundwater levels (GWL) - can be caused by structural, planning, architectural solutions at the construction stage;
- elimination of deformations - heaving forces are eliminated, foundations are restored;
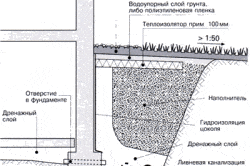
- protection of basement floors from flooding - high water may accumulate in the adjacent layers, the groundwater level should be at least 0.5 m below the underlying layer of the foundation cushion;
- compliance with agrotechnical requirements - for normal cultivation garden plants The groundwater level should lie below the blind area by 0.5 m (for lawns), 1 m (raspberries, gooseberries), 1.7 m (plums, cherries), 2 m (for apple trees).
Attention! Drainage and storm drainage will have to be done with your own hands on clay soils. To protect against swelling in the sinuses of the trenches during backfilling, inert materials are used under the base of the foundation. They contribute to the technogenic accumulation of perched water, even with a fairly wide blind area.
Surface runoff is collected by trays and storm water inlets, and groundwater by drains. These systems cannot be combined to avoid overfilling underground reservoirs.
There are several types of groundwater, each of which should be drained from the building and site:
- soil - present in the corresponding layers in the form of a directed flow, they have a seasonal rise at the time of snowmelt or rain;
- capillary rise of moisture - water can rise due to capillary forces, saturating concrete structures;
- perched water - water lenses are formed in the fractional preparation of communication trenches, backfill sinuses during rains, heavy watering, floods, leaks from artificial reservoirs.

Groundwater can only be drained by drains into natural reservoirs, ditches or low landscaping. This is the maximum construction budget with a non-guaranteed result. Since the level is subject to seasonal fluctuations, the volume of water is large due to the constant influx.
The height of the soil border, in which capillary rise of water is possible, according to the research of P. P. Klimovsky (literature “Dynamics of Groundwater”) is:
- 6 – 12 m – clay;
- 3 – 6 m – loam;
- 1.2 – 3.4 m – sandy loam;
- 0.4 – 1.2 m – dusty sand;
- 12 – 35 cm – medium-grained sand;
- 2 – 4 cm – coarse sand.
To completely eliminate capillary water, it is enough to make a crushed stone layer. To ensure that the rupture of the soil border remains stable, the mutual penetration of soil and crushed stone into each other is prevented by non-woven material - geotextiles.
Disposal of flood, rain and other surface runoff is carried out by storm sewers. The most difficult case is the transit of “alien” flood waters through an area when the ground has not frozen since the fall (the snow fell before the upper layers of the soil froze). The average flow per hectare reaches 6 – 30 l/sec, depending on the proximity of natural reservoirs.
Important! The concept of surface drainage, borrowed from foreign translated literature, is incorrect. Wastewater is discharged either in open ditches or trays.
The load on the drainage system depends on the quality of stormwater. All water not collected by composite, concrete or polymer trays seeps into the soil and becomes perched water. Even from areas located below neighboring ones (in a pit), the shortest routes can be laid to discharge stormwater to the underlying terrain. After which the operational period of the building’s load-bearing frame will increase, and plant reclamation will improve.
Device technology
After the developer has figured out which waters are preventing him from using the building normally, it is necessary to make underground drainage and/or surface storm drainage. Stormwater drainage usually includes stormwater inlets into which runoff from the roof drainage is drained.
Drainage (groundwater drainage)
Groundwater is drained by three drainage systems, the choice of which depends on the geology of the site:
- reservoir drainage is the best option for reducing the groundwater horizon;
- wall drains - serve to collect capillary water and perched water;
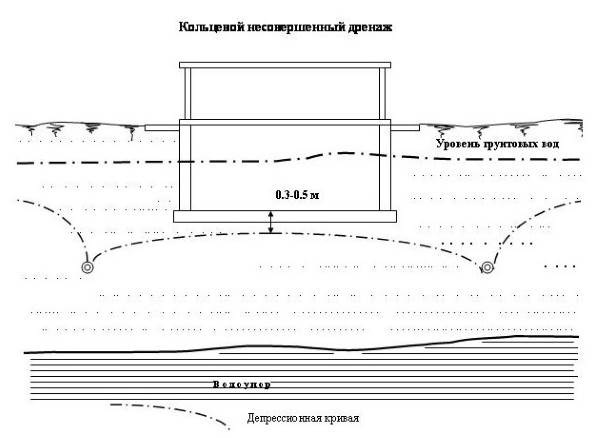
- ring drainage - created to lower the groundwater level.
Attention! Soviet construction literature indicates filling the sinuses of trenches with clay. Making waterproof locks from this material. It is strictly not recommended to do this, since this is the only soil that exhibits uneven swelling.
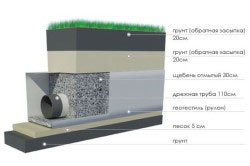
The technology of the most expensive, but easiest to manufacture reservoir drainage is as follows:
- slopes - created from the center of the building to the perimeter, have an angle of 4 degrees (height difference 1 cm/1 m;
- drainage layer - standard leveling crushed stone backfill 20 - 40 cm over geotextile fabric;
- drains - corrugated pipe with slotted perforation in a geotextile winding around the perimeter of the building.
For making reservoir drainage several dump trucks of crushed stone are left, which sharply increases the construction budget. More economical option is a ring drainage, however, in this case, an accurate calculation of design elevations is necessary - the clean floor should remain 0.5 m higher than the top point of the structure's conventional funnel.

The calculations use flooding forecasts, the location of the impermeable layer, friction angles, and special coefficients for each soil type. The design of the ring drainage is simpler:
- wells - inspection wells in the corners of the house, overflow and rotary when changing the height of levels and direction of flow, respectively;
- drains - enter the wells by 5 - 10 cm and are interrupted inside them.
Ring drainage serves to lower the groundwater level, the inflow rate reaches 15 l/sec, so it is used pumping equipment, increase the thickness of the crushed stone layer around the drains (up to 25 cm on all sides), in mandatory use a separating layer of geotextile:
- The bottom of the trench is lined with non-woven material, the edges are placed on the side walls;
- a 25 cm layer of crushed stone is filled in and compacted;
- corrugated pipes are laid;
- drains are filled with crushed stone of the same layer thickness;
- the structure is covered with geotextiles.
Attention! If groundwater is above the floor ground floor, the drain axes are positioned at least 1.6 m from the foundation.
Unlike the previous option, wall drainage designed for drying lenses of perennial water, manufactured using the following technology:
- installation of wells - pipes with a plugged bottom or factory products;
- laying drains - at a distance of 1.6 - 4 m from the foundation, 10 cm below the underlying layer of nonmetallic material, the overall slope to the reservoir is 1 cm/1 m.
Attention! When perforating pipes yourself, it is necessary to cut slots and drill holes only in the upper part (90 - 270 degree sector of the outer surface).
The minimum diameter of drains is chosen constructively; calculations for wall sewerage are not performed. The thickness of the natural filter (crushed stone, gravel) around the drains is reduced to 10 cm due to the insignificant flow.
Storm sewer
To ensure that the surface drainage system does not interfere with the operation of the site, storm drainage elements are usually integrated into the blind area and paths. The manufacturing technology is as follows:
Maximum resource reinforced concrete structures can only be provided by a comprehensive drainage system. Storm sewers collect surface runoff, drains drain high water, lower groundwater and eliminate the capillary fringe.
Advice! If you need contractors, there is a very convenient service for selecting them. Just submit in the form below detailed description work that needs to be done and you will receive offers with prices from construction teams and companies by email. You can see reviews about each of them and photographs with examples of work. It's FREE and there's no obligation.
Drainage work or how to drain water on a site
It's no secret garden plots often diverted in lowlands and inaccessible areas where drainage work needs to be carried out.
Otherwise, stagnant water will cause damage to both the garden and buildings.
Just do this job right?
Where to start reclamation (drainage) work on a summer cottage
It is better to start reclamation (drainage) work either in early spring immediately after the snow melts, or in the fall during the period of prolonged rains.
Then it is easy to see all the stagnant places and determine the presence of water “mirrors”.
Of course, it is better to entrust the development of a drainage system to specialists who will take into account the characteristics of the area being drained and can guarantee the normal operation of the drainage.
However, if you have a small area, you can easily do the project yourself.
First, all problem areas must be identified and transferred to graph paper. At the same time, determine the main depression of the area in the direction of water flow.
In the future, having such a diagram, it is easy to outline how to place ditches on the site to discharge excess water into drainage wells.
Drainage tasks in a summer cottage, rules
Rice. 1 Drainage on level ground
The following tasks are usually assigned to drainage: removal of melt water, which allows walking on the site almost immediately after the permafrost thaws; lowering the groundwater level, as well as fairly rapid removal of excess water from prolonged precipitation in clay soils.
In this case, drainage can be open (ditches), closed (using pipes) or backfill (gravel, broken brick, rubble stone, brushwood).
The general rules for reclamation of an area with three “mirrors” (low places) where water accumulates are as follows.
Let's say the slope of the site (see Fig. 2) goes from the street to the far left corner. In this case, the main ditch should run along the far side of the property line, and two auxiliary ditches would discharge excess water into the main channel.
Moreover, if the path leading to outbuilding, crosses a drainage ditch, then it is equipped with a bridge or simply an asbestos-cement pipe is placed at the bottom.
How to make an open drain
Open drainage. It's the simplest. To make it, you need to dig open ditches 0.5 m wide and 0.6-0.7 m deep along the perimeter of the site.
Their walls should have a slope of approximately 30 degrees. Water from such “ditches” is discharged into a drainage ditch common to several areas.
The main advantages of open drainage are as follows. It intercepts and drains surface water during rain and snowmelt.
Solves the problem of surface water runoff even when personal plot located on a slope. Drainage ditches, dug across the slope, intercept water flowing from above and carry it beyond the boundaries of the plot into a common longitudinal watercourse.
Rice. 2 Drainage in an area with three “mirrors”
Closed drainage
Closed drainage (Fig. 1). For it, trenches are laid with a depth of 0.7-1.5 and a width of 0.25-0.4 m. They are dug with a slight slope towards the drainage well or, if possible, towards a natural watercourse.
The bottom of the trench is lined with a layer of 10-15 cm of sand and crushed stone. Drainage pipes with geotextile windings are laid on this cushion. The trench is then filled again with crushed stone and sand, creating a water-bearing layer. It is covered with soil.
Typically, several closed trenches are laid on the site in a herringbone pattern.
In this case, the central drain collects water from the side canals adjacent to it, discharges it outside the site or into a drainage well, which is installed if there is not a sufficient slope to drain the water or there is nowhere to drain it.
Backfill drainage
Backfill drainage. This is when brushwood, tied bundles of tree branches and stones are laid in a layer of 20-25 cm at the bottom of dug trenches.
You can also use a wooden triangular pipe made from boards. In this case, two rows of holes with a diameter of 20 mm with a pitch of 25-30 cm must be drilled in the bottom board of the pipe.
After completion of the work (regardless of the type of drainage), vehicles should not drive through the area where the drains are laid. If traffic is necessary, build a temporary wooden deck, and then be sure to loosen the area compacted by vehicles.
A device is required to drain surface water storm sewer. Pay attention to where puddles form after heavy rain.
In the Moscow region, where loams are most common, water remains standing for quite a long time after rain. This can lead to moisture penetration into basements, causing a decrease in the hygroscopicity of materials and destruction of foundations.
In addition, excessive soil moisture leads to waterlogging of the area, which causes diseases in fruit trees, shrubs, herbs. For example, the lawn gets wet and rots.
Storm sewer
Storm sewers will collect water flowing from roofs (storm inlets are installed under the downspouts of roof drains), on paths, entrances, areas in front of the house and in other places, then the water will flow through the pipes into a ravine, ditch, gutter or drainage system, if The slope of the site is slight.
By the way, some gardeners, without doing drainage work, decide to fill low areas with imported soil. In this case, all low places should be filled first.
Moreover, first you need to remove the fertile layer, then fill in the soil, level it, roll it and only then return the fertile layer to its place. However, sewerage is necessary in this case, since stagnant water will still accumulate in “mirrors” underground and over time will cause waterlogging of the area, rotting of the root system and death of plants.