Instructions
Strengthening with geogrids
For reliable strengthening priming and on steep slopes, volumetric geogrids are successfully used. This design consists of polymer tapes that are fastened in a checkerboard pattern. Such a geogrid provides a strong base for holding the filler: sand, concrete, crushed stone, etc. Due to its flexibility, geogrids easily take the shape of the relief. Place the grate on the slope, fill priming oh, sow with grass or any other plants. Plant roots, penetrating through the cells, strengthen the slope.
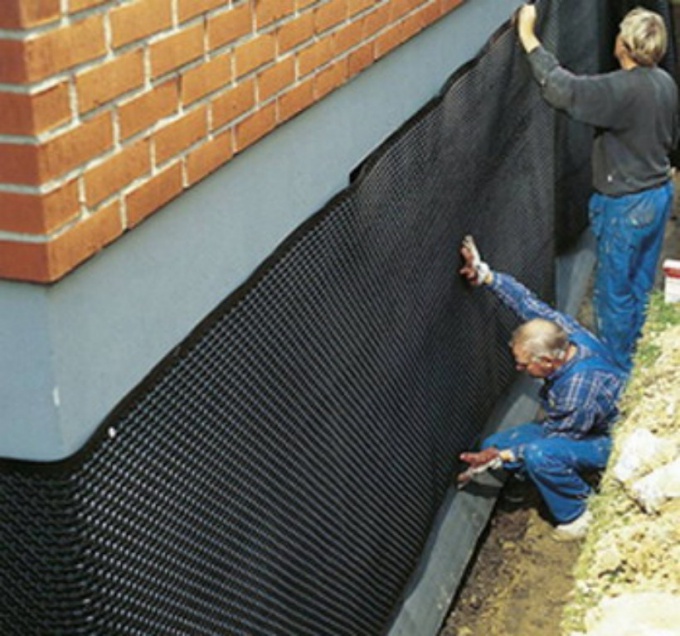
Special anti-erosion mat
This is a reliable three-dimensional product that consists of several plastic mesh. The meshes are thin and fine-mesh. This mat helps protect slopes from erosion and weathering. Also, thanks to this mat, quick and high-quality landscaping of the site is possible. The mat is very flexible, easy to install and safe for the environment.
Before laying the mat, clear the surface of debris and stones. At the base of the slope and at the top, dig a trench about 30 cm deep, lay the mat down with the smooth side down. The material should lie flat without bending. Secure the edges of the mat with anchors. Fill the trench priming ohm and seal.
Geotextiles
Geotextiles – reliable protection from landslides. It is made using a needle-punched method from polypropylene and polyester fibers. This non-woven material in rolls is not only highly durable and waterproof, but also frost-resistant. When water drains, geotextiles prevent layers from mixing, thereby protecting against erosion.
Before laying, level the surface, remove 20-50 cm priming and, lay geotextiles on the bottom and walls. Fill with gravel or crushed stone. Lay a new layer of geotextile on top of them. Fill with sand, and on the sand - paving stones or decorative tiles. Make sure that the overlapping parts of the geotextile are reinforced with staples or crutches, or use a small amount of fill material along the seams.
The soil can be strengthened with buried logs and stones. To prevent water flowing down the slope from destroying the soil, you should install a special tray that will “lead” it in a certain direction. In addition to their protective function, logs and stones can also serve as decoration. With their help, using your imagination, you can create beautiful compositions.
Under the influence of groundwater, wind, and other climatic factors, an area with weak soil is susceptible to reformation and destruction, as a result of which even a building built on the site may suffer.
You will need
- - plants;
- - water;
- - shovel;
- - stones;
- - concrete and building blocks;
- - logs;
- - anchors;
- - manual roller;
- - geomats.
Instructions
If the slope is not large enough (up to 8%), strengthen land You can by planting horizontal and vertical plants and trees. The root system of vegetation connects with the soil and prevents its leaching and erosion.
If the slope slope is from 8% to 15% and it is used for decorative purposes, strengthen land you can use plantings, pebbles and stones. The rhizome of the vegetation will be intertwined with the soil layer and additional reinforcement (in the form of stones), which will result in significantly stronger land.
Before you begin to strengthen the slope, calculate the soil pressure. To do this, you may need to use the help of design engineers. After this, select the reinforcing material that will be used in this case. Then determine the reinforcement zones and the size of the required anchors.
More often than usual, geomats are used to strengthen the earth. Before laying this material, level the surface of the slope and remove all debris. Compact the surface using a hand roller weighing 20-30 kilograms. Dig an anchor trench (at the base of the slope, as well as near the bottom edge), the depth of which should be thirty centimeters. Be sure to create drainage - ditches, all kinds of trays and other stacks for water. Using dowels or anchor bolts, secure the upper edges of the geomats. In the longitudinal direction, the overlap of individual panels should be approximately fifteen centimeters, in the transverse direction - twenty centimeters. When securing geomats on a steep slope, additional anchors are used in half-meter increments. If the slope is average, then the number of required anchors is calculated taking into account two anchors per square meter.
Please note
All geomat fastenings must be of high quality: check them carefully.
Lay geomats with a smooth surface to the ground.
Sources:
- Slope strengthening
Sometimes, for no apparent reason, cracks begin to appear on the walls of the house. This phenomenon in itself is not scary, but it means that the foundation is subsiding, and this poses a danger to the entire structure as a whole. In this case, you should immediately strengthen the foundation of the house before it is too late to stop the deformation at the very beginning.
Instructions
First of all, determine the reason for the foundation subsidence. There may be several reasons: soil with different densities around the perimeter of the foundation, construction of a building on two separate foundations, erosion of the base under the foundation. During the dry season, take soil samples at small intervals throughout the entire foundation and compare the soil density, composition and moisture content of the samples.
If the soil in the subsiding area of the foundation is loose and the samples have high humidity, this indicates erosion of the foundation by groundwater. It is also possible that leaching occurs due to an incorrectly designed sewage system or leaks in the water supply system. Check these systems for possible malfunctions. In this case, you should drain the foundation using a drainage pipe at the base of the foundation or a drainage channel, and strengthen it with concrete pouring.
If the soil throughout the entire area is quite dry, but has different densities, this is the reason for the subsidence of the foundation due to the uneven distribution of natural subsidence of the soil. In this case, it is necessary to strengthen the foundation of the house, increasing its supporting area as much as possible. To do this, dig up the base of the foundation, place reinforcement under it and fill it with concrete along with the protruding edges of the reinforcement. This way you can redistribute the load and stop the subsidence. In order to avoid compromising the integrity of the foundation, pouring concrete in another area must be carried out along the entire perimeter of the house.
A man-made pond may be small, but it is an independent biological unit that obeys all the laws of nature. This means that such a natural process as soil erosion is also characteristic of an artificial reservoir. A person’s task is to ensure that a man-made reservoir does not become a small puddle. And this issue can be solved by strengthening the shore of the pond.

Artificial ponds can often be found on private plots. They fit perfectly into modern landscapes. But the arrangement of an artificial reservoir has certain features.
Why is it necessary to strengthen the banks of an artificial pond?
The washing out of the soil of an artificial pond is not very noticeable to the human eye. But over time, due to natural adjustments, the pond may no longer be as beautiful as before. People have come up with several ways to avoid such sad consequences of natural metamorphoses. The essence of these measures is to maintain the shoreline of the reservoir in its original form.
Methods for strengthening the soil of a reservoir
To strengthen the soil of a reservoir, attention should be paid to its underwater and above-water parts. For many years, the coastline of reservoirs was strengthened with concrete. But concrete structures look unaesthetic, and the result of such strengthening does not always bring the necessary reliable effect.
If we talk about the most modern ways strengthening the pond soil, three technologies can be distinguished among them:
- tongues made of polyvinyl chloride;
- larch piles;
- gabions.
Sheet piles made of polyvinyl chloride are reliable protectors, but their installation requires special equipment. Therefore, the method of installing larch piles is more often used. In this case, larch logs are installed along the entire perimeter of the reservoir. Of all tree species, larch logs are chosen because of its extraordinary qualities. Larch turns to stone in water and does not rot. A larch structure can last in water for about 50 years. The disadvantage of this method of strengthening a pond is that it is very expensive. After all, larch in most regions is an expensive wood material.
The method of strengthening a pond using box gabions will help maintain the integrity of the pond for 25 years. The essence of this method is to use parallelepipeds made of metal mesh and filled with stone. Linked together with wire, they form a strong monolithic structure. It does not rot and is not exposed to aggressive environments.
When strengthening the shore of an artificial pond, one should not forget about the decorative component. The decor should be combined with the overall concept landscape design. Granite, sand, wood, paving slabs, pebbles, gravel.
Video on the topic
Sources:
- Coastal strengthening
- Strengthening slopes and banks of reservoirs
- Coastal strengthening
- Strengthening the banks of the pond
Acrylic primer is used to level wooden surfaces and improve the quality of adhesion of wood to the base coating. Modern manufacturers offer many varieties of acrylic primers for wood, and to choose best option, you should know a few basic rules.

Types of acrylic primer
According to its composition, acrylic-based primer is divided into water-soluble and organic-soluble. Soil containing organic solvents is excellent for facade works, as it is resistant to temperature changes and high humidity.Water-soluble primers are practically odorless and, when applied to wood, are perfectly breathable. This primer is intended for interior work.
In its action, acrylic primer can be strengthening and penetrating. Penetrating primer allows you to strengthen and strengthen the upper structure of wood, impregnating its layers to a depth of 10 cm. The strengthening composition acts only on the upper layers of wood, gluing together the particles that form the surface of the wood.
Benefits of using acrylic primer
Wood coated with acrylic primer can withstand temperature changes, high humidity and other negative environmental influences.Treating wood with acrylic primer helps facilitate the sanding process and allows you to qualitatively prepare the wood for finishing the surface. Water-soluble primer can significantly reduce the consumption of paint or varnish and increase the service life of wooden products, and also helps create a coating with a more even and rich color texture.
Applying acrylic primer to the surface of wood allows you to protect it from the formation of mold and putrefactive processes, preserving the structure of the tree.
Rules for applying acrylic primer
Before you begin applying the primer, you must thoroughly clean the surface of the wood from dust and other contaminants.
Acrylic primer should be applied at temperatures from +5 to +30°C. At lower temperatures, the primer will take too long to dry, and at higher temperatures, the acrylic coating will dry too quickly and will not have time to penetrate the layers of wood.
The drying time for each layer of acrylic primer can be several hours. Information on drying times for layers can be found on the packaging of the acrylic primer.
To process plywood and chipboard, you should purchase a deep-penetrating acrylic primer, since a regular primer will not be able to properly absorb into the layers of such materials.
"A collection of gardening tips"
edited by Ekaterina Bulanina
Strengthening the slope
The main problems on the slope are erosion and landslides.
Erosion (corrosion) is the destruction of soil by water and wind. Melt and rainwater form furrows and gullies; over time, perched water can completely wash away the fertile layer.
Landslides are the result of soil erosion. Garden beds may crumble or houses may collapse. Typically, the steeper the slope, the more actively it is destroyed. However, water erodes loose soils even on gentle slopes, and small streams can eventually form large gullies.
- The first task of the gardener is to strengthen the slopes: gentle slopes with plants, steep slopes with terracing.
- Terraces with retaining walls not only prevent the destruction of slopes, they allow you to create fertile places for plants and are a fertile basis for landscape design.
- You should start, as always, with a plan, because ill-considered construction of fortifications is fraught with large financial losses and a spoiled appearance of the site.
- First of all, it is necessary to curb the water - to ensure that rain and melt water flows along specially created channels and does not destroy the soil. You can build both surface and hidden drainage.
- Any obstacles hold the soil on the slope - large stones, concrete blocks, boards and logs laid across on support posts dug into the ground.
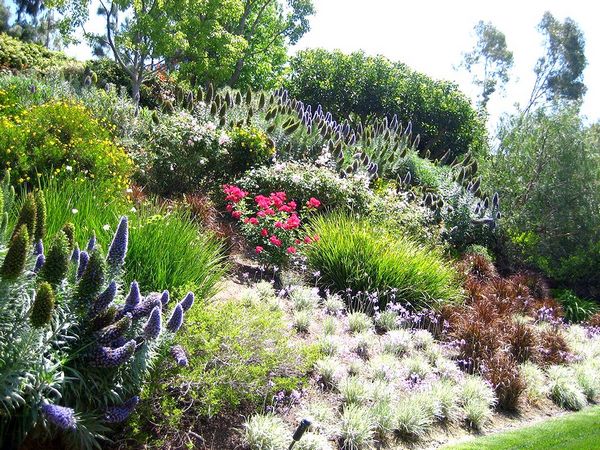
- If you do not want to make terraces, and you want to minimize interference with the natural landscape, gentle slopes can be strengthened with plants.
- Groundcovers and shrubs with deep and extensive root systems can create a natural latticework for the soil and do not require special care.
- Creeping plants such as periwinkle, Bieberstein's sprout, and false sedum grow quickly, forming a thick, elegant cover.
- Group or single plantings of common barberry, Japanese quince, Russian broom, cotoneaster, spirea and elderberry, rose hips, and also some conifers- Cossack juniper, mountain pine.
- Budget option securing the slope: in the spring, drive fresh willow stakes into the slope. At first, the stakes themselves will hold the ground, and after rooting they will hold it with their roots. Choose willow, which grows well. It is better to plant in tiers along the entire slope, and not just along the edge. Solid willow does not look very decorative, but willow takes root faster and easier.
- Terracing is the creation of platforms on slopes in the form of wide steps.
- Do not plan continuous long straight terraces; they look better if they are different in size and shape.
- Choose the width of the terraces depending on the future purpose. For flower beds you need one width, and for a recreation area - a completely different one.
- The greater the number of terraces, the lower the height of the retaining walls, and, accordingly, the easier it is to build them.
- Each level of the terrace should be equipped with a drainage system to remove storm water or drainage grooves should be dug.
- You can create terraces using retaining walls or make embankments with slopes. Keep in mind that in a small garden, slopes eat up space.
- The height and slope of the slopes will depend on the difference in the levels of the sites and the type of soil: the lighter the soil, the gentler the steepness of the slope should be.
- Slopes with a slope of less than 30 cm per 1 m will be held by the roots of plants: grasses, perennials and shrubs. The denser the plantings, the better.
- It is better to make the slopes low, otherwise the soil will begin to slide off them. Over the years, the steepness of the slope can be increased by selecting soil from the base and adding it to the terraces.
- If lack of space does not allow creating a slope, it is made steeper, additionally strengthened, in order to avoid destruction. Just one such way to strengthen a slope or replace it is a retaining wall. It holds the earth masses of the area located above and prevents them from moving.
- On steeper slopes you will have to resort to special anti-erosion structures and materials.
- Geomats are used even on very steep slopes. They resemble a sponge with a large number of voids, into which soil is poured after laying on the slope. The roots of plants intertwine with the fibers of the geomat and the soil of the slope and together with them form a strong system. Geomats are usually used in combination with biomats to increase strength.
- Biomat is a canvas made of plant fibers (straw, coconut fiber or a mixture thereof) reinforced with polypropylene or jute thread. Biomats are supplied in rolls, which makes laying the material easy: just roll the rolls along the slope on top of the sown seeds, overlapping adjacent canvases, and secure them with anchors. This canvas protects the plantings well from rain and wind. And the decomposition of the natural fibers of the material helps fertilize the soil.
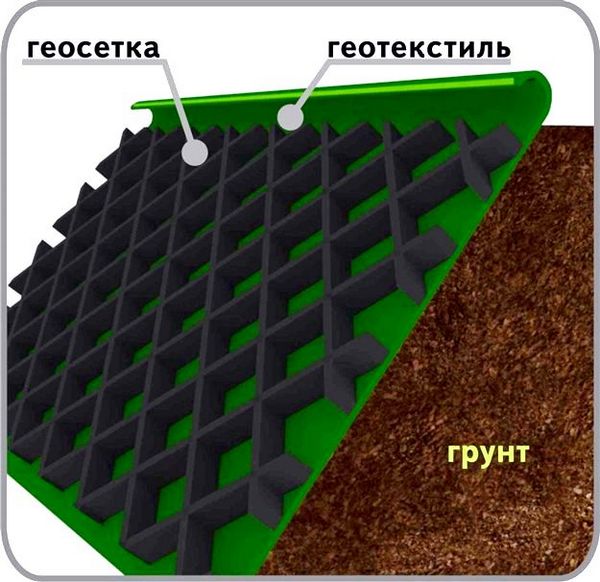
- To strengthen slopes, geogrids are used - three-dimensional cellular structures made of synthetic (usually polyethylene) strips fastened in a checkerboard pattern.
- Geogrids allow you to instantly and reliably fix the soil on a slope until a stable turf cover is formed, and also prevents the blowing out and washing out of soil particles.
- Before laying geogrids, a separating and drainage layer of non-woven geotextile is placed on the soil surface.
- Fill the geogrid layer by layer. The filler can be sand, vegetable soil, crushed stone and frost-resistant concrete.
- A good way to strengthen slopes is to lay gabions. A gabion is a metal mesh filled with stones. The mesh prevents stones from spreading, and the stones provide drainage. The soil is filled between the stones and landscaping is done.
- On sloping slopes, make the paths winding - it will be uncomfortable to walk along straight lines.
- You can install spotlights in the paving of paths. - adjacent to a vertical wall and leading from one level to another.
- When constructing small stairs, cuttings of building materials are often used - trunks, beams, saw cuts, as well as stones. The tree is pre-antiseptic.
- If the staircase will consist of more than 10 steps, it is recommended to build concrete base at the foot of the stairs to provide support for the lowest step and prevent the entire flight from sliding down the slope.
- Used railroad sleepers are great for the role of steps: they are impregnated with creosote and therefore do not rot, and the sleepers are also the same size and width, which is very convenient.
- On steep slopes and terraces it is better to make stairs with wide steps.
- It is more convenient if the width of the paths, as well as the size and height of the steps of the stairs are the same throughout the garden - this will avoid possible injuries.
- Make the stairs more stable by allowing each successive step to hang slightly over the previous one.
- One or two steps are undesirable: they don't feel like stairs and you'll often forget about them, which can lead to accidents.
- The most convenient height for a step on a garden staircase is 12-14 cm. The optimal length of a step is two of its heights (no less than 30 cm and no more than 45 cm).
- Very reliable and durable steps will be obtained if concrete is poured directly into the constructed formwork on site. Boring grayness can be decorated with bricks, tiles or mosaics.
- To prevent water from stagnating on the steps after rain, each of them should have a slight slope forward.
- In dark and shady places, you should not make steps from wood or small clinker. There they are difficult to see, and in rainy weather you can slip on them. In such places, use a stone with a rough texture. Stairs located under trees are also dangerous - it is easy to slip on wet fallen leaves.
- It is better to overcome a small steep slope using a narrow winding staircase.
- Stairs on a steep slope must be equipped with railings on at least one side.
- Please pay attention special attention lighting the stairs if you are going to use it in the dark. For these purposes, use low lamps.
- To make it easier to climb a long staircase, build rest areas between flights, from where you can also change the direction of the climb.
Staircase design
- Park stairs and ramps can decorate the site. The size and style of the house and the adjacent staircase should be consistent.
- A staircase made from wooden saw cuts will easily fit into a rustic garden.
- The Victorian style is characterized by monumental stairs made of concrete, decorated with tiles or bricks. Wrought iron railings are suitable.
- If the design of the site is dominated by smooth lines, then the steps should have a rounded contour.
- A wide staircase always looks more beautiful than a narrow one. Place beautifully flowering and pleasantly smelling annuals in pots on the spacious steps.
- The concrete stairs are too rough and unattractive. Plant carpet plants in the depressions on either side of it. With their soft cascading cascades, they will disguise the outer edges of the steps, which will add natural charm to the staircase.
- Green grass or bushes between the steps is one of possible options registration
- The base of the staircase is usually made of concrete, but the front surface can be decorated using both decorative stone and facing tiles.
- If you slightly shift the steps relative to each other, you will get a natural effect.
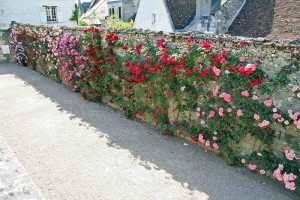
- Next to the stairs, plant vines that are usually grown on supports - clematis, climbing roses, maiden grapes. They will flow in a beautiful cascade.
- The ravines are growing rapidly due to erosion by water. To stop this process, it is necessary to organize the correct discharge of water to the bottom of the ravine using man-made waterproof channels, and strengthen the banks by planting trees and shrubs, retaining walls or gabions.
- Water must flow into the ravine from only one slope, otherwise it will grow in width with catastrophic speed.
- The surface of the slopes can be reinforced with turf or, if funds allow, with concrete gratings. Plant grass or ground cover plants in the cells.
- If the ravine is large, build transverse dams from wickerwork or stone walls with piles. The water will flow more slowly and, therefore, erode the banks less, and the accumulated sediment will make the bottom wider, which will also reduce the flow speed.
- The simplest and cheapest way to secure ravines is to line the bottom with large branches, preferably with knots. Lay the branches layer by layer, with their butts against the flow of water, strengthening them with crossbars and live willow stakes driven crosswise into the bottom. The willow will take root and further secure the bottom. Streams of water running down the ravine are filtered through the laid branches and leave behind soil, plants washed from the banks, and silt. Gradually the bottom is filled with sediment.
Gardens of the North-West.
This is an environmental project.
Help him become accessible to everyone.
The main commandment when planning is that a garden on a slope ends not with the border of the site, but with a hill on the horizon. Remember that you won’t be able to change distant views, but it’s easy to lose them if you plan your garden incorrectly. Keep in mind that the views are two-way, and your garden with your house, especially on a steep slope, will most likely be clearly visible from different sides. It is easier to design a plot located on a slope below the house. Action plan:
- think over a composition including landscapes outside the site;
- if the landscapes are “so-so”, provide camouflage plantings, otherwise the entire underlying slope will be visible from the house;
- create multi-level terraces, each with its own design, so that the eye can “travel” through different compositions.
When the site is located above the house, it obscures the view, sometimes nothing can be seen from the house except this rise. This slope is overwhelming; it feels like it is creeping up on the house. The retaining walls on the rising slope merge into a single wall, and you seem to find yourself at the bottom of a well. Action plan:
- create a wide terrace in front of the house, strengthen the slope above it with intermittent retaining walls;
- lay winding paths between the walls along which to plant plants.
- don't forget about good drainage so that rain and spring flows do not flood the house.
The landscape solution for the bottom of the slope can be different:
- create a pond into which excess water will be collected, or a stream that will divert it outside the site;
- build a house on stilts, this will give the site a marine flavor;
- attach a terrace to the house, building a pond directly into it.
The sloping areas at the construction site themselves are harmless; soil erosion or soil displacement (landslide) caused by them can cause trouble. Slopes are distinguished depending on the angle of inclination - from very gentle to almost vertical.
A slope is an unevenness of the soil, with a certain level of inclination.
Strengthening the slopes will help to eliminate various unpleasant situations, including a collapse, which are fraught with the presence of such an inclined unevenness.
Each type of slope determines the way in which it is strengthened:

Double twisting of the mesh ensures flexibility and strength of the structure. the material is moisture-proof, environmentally friendly, lasts a long time and has an advantageous volume-price ratio.
This is what combination with geotextile/geoset looks like:
All gabion structures are divided into:

If plants, which ones?
The best for soil compaction are:
- Evergreens: cedar, pine, juniper,
- Fruits: quince, sea buckthorn,
- Shrubs: gorse, sumac, fieldfare, broom, lilac, deutzia, mackerel, tree peony, rose hips.
 Slope planted with plants
In a rainy region, there is also the threat of erosion.
Strengthening the slope in such conditions is done taking into account the type of soil:
- With a high content of dust and sand - erodes quickly
- Sandy loam, loam – average in erosion.
- Clayey, rocky, gravelly soils are the most durable.
If you strengthen the slopes in time, troubles can be avoided.
If you make a technical error during installation, the threat to the site will remain, so it is better to resort to the services of specialists.
Proper strengthening of slopes
Rarely seen personal plot with a perfectly flat surface. Somewhere there’s a stump, somewhere there’s a hole, and somewhere there’s even a slope, so what should you do, reconcile and adapt, get upset every time, or still try to level the land with your own hands? We offer options on how to make the ground surface flat, without the use of heavy “artillery”. If there are stumps on the site, then immediately determine for yourself whether they are bothering you. Stumps can be used as stumps, or they can be removed using a tractor or burned with saltpeter.
If you are bothered voids in the ground, holes and slight slope, then it will be enough to remove the top layer of soil and turf with a shovel, use a pitchfork to fill the voids with soil taken from elevated areas, level the surface with a rake, throw the turf back and after 1-2 weeks walk along the surface of the earth with a rake again.
If the slope is very small, but which does not allow, for example, to make a beautiful lawn, then it will be faster and less labor-intensive to use a steam cultivator. Walk it several times, first in one direction, then in the other, thus fluffing up the soil. Use a rake to level the surface and begin sowing lawn grass seeds. If you plan to make a flower bed in such an area, you can create an illusion. Level the surface with a rake and sow flowers of different heights, where tall beauties will grow at a lower level.
If you are leveling a small area with a large slope, then prepare pegs of the required length and install them around the perimeter of the area that needs to be leveled. Using a building level, make marks on the stakes to what height you need to pour or remove the soil, pull the thread, securing it to the marks. Remove the sod, transfer the soil with a shovel, return the sod to its place and level it.
If a large area is in poor condition with a slope, then most likely you will have to use a bulldozer. However, before work, collect all debris, stones and remove the turf (fertile layer of soil). After leveling the area, return the turf and spread it over the surface with a rake. You may have to start new soil if the soil under the turf is very clayey.
 If the plot is on a steep slope, then even a bulldozer will not help make the surface level. Terracing is a great way to improve the landscape, hide the disadvantage of a slope and, if desired, make a garden bed. On a steep slope it is quite difficult not only to build something, but also to grow crops, because... from watering and rain, the soil will be washed away, exposing root system plants, and fertilizers will not be able to linger at higher elevations. You definitely need to make a drain.
Clear the area of debris, remove the top layer of soil and install stakes horizontally every 1.5 m. Install vertical stakes according to the shape of the relief. Do not make the width of the terrace more than 1.5 m, for the convenience of cultivating the beds, and so as not to create large soil pressure on the support. Create comfortable steps between terraces using retaining walls at high points.
 It is better to strengthen the soil on a slope, especially if it contains sand. If the slope of the site is no more than 10º, then planting lawn grass, trees or shrubs with a strong root system (ivy, spirea, broom, etc.) will be sufficient to reinforce the soil. But on a steeper slope, it is necessary to strengthen the soil from erosion using special reinforcing structures - geogrid, geogrid or anti-erosion mat, log. Here are the main materials:
Geogrid is a convenient flexible reinforcing structure that can be used to strengthen soil on slopes in both vertical and horizontal positions. First you need to delimit the area, level and compact the soil on the slope. 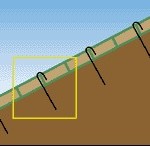 Lay (preferably, but not necessarily) geotextiles, lay geogrid from top to bottom and secure with anchors or drive in pegs. Fill the grid cells with crushed stone, cover with soil and sow lawn grass seeds.
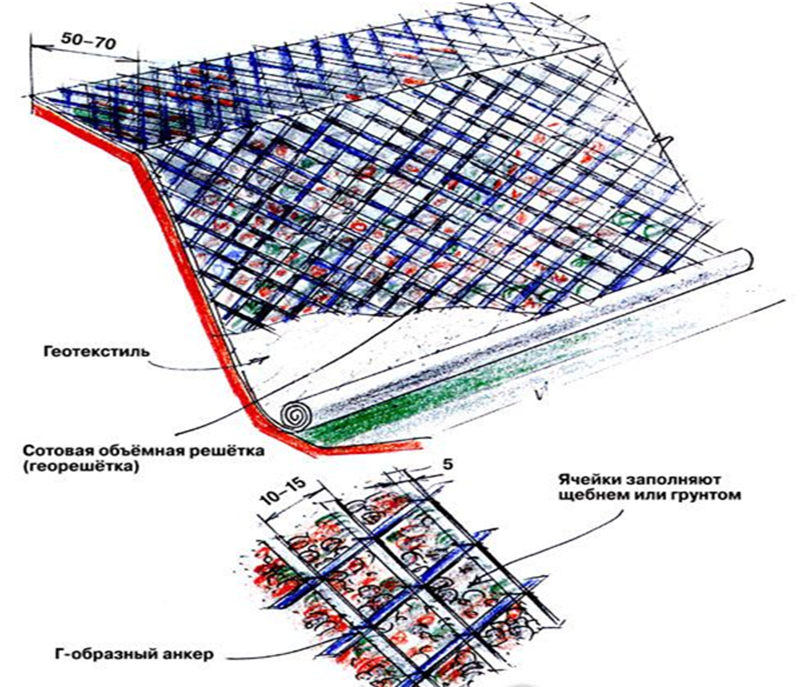
Geomat or anti-erosion mat perfectly strengthens the soil on a slope if the angle of inclination is 50-70º, and also secures the root system of young shoots. 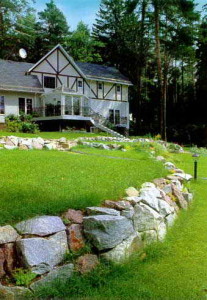 This material is easy to work with because... it fits any slope topography. The geomat is laid with its smooth side to the ground, giving an overlap of 15-20 cm. The edges of the mat are fixed with anchors every 50-70 cm to a depth of 30 cm. Make sure that the material lies tightly and evenly on the ground, without waves. Next, fill the geomat with soil and sow lawn grass.
To strengthen the soil on a slope (slope angle up to 60º), you can use large and small stones or logs (boards). To do this, depressions are made in the soil and stones are placed in them very closely to each other, large ones at the base of the slope, smaller ones at the edge. If logs or boards are used, they are laid deep and across the slope.
The most pressing issue for owners of plots on a slope is, of course, the problem of safety and reliability, because under the destructive influence of natural disasters all efforts to strengthen the plot may come to nothing.
Today, the most productive way to protect your site is to use concrete boxes, slabs and gabions, as well as metal and plastic meshes and gratings. Next, we will consider in detail each design and the principles of its functioning.
Gabions and concrete structures
Gabions (boxes made of metal mesh and filled with crushed stone, pebbles or stones. They are widely used as a reinforcing structure to protect the terrain from destruction) and concrete structures, are the simplest and in an accessible way securely strengthen the area on the slope. The slabs themselves can be fixed to the ground using metal pins and anchors. Concrete slabs are laid at the bottom of the ditch, through which rain and melt water flows.
It is also possible to strengthen the inclined walls of your site using decorative stone, pebbles or other smaller materials compacted into blocks of appropriate size. At their core, these are the same gabions, but somewhat smaller in size - their thickness rarely exceeds 10-15 centimeters. These mini gabions are secured using anchor bolts.
Metal and plastic mesh
To further strengthen the cliff, metal or plastic garden (lawn) gratings can be installed as a canvas for the turf. They are attached to the ground using special pins.

To additionally strengthen slopes up to 3 meters high, with a slope angle of up to a slope of 45 degrees, it is necessary to carry out preparatory excavation work, including drainage of water and securing the soil on the slope. To do this, remove all the turf from the walls, and then level and compact the ground, after which a metal mesh is laid on it, to which square or rectangular pieces of new turf are later attached.
For additional fastening, you can use metal anchors; they allow you to press the turf more tightly to the ground, providing a complete lawn on the slope with individual inclusions of flowers or ornamental plants.

Another option for installing the mesh is to level the soil and slope surface, as well as subsequent covering with a special drainage geotextile. Special flat blocks are laid on top of the geotextile, which are made from wire and then filled with gravel. They are also secured with metal anchors. After this, fertile soil with lawn grass seeds is poured into the gravel. At the bottom of the slope you can make a drainage system from reinforced concrete slabs.

Volumetric geogrids
The “youngest” and most innovative method is considered to be strengthening a slope on a site using a three-dimensional lattice, which is a honeycomb structure made of polymer strips welded in a checkerboard pattern. It is stretched and then evenly laid on the surface of the slope and secured with L-shaped anchors or pegs. After this, the cells are filled with crushed stone or soil.
When laying lawns, another method is also used to further strengthen the foundation. Lawn grates are laid on soil prepared in advance, and then covered with a small layer of soil and sown with grass. Thus, the roots of the grass quickly grow through the cells of the lattice, strengthening it.
The volumetric lattice also solves such an important problem as protecting lawns and slopes from moles, which often spoil the grass cover. A fine-mesh grid prevents rodents from accessing the surface of the ground, and thereby prevents their appearance at all.
It should also be noted that the steeper the slope on your site, the higher the height of the edge of the flexible grid should be. The modules are stretched and fixed using L-shaped anchors, thus checking the uniformity of their tension. The individual lattice elements are sewn together using a stapler or connected with U-shaped anchors.
After fixing the geogrid, its cells should be filled with soil, sand or crushed stone manually or using a loader. It should be filled from top to bottom, along the slope to the height of the geogrid + 5 centimeters above the side of the cell.
Strengthening a site on a slope is a very important event that can protect your site from destruction. You should not treat strengthening carelessly - this can lead to soil deformation, destruction of the house and buildings and other unpleasant events.