Currently, there are many materials that are designed for cladding and finishing houses. Siding is the most popular in this area. He does an excellent job of decorating the building and insulating it. This material appeared on the construction market relatively recently, but almost immediately gained the trust of consumers.
The installation technology is completely unaffected by whether the building is wooden or brick. Insulating and covering a house with siding is not too difficult, such work you can do it yourself. The video presented in the article will clearly demonstrate this process.
General information
Finishing and insulating the facade of a building is not a difficult task, but it is very responsible, because the most minor mistakes can lead to serious consequences. When using siding, experts strongly recommend that the house be insulated at the same time.
Such integrated approach there are several reasons for facing work:
- external insulation of a house is considered more effective than internal insulation, while costs are significantly reduced;
- thanks to a special layer of thermal insulation, heat loss is significantly reduced, which allows significant savings on heating the entire building;
- as a result of such insulation, drafts do not occur inside the room, which is why the air warms up more evenly, which again leads to heating savings;
- if the house is wooden, then the combination of siding and non-flammable insulation will perfectly protect the building from a possible fire.
It is also necessary to take into account the fact that such cladding perfectly protects the house from such atmospheric phenomena as rain, wind, snow, and sudden temperature changes.
Selecting insulation and necessary tools
 On modern market building materials Various products are presented that are used to insulate a home. Most often this polyurethane foam and mineral wool.
When covering houses with siding with your own hands, polyurethane foam is ideal as insulation. This is explained by the fact that its use together with siding is a good option finishing of residential, public and office buildings.
Characteristics of polyurethane foam:
- due to its low weight, there is no additional load on the foundation;
- protects against various precipitation, even if moisture penetrates into the joints between the siding;
- a high level of tightness provides good protection from wind;
- absence of “cold bridges”, since the foam is applied directly to the wall;
- the strength of the wall increases;
- as a result of many years of operation, corrosion, rotting, etc. do not occur;
- The service life of the insulation is at least 50 years.
Also used as insulation mineral wool or glass wool, which has been successfully used for these purposes for many years. However, cotton wool is very demanding when it comes to installing vapor and waterproofing, since even minor mistakes can lead to the fact that some time after completion of the work you will have to start all over again.
You can cover your house with siding at any time of the year. For this The following tools are used:
- fine-tooth saw;
- metal scissors;
- roulette;
- building level;
- ladder;
- square;
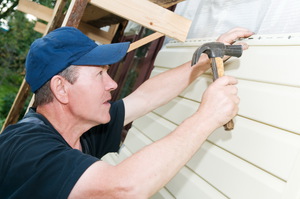
- hammer;
- screwdriver;
- Bulgarian.
To insulate walls wooden house, you will need the entire list of tools and initial skills to work with them.
Preparatory work
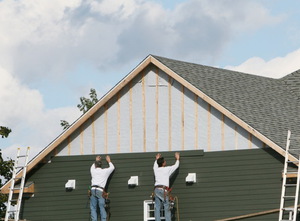
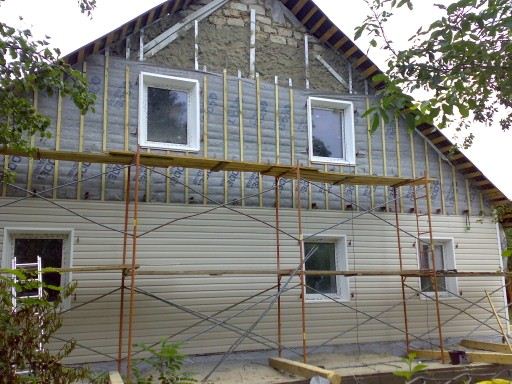
 Do-it-yourself siding on houses begins with the construction of scaffolding around the facade, which helps at height install long panels. When constructing scaffolding, it is prohibited to use old boards because they may be unsafe.
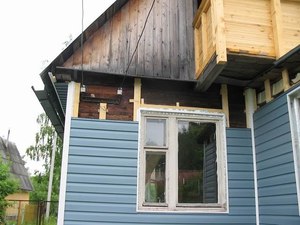
Before finishing the house, the surface of the walls is first prepared. To do this, remove all elements that interfere with the correct installation of the frame. These can be ebbs, lamps, platbands, even window sills. After this, all cracks that may be on the surface are sealed with special silicone sealants or tow. Level the base and remove the plaster if it has crumbled. Then the walls are treated with a moisture-proofing compound and primed. Wooden facades should be treated with a fire-retardant primer because siding is flammable.
Lathing for siding and insulation
Lathing for siding Available in wood and metal.
Directly covering the house with siding yourself begins with the installation of the sheathing. The cheapest option is to use wooden blocks or slats. For this, dry wood is selected so that it does not deform during the drying process. All elements must be treated with an antiseptic. Lathing is necessary not only for leveling the walls, but also for laying insulation.
Metal lathing is mainly used for houses made of bricks and gas blocks. The metal frame is very rigid and usually lasts a very long time. Using hangers, you can set the necessary distances from the wall without any extra effort. To prevent rusty stains on the siding later, it is necessary to use anodized or galvanized fasteners.
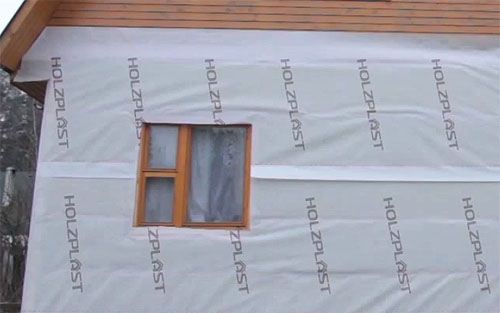
Before decorating a wooden house with siding and insulation with your own hands, be sure to perform vapor barrier of the building. It is necessary to create a barrier that prevents warm air from escaping outside.
The vapor barrier material must meet the following indicators:
- have low vapor permeability;
- be sufficiently strong to tear and stretch.
 This material is considered not the cheapest type of insulation for a wooden house. Such panels are subject to strong thermal expansion. They can “walk” under the influence of external temperatures. Their installation begins from the bottom; before this, the starting rail is first leveled. The panels are fastened with self-tapping screws, which are screwed into the middle of the mounting holes. Each subsequent part snaps into the groove of the previous one.
During installation it is necessary avoid the following mistakes:
- panels cannot be mounted closely, because without a gap their coating usually begins to warp;
- self-tapping screws should not be attached to the edges of the panels, as this may cause them to break;
- The starting guide must be attached strictly level and very tightly, otherwise the coating may deteriorate.
Siding elements
Drainage
Such an element is necessary in order to protect the base and foundation of the house from moisture and represents metal corner, covered with paint. Drainage systems are leveled around the entire perimeter of the house. Insulating and covering a building with siding usually begins with the installation of drainage systems.
After this, the initial or starting rail is attached. Due to the rigidity of the structure, drainage set strictly according to level, which makes installation of the soft starting rail much easier.
Starting rail
 Such a rail is attached directly to the drainage system, maintaining the level. This is where they begin installing siding with their own hands. If the walls have a certain slope, then the lower level of the slats is corrected by releasing the sheathing to the required level.
The siding panel must be inserted into the starting rail until it clicks into place. After all the elements are installed, install the panels from below into the lock until it clicks. If the wall is blank, then the panels are built up to the roof, and if the wall has windows, then to the bottom of the window opening.
Siding corners
The siding must be closed from the end of the building and from the sides. To protect against water and side winds, they are used wide material angles. For proper installation of the sheathing, the corner of the siding is applied to the wall surface and the necessary notches are made.
Finishing strip and soffit
The finishing strip is attached under the roof arch and in places where the wall narrows. Siding panels are not attached to such a lath.
A soffit is necessary for lining the bottom of the roof overhangs. They differ from panels in that they have perforations, which are used for natural ventilation. They are attached in the same way as all elements, only the edges of the spotlights need to be launch into j-rail.
After installing all the elements, fixing the panels with your own hands will not be difficult. This is done quite simply, just like insulation. plastic windows.
Thus, after all the work done on finishing a wooden house with siding with your own hands, you can get a wonderful result. Such a house retains heat well, which allows significant savings on heating costs in winter time. In summer, on the contrary, the room feels pleasantly cool. Thanks to the video presented in the article, you can see all the information on this topic.
Currently, the technology in which walls are insulated under siding and offers owners of private houses a lot of ready-made construction solutions.
Installing siding with insulation is a simple process, and you can do all the related work yourself.
Covering the outer frame of a house with siding panels significantly increases its aesthetic appeal. Such facade cladding, made by yourself, in the case of insulation with foam plastic, significantly increases the thermal insulation characteristics of the house.
1 Features of installation work
Before you cover the outside of the house with siding yourself, you should insulate the walls. The process of installing siding followed by insulating the house is divided into a number of stages.
Installing plastic cladding on the outside of the facade implies the presence of an insulating layer on the siding, but it won’t hurt to be on the safe side and insulate the walls of the house with polystyrene foam.
To insulate the outside of a house with your own hands, you can use the entire range of modern insulation materials. They are presented as:
- Insulating plaster;
- Foam plastic;
- Glass wool;
- Mineral wool;
- Synthetic Polyphome.
However, the most suitable option for insulating the facade of a house (as well as the roof) is the method that uses basalt wool in the form of rigid slabs.
While finishing is being carried out, it is important to correctly calculate the dimensions of the logs with which the sheathing is equipped and correlate them with the dimensions of the insulating boards.
The same actions are carried out when insulating the roof and. When insulating a house from the outside under siding, it is important to correctly calculate the height of its panels.
They should not reach the roof; sheathing can be used to add strength to the structure. In some cases, siding panels can be immediately mounted on top of the waterproofing layer, but before this, special joists for the siding must be secured from the outside.
In this case, the lathing can also increase the mechanical strength of the frame. As a result, a special air gap will be formed for the waterproofing layer.
Installation of logs will provide additional support for fixation, however, caution should be exercised when processing areas that are located at the joints.
This applies to the beginning of the roof, the corners of the walls and the slopes of the windows. In some cases, when particularly problematic areas will be subject to insulation, the use of the thinnest types of insulation will be relevant.
Polyf can be used as such a material. In such cases, lathing is not needed, and excellent thermal insulation qualities are combined with a minimum permissible thickness of 5 millimeters as.
It may be suitable for roof insulation. Close attention You should also pay attention to such matters as finishing and processing of slopes in window openings.
In such places, another type of insulation can be used, and lathing is unlikely to be needed here. If the wall insulation with polystyrene foam is carried out in two layers, the siding installation process becomes several times more complicated.
First, logs are formed with the first layer of insulation, then the logs are applied perpendicular to the first layer again. In such cases, the sheathing can be re-attached on top of the first layer. This is done so that the sheathing receives an improvement in its rigidity.
2 Materials and tools
Before you begin work related to the installation of siding with insulation (foam), you need to make sure that you have all the materials and tools necessary for this.
In such a situation, major cladding will be carried out using panels and preliminary insulation of the outer surface of the walls. In this situation you cannot do without:
- Silicone sealant for sealing defects in walls;
- Tow;
- A set of self-tapping screws;
- Screwdriver or hammer drill;
- Metal or wooden frame for sheathing;
- Plumb and building level;
- Mineral wool with a maximum degree of density;
- Furniture stapler;
- Moisture-proof membrane;
- Primers;
- A sharp construction knife;
- Metal brush;
- Wide brush;
- Siding sheets;
- Tape measures and pencils for marking.
Before installation, you should correctly calculate the required number of sheet siding elements. First of all, the length and width of the siding panels are determined, which will be insulated on the inside with foam plastic.
By the way, finishing internal surfaces roofs or attics can also be made using foam plastic or its derivative modifications.
2.1 How to properly prepare the walls and install the sheathing?
First of all, you need to carefully prepare the walls from the outside for all manipulations performed on them.
It will be necessary to remove and dismantle everything that will interfere with the siding installation process. Here, all kinds of canopies or window sills can clearly be superfluous.
An hour later, you can begin to seal any detected cracks and other defects. Particularly large defects can be sealed with tow; upon completion, a sealant containing a silicone base is poured on top. Small cracks are simply covered with sealant.
With the correct selection of sealant, not only will defects be eliminated, but a barrier will be formed that protects the surface from moisture.
The second part of the work is concentrated on the installation of the sheathing, presented in the form of a frame. For this purpose, both wooden and metal elements can be used.
Planks made using metal can be used to facilitate the installation of sheets of drywall and.
If wood is used, its cross-section parameter will have to be 45 millimeters. The ease of use of wood lies in the fact that it is easiest to attach a membrane to its surface.
If a metal frame is used, then the installation of wooden pieces can be done at a distance of half a meter around the entire perimeter.
This is done in order to securely fasten the membrane. Before you begin the process of fixing the sheathing, you need to take care of marking the walls using a pre-prepared pencil and a hand tape measure.
If surface unevenness is found in some areas of the wall, then short slats can be placed there, on top of which the frame will be secured.
2.2 Installation of the second layer
The formation of a second layer of sheathing is necessary so that the walls of the house are not exposed to the harmful effects of dampness and can “breathe” freely.
The second layer of sheathing can be made using wood or metal. The second layer of planks is fastened on top of the first.
The thickness of the backup layer of the sheathing should be equal to 15 centimeters. Thanks to the implementation of this method, the walls of the house will be able to breathe, this will prevent the sudden appearance of harmful mold fungi and excess moisture concentration in internal structure the thickness of the walls of the house.
When arranging the second additional layer, it is important to pay attention to the evenness of the lines and their correct installation. To do this, you should use an ordinary construction plumb and level everywhere.
2.3 We cover the walls with siding
Covering the prepared walls of the house with siding panels is the final stage of all work. Installation begins with attaching side and corner type planks.
After the lines are drawn, the strips will need to be fixed along their guides using self-tapping screws, which will be located along the entire perimeter of the door and window openings.
After this, the installation of the siding panels begins. Everything will happen quickly enough if all the stages of the previous preparatory work were performed correctly and correctly.
The sheets are fastened starting from the lower corner of the load-bearing wall, oriented towards the horizontal row. Using this method, you can secure the siding over time, reaching the top edge of the wall.
During the installation process, it may be necessary to cut some sheets. The most convenient way to do this is with a sharp construction knife. If you hear characteristic clicks when attaching sheets, this will indicate that they are correctly secured.
2.4 Preparing the facade for siding installation (video)
Any owner of a private home wants to create not only a strong and reliable home, but also decorate it beautifully. Currently, siding is especially popular as a finishing material.
Siding for cladding a house
This design option was not chosen by chance. This material is capable of performing not only a protective function, but also looks very interesting and aesthetically pleasing. Facade cladding provides excellent protection to walls from atmospheric agents, improves appearance at home, it perfectly hides some imperfections, unevenness, and surface defects, which is especially important in old buildings.
Externally, a wall covered with siding looks like it is covered with boards.
Siding consists of strips of various widths and lengths, equipped with snap locks. Thanks to this, they are easy to attach to each other. The length of the siding can be up to 6 meters, and the thickness reaches 10 millimeters.
Pros and cons
TO positive qualities façade finishing with siding can include:
- Long service life.
- Minimal care.
- The ability to use this material on almost any surface.
- Siding is resistant to rotting, corrosion, and microorganisms.
- Convenience and ease of installation.
- Strength.
- Attractive appearance.
- Relatively low cost.
Each type of siding has certain disadvantages:
- Metal siding is difficult to transport because the sheets do not bend. In addition, this material is not elastic, and once a dent appears, it is difficult to fix.
- Wood siding is not resistant to impact environment, he needs protection. It is highly flammable and unsuitable for use in damp environments.
Vinyl siding is the most common, but it also has its disadvantages:
- Instability to mechanical damage.
- Difficult to replace. You cannot remove the sheet separately and change it; you will have to change a large area.
- Large coefficient of expansion when changing temperatures (you have to solve the problem using gaps between the sheets).
- Poor thermal insulation.
- The material melts when heated strongly.
Species
The choice of material depends on the material of the walls and the conditions for the further operation of the building. It is better to resolve this issue with specialists.
Currently, the following types of siding can be found on the market:
- Vinyl.
- Ceramic.
- Wooden.
- Basement.
- Metal (copper, aluminum, steel).
Required tools and materials
It is first necessary to determine the area of the walls and the type of roof in order to correctly calculate the amount of material.
Before you begin work on siding your house, you should prepare necessary materials and tool.
For installation you will need:
- Bulgarian.
- Metal knife.
- Hammer.
- Screwdriver.
- Drill and hammer drill (when working on concrete walls).
- Screwdriver.
- Roulette, preferably laser. If you don't have one, you can take a level and a square.
- Ladder.
Preparatory work
Preparation for house cladding includes the following types of work:
- Dismantling of protruding parts (door and window frames, ventilation grilles).
- Possible gaps in the walls near windows and doors are sealed. For this you can use cement mortar or polyurethane foam.
- If you are siding an old house, all old siding should be removed. Prepare the surface: clean it of dirt and dust, chipped plaster, remove mold, replace possible rotten areas and treat them. Houses made of wood should be pre-treated with antiseptic agents, and foam blocks should be coated with a primer.
The surface must be smooth and clean. Although siding can hide small defects.
How to sheathe a house
Siding installation is carried out in several stages:
- Surface preparation.
- Construction of a frame or sheathing.
- Creation of a steam, hydro and heat insulating layer.
- Installation of siding sheets to the sheathing.
Many people try to replace the frame with sheathing; this is highly undesirable for the following reasons:
- The frame allows you to hide uneven surfaces of the house.
- Thanks to it, you can make a thermal insulation layer, since siding does not have sufficient thermal insulation.
- There is space between the material and the wall of the house, allowing air to flow freely. This will provide protection against fungus and mold.
Step by step instructions
- Choice of material for the frame. The material for the sheathing is selected depending on the material from which the walls are made. For a wooden house you should take wooden blocks, and on concrete walls or made from foam blocks, it is more advisable to purchase metal profile with galvanization. It will allow you to secure the siding efficiently and provide long term services.
- Creating a frame. A starting profile is installed at the base, and a finishing profile should be placed at the top of the wall, near the roof. They must be connected to the longitudinal profiles using larger self-tapping screws - 9.5 millimeters. In this case, it is better to purchase self-tapping screws in the form of a drill, and not just with a pointed end. The sheathing should be attached directly to the wall surface. For this, dowels are used; they are inserted into pre-prepared holes, which are drilled with a hammer drill. The longitudinal profile should be attached in increments of 35-40 centimeters. Window strips are attached in the area of window openings, and doorways are edged with J-profiles. The vertical elements are not fixed tightly to the base and roof; it is necessary to leave gaps of up to 6 millimeters so that the guides do not bend when the temperature changes.
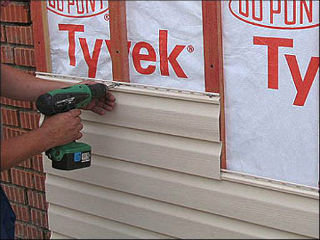
- Creation of a waterproofing layer and laying of insulation. Waterproofing is required for walls made of wood and aerated concrete blocks. It is advisable to use a moisture- and windproof membrane, which can be attached directly to the wall of the house if a thermal insulation layer is not created. Then there is space between this layer and the siding for ventilation. If thermal insulation is created, then the waterproofing is attached to this layer. And then additional sheathing is created to ensure ventilation of the skin.
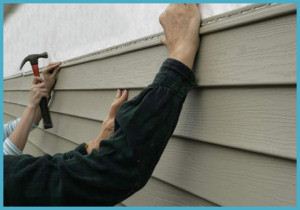
- Installation of panels. The panels should begin to be installed only after all the sheathing elements and guides are fixed in place, heat and waterproofing have been created. The first row of panels is attached to the starting bar. It is necessary to install the element from below until the lock clicks, and from above it is fixed to the guide using self-tapping screws. Fastening is carried out strictly in the center of the recesses on the siding, in increments of about 40 centimeters. The remaining panels are also fixed in the direction from bottom to top, from the base to the roof or window opening. They should not be fixed rigidly; the panels should “move” a little from side to side. The top row should be attached to the finishing strip.
How to cover a house with siding and insulation
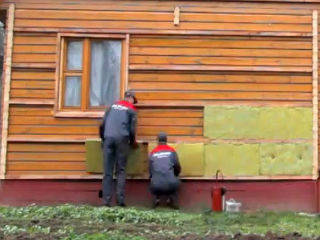
Thermal insulation should be done in wooden and concrete houses, as well as when creating a ventilated facade. It is correct to install the insulation between the longitudinal guides.
This layer is made as follows:
- A vapor barrier layer is laid on the wall.
- Next comes the thermal insulation material.
- A moisture-proof membrane is attached to the top.
To fasten the material, you should create another sheathing, the guides in it are attached horizontally. Or there is an option to make a recessed sheathing; the width of the guides should exceed the thermal insulation layer.
When installing panels, the following points should be taken into account:
- It is advisable to begin cladding not immediately after the construction of the house, especially if the structure is made of wood.
- The ideal option for fastening panels is aluminum nails. They should be placed strictly in the center of the elements.
- It is better to cut panels with an electric saw or hacksaw.
- Be sure to use a level to ensure a leveler.
- You should not tightly fasten the elements of the sheathing material to the frame; you must leave gaps between the nails and the material, at least 1 millimeter.
- The mounting holes on the panels are made in an elongated shape. This allows the siding to move freely with temperature changes.
Sheathing a house with siding with insulation: sheathing for siding, facade insulation, siding fastening
Siding is the most convenient and most common material for exterior finishing Houses. The installation technology is not affected by the material from which the building is constructed - brick or wood, the technology is the same. Insulating and covering a house with siding is not a difficult job; you can do it yourself.
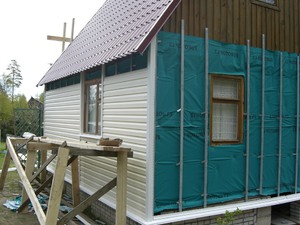
Photo of a house covered with siding
Preparatory work
Before starting work, scaffolding is erected around the facade, which will allow long panels to be freely mounted at height.
Attention! Do not use old boards when constructing scaffolding; your safety directly depends on their reliability.
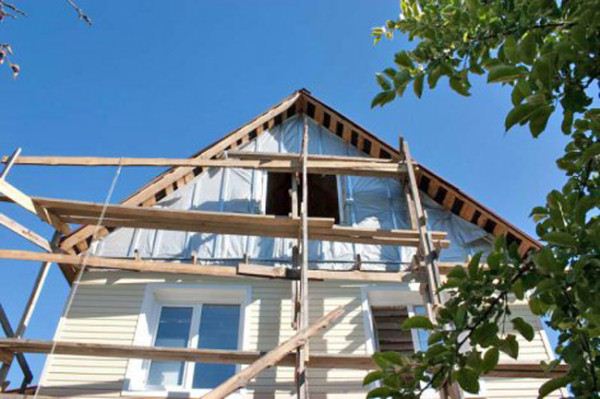
Scaffolding for working at heights
Before covering a house with insulated siding, you must first prepare the surface of the walls. The instructions are:
- Remove all elements that may interfere correct installation frame. Such elements include ebbs, trims, lamps, sometimes even window sills;
- Close all cracks on the surface with tow or special silicone sealants;
- Level the base, remove crumbling plaster;
- The walls are treated with a moisture-proofing compound and primed.
Note! Antiseptic and moisture-proof treatment is carried out in the warm season, with mandatory drying of the surface. Wooden facades also need to be treated with a fire-retardant primer, since siding is flammable.
Installation tools and work technology
Houses are covered with siding at any time of the year. The main thing is that the ambient temperature is not lower than – 10 0 C. This requirement is due to the fact that at subzero temperatures the panels easily break when cutting.
Advice! At temperatures below 0 0 C, do not use scissors to cut panels; use only a grinder or a saw with fine teeth. When cutting even frozen panels with these tools, they will not crumble.
Basic tools for work:
- fine-tooth saw;
- square;
- metal scissors;
- hammer;
- roulette;
- square;
- building level;
- screwdriver;
- ladder;
- Bulgarian.
To insulate walls (brick, concrete or wood), you need a whole list of tools and some basic skills in working with them. As a rule, the price of some instruments is quite affordable.

Tools that allow you to quickly and efficiently cladding a building
The technology for covering a house with siding and insulation is very simple:
- Using nails or special fungi, a vapor barrier film is fastened over the entire surface of the house;
- thermal insulation is laid between the vertical bars of the sheathing;
- cover the thermal insulation layer with a layer of windproof film;
- install the panels.
Advice! When constructing thermal insulation, you should not use insulation materials that are too loose, since as a result of settlement they can damage the surface of the siding.
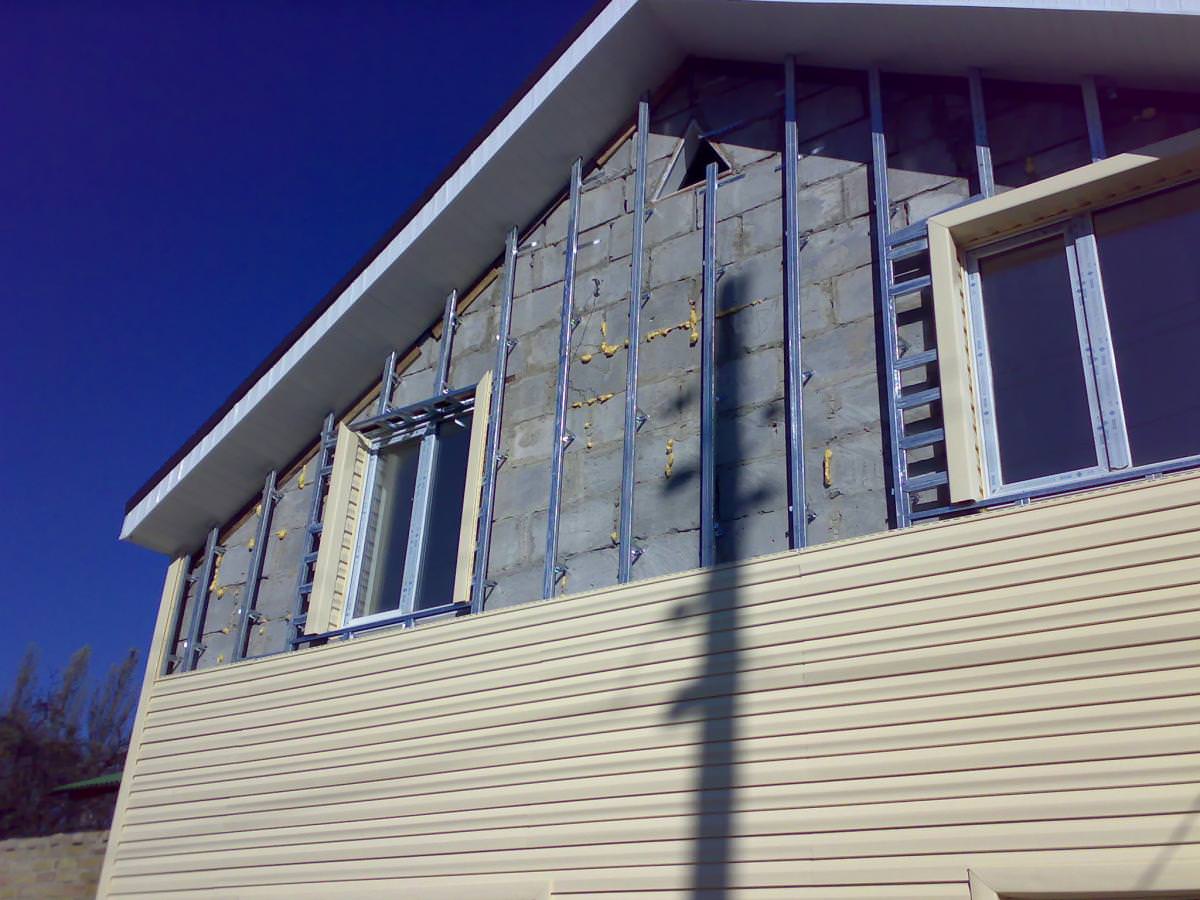
Lathing for siding
Wooden sheathing
The actual siding of the house begins with the installation of the sheathing. The simplest and cheapest option is to use wooden slats or bars. Dry wood is chosen for them to avoid its deformation during the drying process. All elements must be treated with an antiseptic.
The need for lathing is due not only to the fact that it is necessary to level the walls, but also to arrange a place for laying insulation. The sheathing pitch is 30-40 cm and depends on the region and wind load; its depth directly depends on the insulation material.
Metal sheathing
This type of lathing is most often used on houses made of brick, aerated concrete blocks, and also when it is necessary to install insulation. The metal frame has great rigidity and will last a very long time.

Using hangers, you can set the necessary distances from the wall without much effort. To ensure that there are no rust marks on the siding in the end, galvanized or anodized fasteners should be used.
Facade insulation
Before properly covering a house with siding and insulation, it is necessary to perform a vapor barrier on the house. With its help, a barrier is created for warm air to escape outside.
The vapor barrier film must have the following characteristics:
- have low vapor permeability, that is, water vapor should not pass into the enclosed structure;
- have sufficient tensile and tear strength.
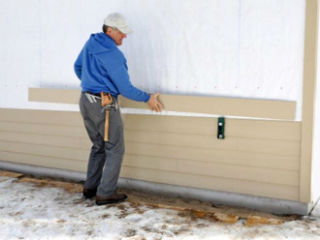
Siding fastening
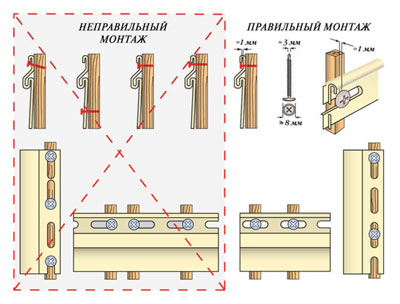
Siding is not the cheapest type of building insulation. Siding panels are subject to significant thermal expansion. Under the influence of external temperatures, the siding “walks”. They are mounted from below, having previously secured the starting rail level.
The panels are secured with self-tapping screws, screwing them into the middle of the mounting holes. Each subsequent part is snapped into the groove of the previous one.
At winter installation the gap between the panels should be increased to 8-10 mm, which will compensate for the temperature movement of the supporting structures.
When installing, avoid the following mistakes:
- The panels cannot be mounted closely. Without a gap for thermal deformation, the siding coating will warp or lead;
- It is not recommended to attach self-tapping screws to the edges of the panels, which can lead to breakage;
- The starting guide should be fastened tightly and strictly level, otherwise the coating will be damaged.
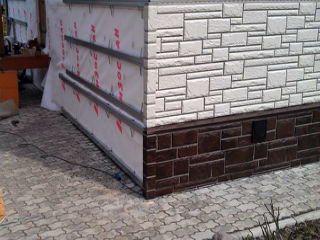
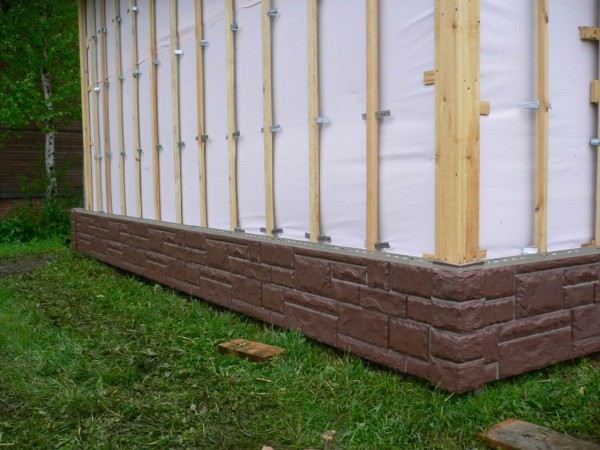
Siding elements
Drainage
This element serves to protect the base and foundation of the building from moisture. It is a painted metal corner. Drainage drains are leveled along the entire perimeter of the building. Insulation and siding of a house should begin with drainage.
Then the initial or starting rail is attached to them. The rigid design of the drain allows it to be set strictly at level, which simplifies the installation of the soft starting rail.
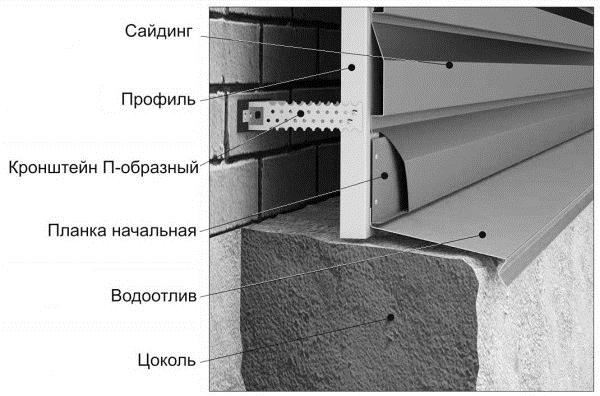
Starting rail
This rail is attached directly to the drainage system while maintaining the level. This is where siding installation begins. The lower starting level is corrected by releasing the sheathing to the required level if the walls have a slope.

The siding panel is inserted into the starting rail until it clicks. After installing all the elements, install the panels from below into the lock, also until they click. On a blank wall, the panels are stacked up to the roof, and on a wall with windows – up to the bottom of the window.
Siding corners
The siding must be closed on the sides and ends of the building. To protect against side winds and water, wide siding angles are used. To properly install the sheathing, you need to attach the corner of the siding to the wall surface and make the necessary notches. The panels extend into the corners by 10 mm and should not rest against its walls.
Finishing rail
This element is attached under the roof arch and in the narrowing areas of the wall. The siding panels are not attached to the finishing strip.
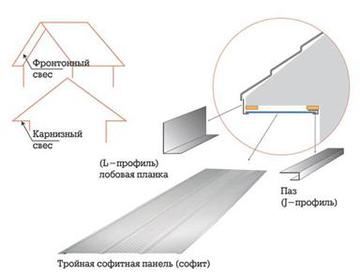
Soffit
A soffit is needed for lining the roof overhangs from below. The difference between soffits and panels is that soffits have perforations for natural ventilation. The fastening technology is the same as for all elements, only the edges of the spotlights are inserted into the J-rail.
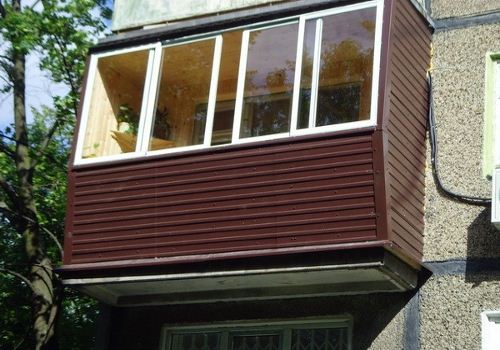
Fastening the panels after installing all the elements will not be difficult. This is easy and simple to do, just like insulating plastic windows or insulating a loggia.
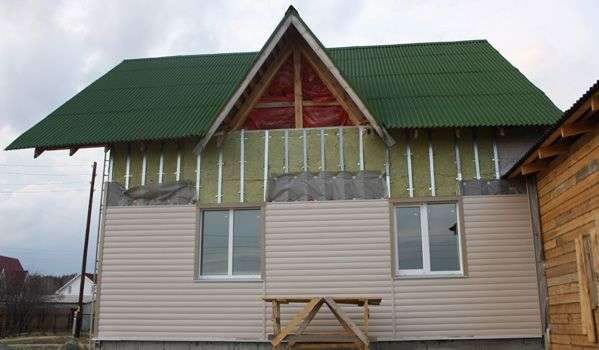
Insulation of the house followed by cladding with siding panels
Conclusion
Siding is excellent option for finishing and insulation of building facades. The cost of materials is quite affordable. In this article you will find additional information on this topic (also find out how to insulate a floor using wooden beams).
http://pro-uteplenie.ru
The most popular material for covering houses is siding. Covering a house with siding and insulation with your own hands is a process that interests large number people. It is used not only as decorative element, but also carries the function of insulation.
For owners, additional insulation of the house is considered the main task, because it is foolish to refuse to save additional warmth and comfort.
Insulation or the first stage of sheathing
Of course, the insulation material should be located outside, but before that it is necessary to prepare the building. Conventionally, the preparation process can be divided into several successive steps:
- The first step is preparation for installation of the sheathing.
The technology of covering a house with siding with insulation with your own hands requires the preliminary dismantling of platbands, window sills, ebbs and other structural elements that may interfere with the full and correct installation of the frame, and in the future, the siding with insulation. You also need to take care of blocking the cracks with tow or special silicone sealants.
- The second step is preparing the frame.
At this stage it will be necessary to prepare the frame for future cladding. For lathing, in most cases, wooden blocks with a cross-section of 40x50 cm are used, which must be treated with special means to prevent rotting before installation. The thickness of the insulation must match the thickness of the inner edge. The lathing must be made in one plane; for this, a level must be used during installation. If the wall surface is uneven, it needs to be leveled with slats.
- The third step is installation of insulation.
The insulation under the siding is installed clearly between the spacers of the beams, so the area of the canvas should be identical to this space. As additional insulation, you can use any materials whose density should increase as the height of the building increases.
- The fourth step is laying the membrane.
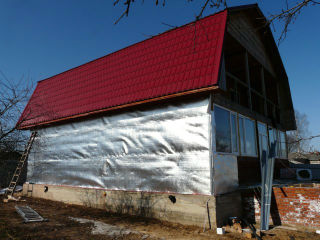
To ensure the removal of excess moisture and protection from wind, the insulation must be covered with a membrane film, which is attached using a construction stapler.
- The fifth step is the installation of an additional frame.
A frame similar to the previous one is installed on top of the membrane. It is attached exactly to the first one. Here, in increments of 30 cm, a beam with a cross-section of 20x40-50 cm is mounted. Thanks to the second lathing, an empty space is created that acts as ventilation.
Sheathing and installation rules
After insulating the facade, you can proceed to calculating the amount of siding and purchasing it. No one wants to overpay or go back to the store to buy it, so there is no need to make calculations “by eye.”
Calculation rules
- To find out how many siding panels will be needed for cladding, you need to divide the total area of the walls by the length or width of the panels.
- The number of slats can be calculated by dividing the perimeter of the building by the length of the slats.
Instructions and rules for installing siding
- Sheathing installation line drawing.
- Drive nails into the opposite ends of the wall at a distance of five centimeters from the siding installation line.
- A thread is installed between the nails, the parallelism of which is checked with a building level.
- Further along the thread is carried out clear line, which will be the top cut area for the initial rail.
- To prevent expansion, a small gap (no more than 0.5 cm) must be left between the starting strips.
- Corner slats are installed on the corners, which are divided into external and internal.
- The inner strip remains intact, and when joining the corner strips, the two edges that have holes should be trimmed by 2-3 cm.
- When placing the top plank on the bottom one, be sure to leave a gap of 2 cm.
- For door and window openings, there are special near-window strips, which have many brand names in catalogs of building materials.
- When installing siding panels to compensate for expansion or shrinkage, you need to leave a gap of 1-1.5 mm.
- So that the siding panels can move when shrinking or expanding, and also so that they do not press, the nails must be fixed clearly in the center of the hole. Remember that when cutting siding panels, you can only use a sharp knife or a hacksaw, otherwise the saw teeth can damage the surface of the skin.
Fastening siding panels
The bottom of the first sheet of siding is attached to the bottom strip, and its top is fixed with self-tapping screws. Further, when installing the panels, the same principle is used. Subsequent sheets of sheathing are overlapped with the previous ones. Where the siding connects to the corner strip, it is recommended to leave a gap of 5-6 mm.
Sometimes the length of the siding panel is not enough to cover the length of the wall. In this case, the sheathing sheets must be connected to each other with special connecting strips.
Often, panels that are mounted in the window space require adjustment. To do this, just attach it to the installation site, mark the depth and length of the cutout, after which you can trim it. Next, the panel is installed in the desired location using a special near-window strip.
The last sheet of siding is attached as follows: a finishing strip is mounted at the wall level, then in the remaining space the siding panel closes with a slight click or a characteristic crunch. Upper part closes similarly. Thus, covering a house with siding and insulation with your own hands is a complex process, but it gives a significant effect in terms of insulation.
A few words about the “ventilated facade”
It was described above how a façade ventilation system is formed. It gives the building cladding good properties:
- Air circulation. The movement of air flows under the surface of the skin allows you to maintain and maintain the humidity of the insulation at the same level. This way you can avoid the formation of condensation, which can damage the materials.
- The insulation does not get wet, and if this happens, it dries quickly thanks to air flows.
- IN summer period, thanks to the ventilation system, it is possible to prevent the walls of the building from heating up, as well as the penetration of excess heat into the house. This does not create a closed space, the wall breathes, and the temperature in the room does not change.
- The insulating material cannot be covered with roofing felt, since the entire structure, including the frame, can rot.
What happens after the installation work is completed?
Covering a house with siding and insulation yourself using the installation method described above has a number of advantages that have already been mentioned. This is not just a solution to many problems, but also an excellent design move that will change the appearance of the building.
There are a huge number of companies producing cladding materials, which are divided by color, style and quality. The cost is always justified after a few years, and the owners are satisfied with the work for a long time.
Remember that the durability and quality of building siding depends on manual dexterity, the ability to follow instructions and installation rules, as well as your attentiveness.
Training video.