A good roof for a balcony is a rather sensitive issue for many residents of high-rise buildings. As a rule, an old roof creates many problems, from its emergency condition before leaking and definitely requires at least a major overhaul. Soviet roofs were built according to a single model and consisted of reinforced concrete structures. Such a canopy, which obviously does not always protect from heavy precipitation or large accumulations of snow, can be converted or even replaced with a more modern and quality products. Self-installation roofing onto a balcony is not only entirely possible, but also feasible, so let’s take a detailed look at the upcoming range of work.
Designs of various types
The first thing that needs to be taken into account during installation is the opinion of the local administration or service organization on any “self-construction”, since putting a roof on a balcony is one thing, but there are a number of specific regulations on the dismantling of structures that deform the appearance of the building. In this case, before you start work, you need to orient yourself to your floors and the floors of neighboring houses. It is always better to be prepared for such unexpected situations in advance.
Next important point installing a roof over the balcony - these are your personal plans for the future:
- Layout with subsequent glazing of the balcony.
- Layout without glazing.
Now let's move on to consider two types of roofs, each of which has both its advantages and disadvantages.

Roof type – independent
An independent roof structure does not have vertical posts (supports), which provide additional strength to the frame. Its installation takes place as a hanging-type balcony superstructure, but for the upper floor a canopy made of polycarbonate (the most optimal material) is clearly not the best option, since the structure is not particularly strong and there is a risk of destruction of the extension under the heavy weight of the snow layer. At the top level of a high-rise building, it is only suitable for small balconies (existing in old-design houses) or for latitudes with snowless winters.
An independent roof on a balcony has a fairly significant advantage - it is a highly economical design, very simple to implement, does not require a lot of time and material, but again - its windage under the influence of strong winds is also a significant factor - clearly not in favor of an independent type of roof. It is not suitable for areas where strong gusts of wind blow between houses.
Roof type – dependent
A dependent roof can be divided into several installation models.
- Installation with additional supports.
Such supports make the structure more resistant to changes in weather conditions and are fixed diagonally to the supporting surface.
- Use of vertical racks.
In this case, it is more expensive, but the installation of the structure is designed for your own balcony, which can be glazed.
The positive aspects of this design will be serious:
- Your balcony can be equipped as an additional summer room. In this case, it all depends on your imagination: whether it will be a cozy veranda or a summer garden with flowering plants. Additional insulation and plastic glazing are not designed for balconies, since only a loggia can withstand the load of PVC glazing and major finishing for insulation. But there is always the opportunity to place sources of external lighting and install light furniture.
- The dependent roof design is suitable for any balconies, regardless of their size or layout.
Despite positive aspects, there are also several disadvantages in installing this type of roof:
- Installation is much more difficult than with an independent frame.
- Financial costs are several times higher than the cost of simpler structures.
Do-it-yourself balcony roofing is a responsible undertaking that requires an investment of both time and financial resources. Before changing the roof, the main thing is to firmly settle on your choice, and spending money can be divided into several parts and continue to improve your balcony in stages.
But it is only possible to really evaluate the structural features and layout of each balcony on site, so we will describe the most optimal materials and some installation features.
Roof installation materials
To use the most successful building materials for the specifics of your design and climatic conditions, it is advisable to familiarize yourself with the following information.

Wooden frame
Wood has several advantages and quite noticeable disadvantages, but let’s start with the positive side:
- Relatively low price and ease of working with parts.
- There is practically no need to buy new tools for installing a wooden frame.
- The natural beauty of a wooden structure with a well-executed roof design looks neat and favorably emphasizes the coziness of your room.
Considering the external structure made of wood, several serious disadvantages can be identified:
- Destruction of the wood structure under the influence of high humidity (frequent precipitation in the form of rain, snow, etc.).
- In the case of the top floor, the roof on the balcony is leaking.
- The influence of sunlight. Under the influence of ultraviolet radiation and high temperatures, wood quickly dries out, may not hold paint, and the structure becomes shaky. Another negative factor at high temperatures is the risk of fire.
- Repairing the balcony roof on the top floor will require additional help.
If the tree has gained enough moisture, the structure needs to be completely changed.
Such design disadvantages almost cover the positive aspects of wood, so a roof base made of such material is installed for a relatively short period of time.
In this case, a good option is moisture-resistant plywood; if you are going to install OSV or chipboard, then the material must be painted with a special water-resistant composition.
Roof based on metal profiles
A metal roof consists of individual elements fastened together and welded into a single structure. Preference is given steel pipe, preferably with a square or triangular cross-section. The only disadvantage of a steel frame is its significant weight; otherwise, the properties of a steel structure are the most optimal option for your roof.
Another good option, even better than a steel product - duralumin. The only disadvantage of duralumin is that it is almost impossible to weld a solid frame of a balcony roof from it, with the exception of screw connections, but otherwise this material will greatly facilitate both the future structure and its installation.
Polycarbonate roof
If you are going to install a roof on the top floor, then cellular polycarbonate will be the best option.

- The material is light in weight, easy to cut and inexpensive.
- By using monolithic sheets, taking into account the glazing of your balcony, you will ensure good lighting and warmth.
The only disadvantage of polycarbonate is that it is difficult to combine high-quality insulation with thermal insulation material.
Roof made of corrugated sheets
Corrugated sheet is a fairly universal material that is inexpensive, harmonizes well with metal profiles of any category and is easy to install. The only and rather significant disadvantage of the material is poor sound insulation. You will hear literally everything: from the pattering drops of rain to a small bird that decides to run around on your roof.
Roof installation and its features
How exactly to assemble the future structure is up to the apartment owner. It’s not difficult for a master who has experience in installation to figure it out by estimating the amount of work, but there are certain specifics of the work.
First of all, the slope is taken into account, with a focus on the architecture of the house.
- If the roof of a high-rise building is pitched, then it is advisable to make the canopy over your balcony the same.
- If it is flat, then the design should be chosen without strong deviations from the general architecture.
The ideal ratio is 1 to 2.5 (height to width of the canopy), since the frame made allows for independent snow removal and creates conditions for minimal roof windage.
Fixing with wall
In this case, fastening is considered in one, most optimal option - using anchors. Regardless of the type of material used to build the house (brick or reinforced concrete), anchors allow you to securely fix the load-bearing parts. Any other option with advance installation of dowels in this case is not suitable for high-quality installation.
Thermal and sound insulation of the roof
Thermal insulation and sound insulation is possible only if the roof type is dependent. In this case, the insulation of the balcony roof has many variations.
- Penoplex sheets are quite suitable (if the ceiling of the room is covered with PVC or clapboard).
- If you are insulating the upper floor, you should take care of the moisture resistance of the thermal insulation; for example, mineral wool is definitely not suitable for you, since over time it will become saturated with moisture and begin to leak.
Before repairing or installing a new roof, you should thoroughly prepare: take measurements, calculate financial costs, design a model of the future roof and, if possible, a balcony, select the appropriate tools and only then begin work. The restoration of the concrete slab of the balcony floor should also be taken into account. As they say: “measure twice, cut once.”
The first step to finally getting rid of snow and puddles on the top floor balcony is to install a roof over it. Often in old houses there is none at all, if it was not provided for by the project and when the balconies are located in a checkerboard pattern, or only across the floor. This leaves everything open to rain, snow, hail and dust. But this is no reason to despair, because it is quite possible to make a strong and reliable visor yourself!
We will now tell you what exactly the roof on the balcony should be like, what materials will be needed, how to install it and ensure the reliability of the entire structure for at least 20 years.
Let's first define clear requirements for the roof of the top floor balcony. First of all, there is a minimal need for repairs. The fact is that there are requirements for the roof on the balcony, and it doesn’t matter whether it was made with your own hands or you hired professionals for this purpose.
Such a roof must be resistant to precipitation, temperature fluctuations and any mechanical stress. Another small requirement that not everyone knows about: the roofing on the upper floors must have a high reflectivity, and therefore, if possible, choose a white or silver visor color. This will also help prevent the roof from heating up to the limit in the summer heat.
Determining the angle of the roof: flat or steep?
Regarding the angle of the balcony roof, there are several points. For example, the most important rule is to avoid an avalanche of snow, which will then fall on people or cars passing below.
Therefore, either make the roof steep (closer to 45°), or install snow guards on it. In general, calculate the slope of the slope using this simple formula: 30 cm for every meter. The length of the eaves overhang should be within 20-25-35 cm, and the installation step of the trusses should be 70-100 cm.
The angle of the roof is also affected by the angle of the roof of the building itself. If it is gable, then the roof will need to be made with a slope so that snow does not accumulate on it. But if the roof of the house is flat, it is still better to make the balcony canopy not horizontal. The ideal proportion is a height to length ratio of 1 to 3.
Considering that under the balcony there may be not only an entrance, but also a pedestrian area, as is usually the case, then, according to the laws, the owner of the apartment is personally responsible for the safety of these people.
Roof height: how to achieve the golden mean?
Think carefully about the height of the roof. Too high will not be able to perform its main functions - to protect from wind, rain and snow. Those. The higher the roof, the less difficulty it will be for snow and wind to penetrate onto the balcony. But there is also no point in placing it too low, because then such a balcony will no longer be comfortable.
That is why experienced builders calculate everything using such a simple formula: they take the height of the tallest resident of the apartment and add 20 cm to it - the normal height of the balcony roof.
Choosing a roof shape: straight, semicircular, arched?
Next, decide on the shape of the balcony roof: will it be straight or semicircular. You can easily make the first one yourself, but it makes sense to order the second type already ready-made, which is made in a factory by gluing metal to polymer.
Semicircular roofs of balconies add a special flavor to the facade of buildings and look much more advantageous against the background of ordinary straight ones. In addition, this shape allows snow to slide off easily and not linger. And in terms of aesthetics, being on such a balcony is especially cozy.
But choosing materials for a curved roof is quite difficult. After all, it is important that they are convenient not only to attach, but also that they then store their shape. Therefore, such a roof is made in advance to order, and cellular polycarbonate is often used as a covering material.
And finally, at this stage, decide whether you will do the roof yourself, or whether it is better to hire specialists. It is clear that the top floor is quite dangerous, and therefore, if you have never worked at height and do not have the necessary professional training, then this risk may not be justified.
Types of types of balcony roofs
Remember that the balcony on the top floor has its own characteristics and pain points. Therefore, first, it is better to invite a specialist for a consultation so that he can examine everything and discuss all the details with you.
If this is your first time encountering such a concept as a balcony roof, we advise you to start by watching this video - it explains a lot:
It is important to indicate how tightly the roof itself will be connected to the glazing. After all, if there is none, it can be installed both at the beginning of glazing the balcony and during the process itself. Each of these methods has advantages and disadvantages, so let’s figure out what types of balcony roofs there are in this regard.
The first type is an independent roof. This is installed using a console and brackets. Among the advantages, we note simple installation, high functionality and reliability. The good thing about an independent system is that it does not impose any special requirements on the parameters of the balcony. At the same time, any materials can be used as a roofing covering, because such a roof is installed independently and does not create a load on the glazing.
In other words, a dependent roof type requires the presence of special supporting structures, while an independent roof, on the contrary, allows it to take significant loads on itself. Those. if there is a roof in the form of the same slab above the balcony of the top floor, this is an independent system, because all the profiles are attached to it, but if there is no roof, then there are also two options for arrangement: dependent and independent systems.
So, if you install strong corners and accurately calculate the load, the roof will be strong enough to even attach frameless glazing to it (this is an independent roof). But if you rest the new roof on the new glazing as a support, then this roof - dependent, and additional loads cannot be distributed on it, and you will need to be more careful with the choice of roofing covering.
The dependent systems themselves are intended to be used only for a narrow balcony. Among the disadvantages, we note a considerable load on the glazing, which increases in winter, and among the advantages are cost-effectiveness and ease of installation. But a dependent structure cannot be used in old houses, where it is forbidden to unnecessarily overload the walls!
And finally, let's note the third type of balcony roof is post-supported. Here the roof does not rest on the glazing and not only on the wall, but is supported by a special frame made of steel racks, similar to the top and bottom trim. Moreover, they not only act as supports, but also create openings for glazing. True, due to the fact that such a design creates additional load on the parapet or balcony slab, it should be strengthened. And the order of work here is also slightly different: we do the roof, and then the windows.
Another interesting case, which occurs quite often in Russian houses, is when half of the balcony has a roof, but the other half does not. Then it needs to be completed, either further expanded, or another one installed with removal, and simultaneously with the glazing of the balcony.
Installation of an independent system
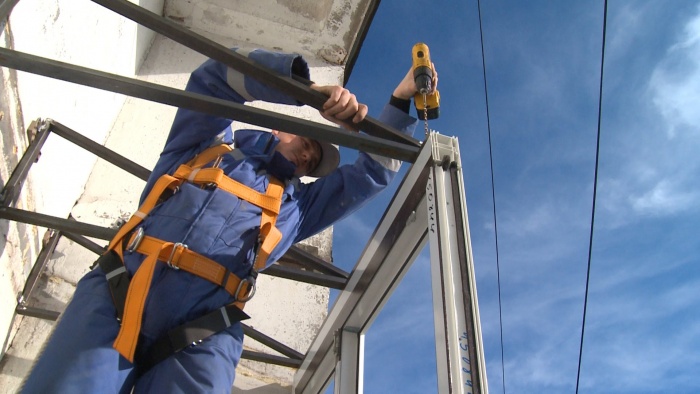
So, first of all, in order to make an independent roof that will not rely on the glazing with its weight, you will need to build a supporting frame for it. Usually it is a simple truss made of rolled metal or wooden frames. These need to be attached to metal anchors or a façade dowel with a screw, directly to the wall.
Why do farms have to look like this? The fact is that due to such direct support they provide 100% resistance to disruption from strong winds. Here, reverse wind loads will be compensated by connecting the covering to the trusses using steel plates with a thickness of 3 mm, and the side posts gain their resistance to gusts of wind thanks to direct attachment to the wall.
Wooden trusses for balcony roofs are rarely made today due to the fact that it is not always possible to achieve complete protection from moisture under such a roof. But if they do, then in the form of ordinary triangles like metal ones, they are treated with an antiseptic and attached to the wall with anchor bolts or special plates.
Of course, since we are talking about the top floor, it is much more rational to attach the balcony roof to metal trusses.
- Step 1. For this undertaking you will need 35x35 mm steel profiles, from which you will make load-bearing consoles. individually tailored to the size of your balcony.
- Step 2. Next, secure them with anchor bolts directly to the wall, and make a cut above the consoles in it, where you will later insert the valley.
- Step 3. Place a roof made of corrugated sheets or ondulin on the valley and seal the joints.
Rainwater or melt water will flow down the roof and fall onto the valley, and from there it will be discharged outside the balcony. Here is the process of making such trusses in detail:

The lathing for a balcony roof is usually made of wooden beams 20x40 mm or 40x40 mm. It is made from dry quality material. When such a beam is located between the same sheet of corrugated sheeting and metal corners, to some extent it absorbs the main noise and impacts from raindrops, at the same time absorbing them a little, and the roar is no longer so strong.
Typically, the length of the roof slope of a standard balcony does not exceed two meters, and therefore only three such slats are enough. Wire will help you temporarily secure the sheathing to the trusses, and then connect the sheathing to the trusses using bolts. This is what it looks like:


Let's consider another common case when there is a slab on top, but it is very dilapidated. That is, it cannot be additionally loaded at all, and sometimes it’s scary to touch it. What to do then? Go for tricks! For example, install a new, independent roof directly under the slab, and glass the balcony next to it:

Mounting a dependent system
In the case of a dependent roof system, the balcony glazing is first installed, and only then the roof itself, which in most cases sits directly on the frames:

The roof is placed on mounting foam, which, after drying, is trimmed and sealed with sealants on both sides. Next, the ceiling is insulated and hemmed. As you can see from step-by-step master class, there are no trusses here, only support for the roofing sheets, which itself rests on the window profiles. In this option, it is impossible to install frameless glazing, which always rides on the upper guides.
Installation of the support-rack system
And finally, let’s consider another popular option, the support-and-post system. Here, both for glazing and for installing the roof, one complete frame is created, usually wooden:

In a word, here neither the roof lies on the frames, nor the frames hang directly on it. Here is the installation process step by step:
- Step 1. Install vertical posts along the entire perimeter of the balcony and cut them to the desired height. If the roof of the balcony is flat, the posts will be the same; if they have a slope, those closer to the street will be trimmed.
- Step 2. Using a building level, check how vertically the supports are mounted - there should be no deviation.
- Step 3. Now screw the posts to the railings or directly to the concrete slab, using special anchors.
- Step 4. Secure the base for the roof - beams or metal rods at an angle. Fix them to the wall using dowels and anchor bolts, and to the racks using self-tapping screws. The fastenings should be as reliable as possible; the entire rack will take the entire load from the structure.
- Step 5. Additionally, connect the edges of the crossbars at the top with a profile pipe.
- Step 6. Now lay the wood sheathing and, if desired, wood decking under the roofing. We, of course, recommend making the flooring anyway, so that even that same metal sheet does not sag later from the snow. For this purpose, regular chipboard or thick plywood, and even a few additional boards, are suitable.
- Step 7. Be sure to coat all wooden parts of the structure with antiseptic.
Now you can move on to the selection and installation of roofing sheets.
Selection and installation of roofing
Corrugated sheeting, metal tiles, plastic slate, polycarbonate, soft roofing and galvanized sheets are excellent as roofing for a balcony:

Let's look at each type of roofing separately, taking into account its pros and cons specifically for the balcony.
Corrugated sheeting: ideal for a balcony
Just keep in mind that a metal roof will be annoying with noise from rain, but it can be soundproofed and at least use damper tapes.
And yet, the most typical roof for a top-floor balcony is a profiled galvanized sheet with a thickness of 0.55 mm and a wave height of 20 mm. The corrugated sheet itself is good for its ease of installation, wide choice of colors and light weight. But if it gets damaged during installation, it will begin to corrode.
So, to install corrugated board you will need the following materials: the corrugated sheet itself, the number of sheets of which you can easily calculate yourself, anchor bolts 10 cm long, antiseptic for the timber, screws with sealing gaskets, dry wood timber 20x40 or 40x40 mm for sheathing and pre-welded supporting triangular trusses from corner No. 6.
As soon as the farms are installed (we presented the technology above), follow these instructions:
- Step 1. Make a lattice from timber, take sheets of corrugated sheets and cut them with metal scissors.
- Step 2. Now, using screws with sealing gaskets, secure the corrugated sheeting to the wooden sheathing.
- Step 3. There will be a small gap between the corrugated sheeting and the wall - seal it with polyurethane foam. Just don't leave it open for several days.
- Step 4. Additionally, under the future low tide, lay foam rubber, which will help prevent snow from getting under the profiled sheet.
- Step 5. Install the tide itself. To do this, start by drilling holes with a hammer drill, and then secure the ebb using plastic dowels with 6x60 nails.
- Step 6. After this, fill the cracks on the outside with cement mortar and treat with a two-component sealant. To ensure that the sealant is laid evenly, use masking tape, which will then need to be removed.
- Step 7. Proceed with the glazing, and for convenience, mount a wooden beam along the edge of the roof, to which the frames will be attached.
Here's how the work goes:

When installing the sheets, it is important not to tighten the screws, otherwise the rubber will crack and allow moisture to pass through. Imagine how difficult it is to repair the roof at such a height. This is what the correct mount should look like:

To secure sheets on metal trusses, it is also good to use a special fastener:

Metal tiles: for beautiful projects
Beautiful and in demand metal tiles are similar in properties to corrugated sheets, but have a more aesthetic appearance. But all these reliefs can interfere with snow rolling down at a low roof angle. In this case, the snow itself will accumulate and fall down in an avalanche, which is bad.
Metal tiles are installed on the balcony according to the same principle as corrugated sheeting, the only important thing is that each wave has its own wooden base. Also mark the metal tiles in advance and drill holes for ropes that will hold the sheets at a height. And all you need to take care of is that the edges of the sheets fit into the niche in the wall and are well protected from moisture.
Seam roofing: just like the old fashioned way
Let us also note such a practical and inexpensive roofing material for balconies as galvanized iron. It is characterized by low susceptibility to mechanical stress and can withstand quite severe loads.
Among the disadvantages is the complete lack of sound insulation. Those. when it rains, the roar will be incredible, so immediately think about insulating and soundproofing the ceiling of such a balcony:

Soft roofing: bitumen mastic, roofing felt and euroroofing felt
A less popular, but quite convenient option for arranging a balcony roof is a soft roof. It is valued for its noiselessness, integrity and water resistance. In other words, such a roof has no potential places for moisture to penetrate. It also fits easily on any angle or curve.
But keep in mind that the same euroroofing material does not tolerate straight lines sun rays and prolonged frost. Therefore, if the climate in your region is quite harsh, from soft roof refuse, otherwise cracks will appear on the balcony roof over time.
Heat also has a bad effect on it: the bitumen heats up and an unpleasant odor can penetrate into the apartment. If the weather is usually mild, then this option is quite suitable.
To install a soft roof, you will need to build a continuous flooring:

Transparent and cellular polycarbonate: plenty of light inside
Another good option is polycarbonate coating, which is expensive, but is compensated by excellent performance properties. Such a coating will be transparent enough so that you can set up a personal office or just a relaxation area, but at the same time it will be durable, heat-insulating and quite resistant to mechanical loads.
And not just resistant: stronger than glass, and at the same time 15 times lighter! And this is important: if your balcony is on the top floor, then it is at risk, because teenagers today love to spend their leisure time on roofs, throwing down everything they can.
In addition, polycarbonate is resistant to ultraviolet rays and does not lose its transparency even over time, and its operating temperature range is from -45°C to +80°C. Specifically for a balcony, take panels from 10 mm thick - this will be enough:

And the choice of color in the installation of a polycarbonate roof is simply pleasing to the eye:

To install a polycarbonate roof, you need the same trusses as for corrugated sheeting. It’s just important to properly equip the rear connection unit:
- Step 1. To do this, make a 40 mm deep slot in the wall.
- Step 2. Fill it with silicone sealant and insert the back of the polycarbonate there.
- Step 3. Any excess sealant that squeezes out of the groove should be spread along the seam. This sealed mount lasts a very long time.
- Step 4. After installing the roof, all that remains is to remove the protective film.
See how easy it really is to work with monolithic polycarbonate:
 The only unpleasant moment in the case of a polycarbonate roof is that it is not repaired, but is immediately replaced with a new one. After all, any traces of repairs spoil the entire appearance, while the same corrugated sheeting with the same damage can still be patched and patched.
 Ondulin roofing: fashionable strength and durability
Also, one of the most beautiful roofing coverings for a balcony is ondulin, or euroslate. It is characterized by ease of installation, low weight (6 kg per 1 m2) and excellent sound insulation properties, which is important for the last floors.
But, unfortunately, because... Ondulin is just a multilayer sheet of ordinary paper impregnated with bitumen; it does not have the best impact resistance and resistance to mechanical damage.
Also, the surface of Euro slate is usually rough, which is why it retains snow and accumulates dust. As a result, such a coating on a balcony lasts no more than 10 years, simultaneously fading in the sun and twisting if rainwater gets into random cracks.
But it looks beautiful, there’s nothing to say:

To attach Euro slate to a balcony, the same special fasteners are used as in the case of installation on a regular roof of a house. Here's a great video tutorial on this topic:
Glass roof: for special projects
Today, many companies offer real glass roofs for top-floor balconies. They are divided into two main types: static and sliding.
If we are talking about static ones, then these are high-strength structures made of glass and different types fastening improvements. So balcony roofs Neither hail, nor temperature changes, nor strong winds are scary.
Their main advantage is 100% visibility, but on the top floor the sky seems especially close, and on such balconies they are happy to set up relaxation areas in the form of a coffee shop or a hammock!
In order to install a modern glass roof on your own balcony, you will need four types of fastenings: a wall-to-hang connector, a wall-to-glass connector, a hang-to-glass connector, and a hanger without turns. And they attach the glass roof to cantilever ribs of different types:

In practice it will all look like this:
- Step 1. First, decide what shape the visor will be and its design.
- Step 2. A hired specialist will make accurate calculations and show a visual project. This is where important changes can be made.
- Step 3. The measurer will order the production of such a visor according to the choice of thickness and color.
- Step 4. The finished roof will be delivered and installed on the balcony.
All this beauty will be expensive, but it will last a long time, because modern types of glass are far from fragile.
And only you can decide what kind of roof you need for your balcony, based on your planned budget, aesthetic requirements and practical calculations. Good luck!
Building a roof over a balcony is primarily of interest to residents of the top floors in old houses, where a balcony roof is not included in the house design. How to make a roof on a balcony, what you need to know, what materials to use and is it really possible to do it yourself?
Is it necessary to obtain approval for the construction of a roof over a balcony?
From the point of view of the law, the unauthorized construction of roofs, canopies and awnings over balconies is prohibited. Therefore, before starting work, it is necessary to obtain permission from the BTI to complete the construction of a balcony for a specific project. This will save you not only from possible litigation, but also from much more unpleasant consequences: installing a roof on a balcony, done without taking into account the load-bearing capacity, can lead to the collapse of both the roof and the balcony.
Many people actually build roofs and canopies over balconies and loggias without approval, and in some cases the court rejects the claim for dismantling if the superstructure does not violate the rights of other residents and complies sanitary standards. But if the court satisfies the plaintiff’s demands, you will have to dismantle the roof, and the costs for it will not be reimbursed.

Types of balcony roof
The roof on the balcony can be dependent or independent. The dependent woman rests on the racks and is tied to load-bearing structures at home, the independent one is attached only to the wall and does not have racks.
Dependent roofs can withstand greater loads than independent ones, so there are no restrictions on the size and choice of material. This option will require more building materials. Often they are done simultaneously with the glazing of the balcony, or the glazing is done later. Dependent roofing allows for better insulation of the balcony.
Independent roofs require lower costs, but are less reliable, especially over wide balconies. Such roofs cannot be made too large; they can only be made from lightweight materials - corrugated sheets or corrugated sheets. If there is a lot of snow in your region, these options are not recommended - they will not withstand the snow load. In addition, it will not be possible to properly connect them to the glazing and insulate them, so if you want to glaze the loggia in the future or immediately, this option is not suitable.

The third option is a roof over the balcony with racks that rest on the parapet. The racks strengthen the independent roof if it is very wide. The racks are welded to a metal parapet or attached in another way to a brick parapet.
Material selection
Most often, corrugated sheets are used to install the roof on the top floor balcony. This material has an optimal price/quality ratio and does not deform under the influence of snow and rain, which means that repairs to the roof of the balcony on the top floor will not be necessary. The disadvantage of corrugated sheets is poor sound insulation properties, so additional sound insulation will have to be done. Other sheet steel materials are also used, for example galvanized steel sheet.
Ondulin is a soft material that requires a rigid frame. Soft materials also include bitumen shingles and other rolled materials. Metal tiles are a durable roofing material that does not require additional sound insulation.

You can also use cellular polycarbonate. This option is suitable for insulated balconies. Polycarbonate does not decompose under the influence of ultraviolet radiation, can withstand temperatures from -45 to +80 degrees, and is very durable.
The most expensive material is double-glazed windows made of tempered glass. At the same time, installing such a roof will require minimal effort on your part - the double-glazed windows are delivered and installed by employees of the company where you ordered them. Such a roof looks impressive, and in addition, it immediately solves the problem of insulation.

Whatever roofing option you choose, there are some general guidelines.
- Observe safety precautions when working at height. If the roof installation cannot be carried out from the balcony, contact industrial climbers.
- As a material for the frame, you can take metal corners, rectangular or square pipes, or wooden blocks. The corners must be at least 60 mm wide; if they are connected to a wooden beam, it is better to take corners of the same width as the beam.
- It is better to choose anchors with a washer. For brickwork You will need special anchors with a wedging pin.
- Cement mortar for fixing anchors in the wall is made in a ratio of cement and sand 1:3. Add water gradually, in portions, until the desired consistency.
- To connect wooden elements, reinforcing metal parts are needed: corners, plates. The covering is attached to the sheathing with roofing screws and sealing gaskets. If the roof is assembled from several pieces of corrugated sheets, they are laid overlapping.
- The roof is made with a slope of at least 40 degrees so that snow does not linger on it.
- If you need to repair the roof or replace part of it, contact a specialist.
How to make an independent roof
If the option you choose is an independent roof on the balcony made of corrugated sheets, then you can build it as follows.
- First, the support trusses are made. They are made from metal corner No. 60, from which it is necessary to weld right triangles. The trusses are secured to the wall with anchor bolts. First, holes are drilled for the bolts and filled with cement; the anchors must be buried at least 8 cm into the wall.
- The number of trusses depends on the length of the canopy. They are placed at a distance of no more than 1 meter.
- For the sheathing, use a 4*4 wooden beam. In order for the frame to be strong, you need to take even, whole bars without cracks, knots or holes. Before installation, they must be impregnated with an antiseptic to prevent rotting.
- The sheathing is attached to the corners using self-tapping screws.
- Cut off the required amount of corrugated sheet. To do this, use a hacksaw or metal scissors. You should not cut the corrugated sheet with a grinder, as in this case the protective layer is removed from the edges of the sheet and it will begin to rust.
- The corrugated sheet is attached to the frame.
- The space between the wall and roof is filled polyurethane foam. After it hardens, the excess is cut off and sealant is applied. The seam is protected from above with a metal apron.
- From the inside, any heat-insulating material is glued onto the corrugated sheet, which will also absorb excess noise.
- If you are going to glaze the balcony, you need to lay timber along the edge of the roof. All gaps are filled with polyurethane foam, and a sealant is applied on top for waterproofing.

How to make a dependent roof
A dependent roof on a balcony can be with vertical posts or with inclined ones, which are attached to the wall. Both options are quite durable. On the top floor, as a rule, the roof is brought under the general roof of the house, the joint is sealed with polyurethane foam and sealant.
To make the frame, you can use not only metal, but also wood. For vertical posts, take bars of at least 50*70 mm, for other parts - 30*30.
- The frame made of wooden beams is fastened with metal corners. The wood must first be treated with an antiseptic.
- Vertical posts are attached to the wall with anchor bolts. The face posts are securely attached to the balcony slab and parapet. Horizontal bars 30*30 mm are attached to them.
Important! Attachment of the face posts should be given special attention- this is the weak point of the balcony; they are not attached to the wall. Poor installation of racks can lead to deformation or collapse of the roof.
- Install inclined bars from the wall to the front posts.
- The corrugated sheet, cut into sheets of the required size, is attached to the frame.
- The cracks are foamed and then sealed with sealant.
- From the outside, the junction of the roof and the wall is protected with an apron made of metal or elastic material.

You should do a roof with your own hands when you are confident in your experience and skills. Remember that working at height is dangerous. It is better to assemble most of the structure on the ground or indoors, and then install it on the balcony. In some cases, it is better to invite specialists. Often the same companies that install plastic windows, are also engaged in the creation of roofs, awnings and canopies on balconies, in addition, glazing can be done immediately.
For exterior finishing For roofing on the top floor balcony, several types of materials can be used:
- Corrugated sheeting painted or galvanized smooth metal covering;
- Soft flooring, represented by soft and rolled roofing;
- Polycarbonate flooring or impact-resistant glass.
Profile sheet is considered a very advantageous, stable and durable material in terms of quality and cost. It has sufficient elasticity and is able to withstand wind loads, snow accumulation and other negative impacts. external factors without the risk of roof damage. It is important to remember that when choosing a profiled sheet as a roofing covering, you must additionally take care of the soundproofing of the balcony. We use 3 mm Guerlain self-adhesive tape, coated with foil.
Using a soft roof requires the construction of a rigid frame, but you will not have to spend additional money on soundproofing the space of a balcony or loggia.

Make a roof on the top floor balcony
Polycarbonate flooring guarantees structural strength, protection from mechanical stress and maintaining an attractive appearance. appearance under the influence of ultraviolet sunlight.

Installation technology
Specialists of the ElitBalcon company will perform the entire range of work on installing a roof on a balcony in Moscow and the Moscow region. We will organize a visit from a specialist to assess the complexity of the project, take measurements and determine the estimate. Our specialists have sufficient experience and qualifications and carefully follow the work technology:
- Fastening a steel structure to a wall base using anchor or chemical bolts.
- Installation of steel sheathing to lay the selected roof covering on a steel truss
- Measuring and cutting of roofing according to pre-calculated parameters.
- Laying and fixing the roofing material on installed system lathing using self-tapping screws and special washers, rubberized with bolts.
- Eliminating gaps at joints using strips, silicone or other sealing compounds.

The final cost of the work is determined individually, because we do not work according to standard projects. The estimate includes the price of heat and vapor barriers, and also takes into account the features of the roof, the type of covering and the complexity of the work.
