Do drilling machine Doing it yourself is advisable in situations where in a home workshop or garage there is a need to drill holes in parts of various configurations, as well as those made of different materials. It should be noted that such a device makes it possible to obtain holes with sufficient high level quality.
When you need a homemade drilling machine
In production or repair enterprises, where the drilling operation is considered the most common, a special device is used to perform it, the models of which may have different functionality. So, it can be a compact desktop drilling machine, characterized by a simple design, or equipment equipped with several working spindles and numerical control.
For drilling holes in various materials, which is performed in a home workshop or garage, you can use home-made equipment. Naturally, for use at home you need a simple device that can be made from components and materials found in almost any garage or home workshop.
And in this article we will not leave unanswered the question of how to make a drilling machine at home, while spending a minimum of money. The drawings and experience of many craftsmen who have already walked this path will help us with this.
The need for such mini drilling equipment for metal, wood or plastic most often arises among those who are used to independently performing various repair work in their house or apartment. Also, quite often radio amateurs are puzzled by the construction.
It would seem that a conventional drill can be used to perform such an operation, but such a tool is not always able to provide the required quality and accuracy of drilling operations. Homemade, in addition to its compactness, has one more important quality: It can accommodate different types of drills.
Drilling machine from a conventional drill
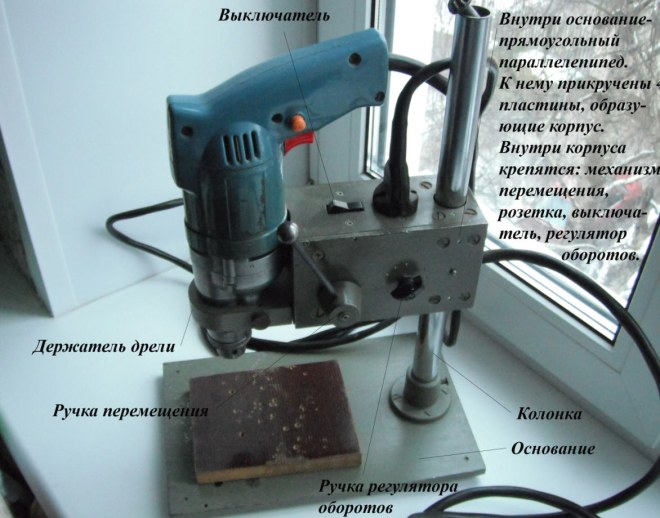
To make a small but functional drilling machine for your home workshop, you do not need to purchase special materials and components. The design of such a convenient and useful desktop device contains the following components:
- the base, which is also called the bed;
- a mechanism that ensures rotation of the working tool (a conventional drill can be used as such a mechanism);
- device for providing supply;
- a vertical stand on which the rotation mechanism is fixed.

The stand on which the drill will be mounted can be made from a sheet of chipboard. This material is quite capable of supporting the weight of such a device. The bed of such a mini-machine should be more massive, since it protects the entire structure from vibrations, which can negatively affect both the quality and accuracy of the resulting hole, and the comfort of work.
As a material for this frame, you can use an ordinary furniture board, the thickness of which is more than 2 cm. It is most convenient to use the base of an old photographic enlarger for this, slightly modifying its design. Sometimes an old microscope is used, but this is quite rare option, since such a unit will not be large enough and its use will be limited.
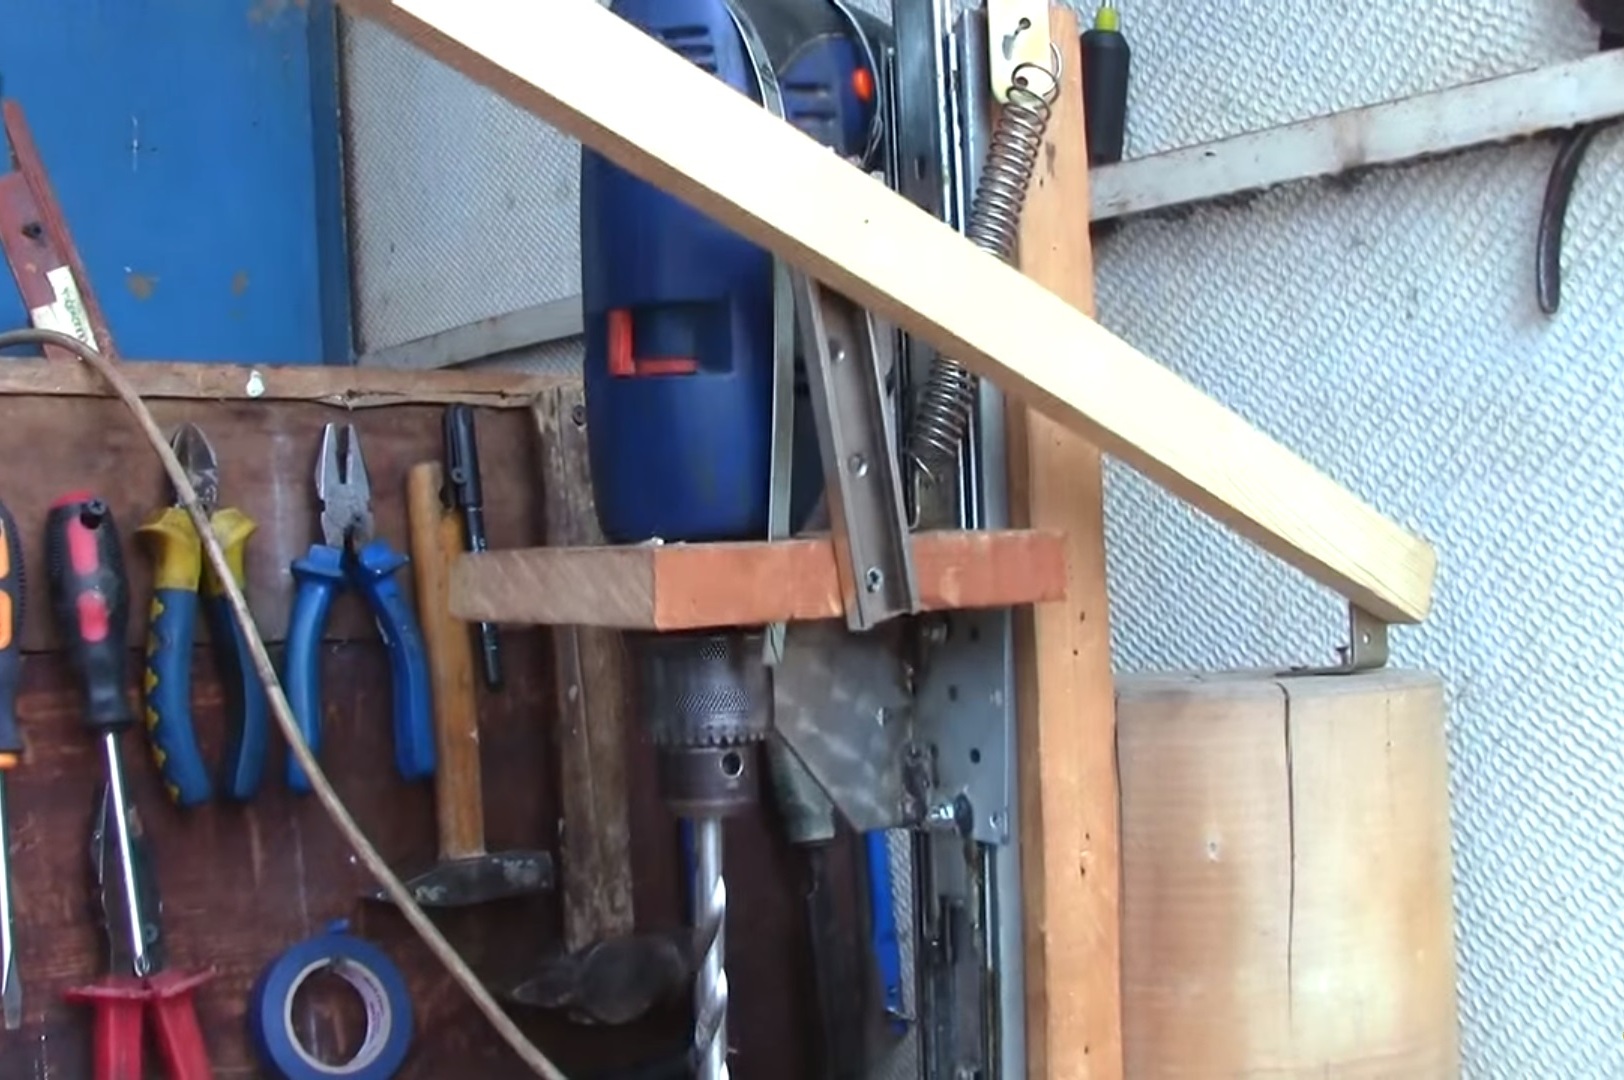
The quality and accuracy that a homemade drilling machine will provide depends primarily on how correctly and reliably the connection of its base and vertical stand is made. The important elements of such a micro machine are two guides along which the block with the drill attached to it will move. Such guides are best made from two strips of steel, which must be securely screwed to the rack using screws.
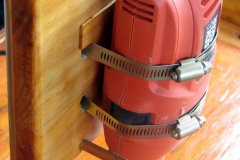
When making the block, it is advisable to use steel clamps that will securely fix the drill on it. In addition, in order to avoid unwanted vibration processes when drilling, a thick rubber gasket must be installed at the junction of the block and the drill.
After this, you need to make a feed mechanism for such a mini machine, which should ensure the movement of the electric drill in the vertical direction. The manufacturing schemes for such a mechanism can be different, but it traditionally contains in its design a lever and a spring, which is attached at one end to the stand, and at the other to the block with the drill. This spring gives the feed mechanism greater rigidity.
A drilling machine made from a drill, which is not planned to be removed from it, can be made more convenient to use if you disassemble the drill’s original switch and mount a separate button on the frame of the mini equipment. This button will always be at your fingertips and will allow you to quickly turn the device on and off. As you can see, it’s not at all difficult to make a drilling machine from a drill; all you need to do is read these instructions carefully or watch the training videos in this article.
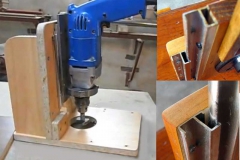
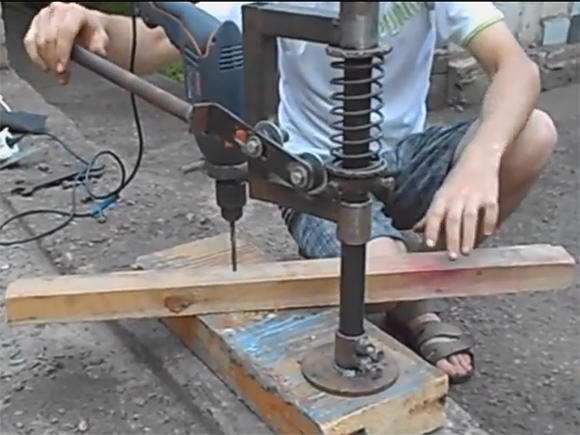
An example of a drill machine in more detail
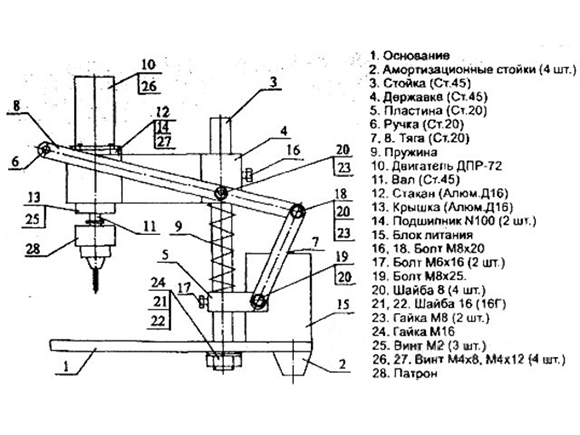
As an example, let's look in more detail at one of the options for a homemade drill assembled at home.
![]()
Manufacturing a machine using an asynchronous motor
The absence of an extra electric drill in the household is not a reason to abandon the idea of making a drilling machine with your own hands. Any electric motor can be used to drive the rotation mechanism of such equipment. Such engines, which were previously installed on various equipment, are likely to be found in the garage or workshop of any home craftsman.
Asynchronous motors, which are equipped with washing machines. If you have such a motor, you can confidently use it to make home drilling equipment. Making drilling equipment with such an engine at home is somewhat more difficult than using a drill, but the power of such a machine will be much higher.
Given the fact that an induction motor weighs more than a conventional drill, you will need a stronger base and stand to accommodate the feed mechanism.
In order for such a mini drilling and attachment machine to vibrate less during operation, it is necessary to install the motor on a powerful base and place it as close to the stand as possible. But here it is important to maintain the correct distance, since the convenience of installing the belt drive depends on it, due to which the rotation from the motor will be transmitted to the drilling head.
In order for you to make such a machine at home, you will need the following structural elements:
- gear;
- a hexagon on which the pulley will be placed;
- two bearings;
- two tubes, one of which must have an internal thread;
- clamping ring, which must be made of durable steel.
The hexagon also connects to a metal tube, bearing and clamping ring. Such a connection must be very reliable so that the resulting assembly does not collapse during operation.

The mechanism necessary to ensure the feed of the tool in such a mini machine must consist of a tube on which cuts are first made, and a gear. The tube will move due to the connection of its teeth with these cuts. An axle with a hexagon is then pressed into this tube, the height of which must correspond to the amount of the required tool feed.
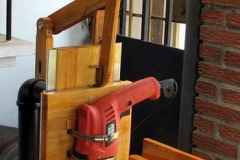
Example of a drilling machine with an asynchronous motor
Let's consider one of the very serious options for a homemade drilling machine with asynchronous motor, made clearly not by a newbie. Few home craftsmen would dare to take on such a project, but if, as they say, the urge comes, then nothing is impossible.
Drilling operations do not have any specific difficulties, and most often do not require additional equipment, with the exception of a simple drill. Therefore, at home, a drilling machine may not be available.
If you have a drilling machine made from a drill with your own hands, remain calm, because in this case some of the problems are solved by themselves.
Purpose and device
There are situations in which an electric or hand-powered drill cannot achieve the required geometric characteristics of the holes being drilled. Very often in amateur radio technical specifications there is a need to manufacture electronic boards, where, according to the drawing, it is necessary to drill large number holes having a small diameter.
Making holes with nominal diameters of about 0.3...0.8 mm using hand or electric drills is extremely inconvenient, and there is also a high probability that the drill will simply burst.
Buying industrial drilling units is economically unwise. There is a need to manufacture homemade drilling equipment. Many people prefer mini-drilling machines; these mechanisms are quite simple units and have four components.
Homemade drilling machines are intended for making through and blind holes in semi-finished products, in particular, cutting from sheet metal plaques and cutting internal threads of various configurations. Drilling and milling machines have the ability to mill at various angles and/or grind workpieces.
To carry out the above activities, use countersinks, drills, taps and others. technical tools. By using specialized equipment and optional tools, it becomes possible to cut holes with large diameters, make borings and carry out lapping in a precise manner.
Operating principle of the machine
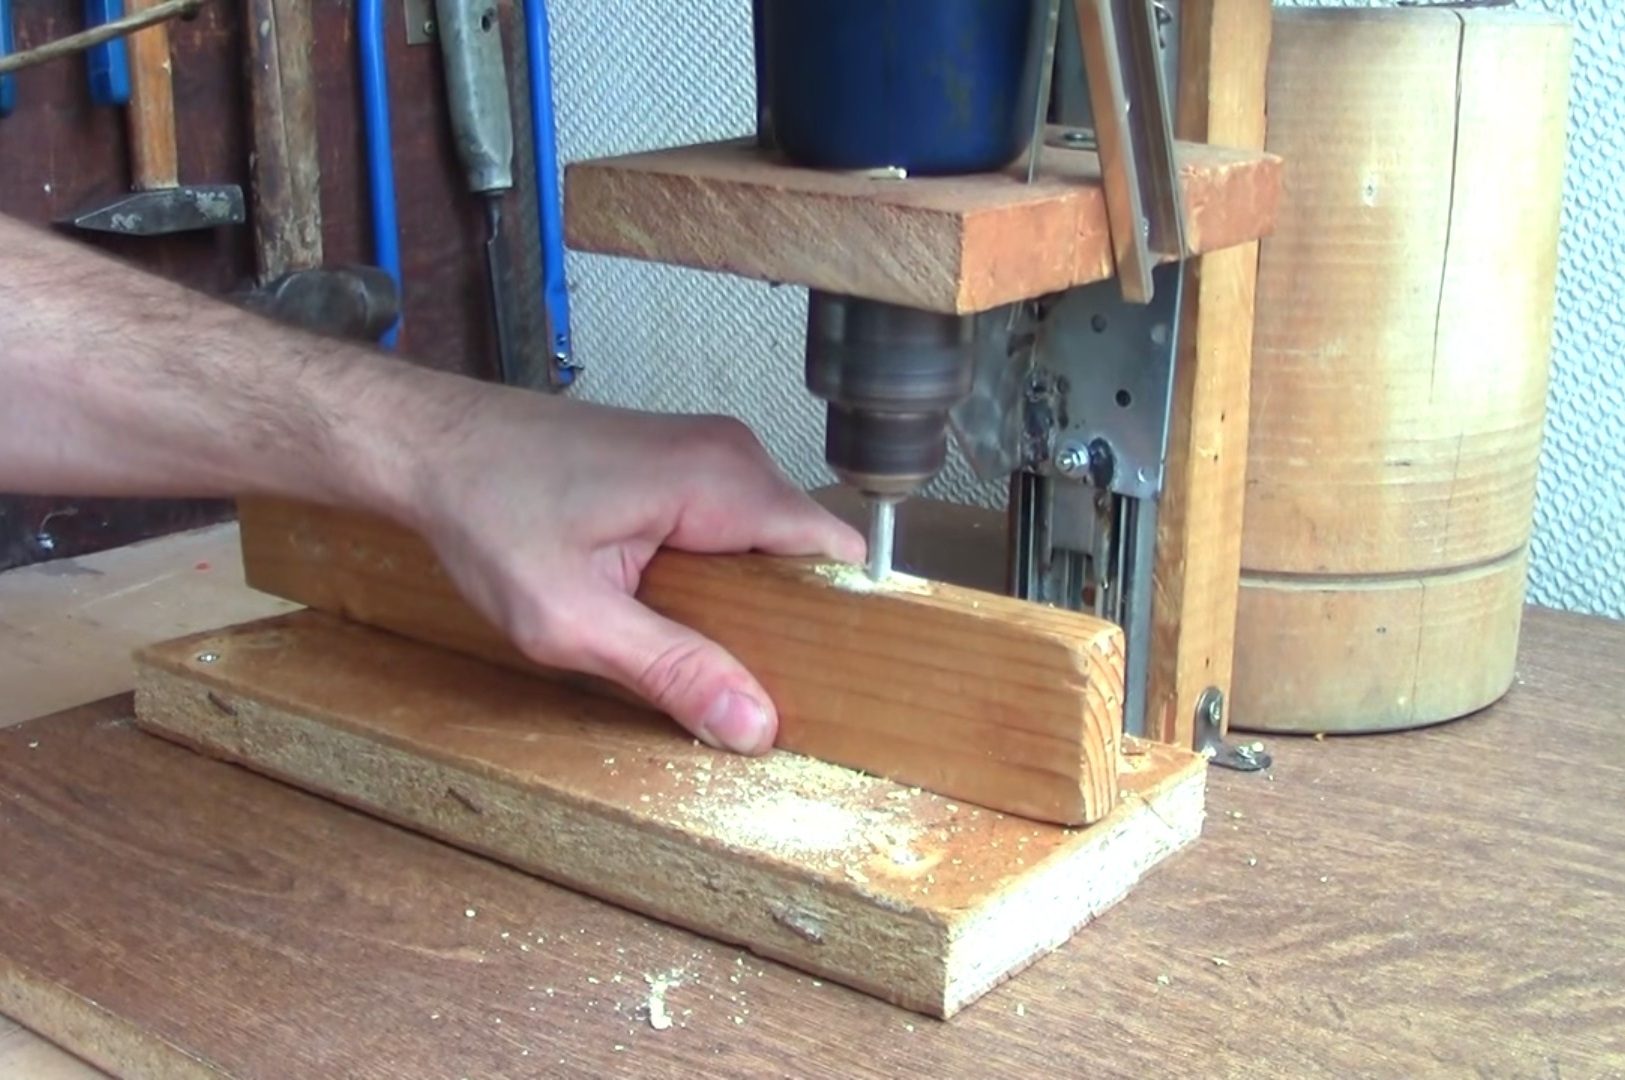
Before the drilling process using homemade equipment, you need to hide everything unnecessary from the table. The workpiece with pre-designated centers for future holes must be secured in a vice. Next, a drill of the required parameters is inserted into the headstock and tightened with a special wrench. To check the correctness of the operations performed, the machine is turned on for a certain period of time.
If the drill is positioned correctly, during rotation its end will not “write out” an ellipse or circle. If it is positioned with a certain misalignment and “beating” occurs, then the equipment must be disconnected from the power supply and the drill must be secured again, based on the technical instructions for this unit. Next, turn the handle, move the drill down and fix the clamps with the semi-finished product being processed so that the core coincides with the end of the drill.
Connect the equipment and perform the necessary technical operations, operate the feed handle smoothly, without significant use of force or jerking. When making through holes, place the workpiece on a wooden beam so that the working element does not burst and the table of your mechanism does not deteriorate.
When drilling deep holes, periodically remove the working element from the work area, thus cooling it. It is also recommended to dip it in a container with coolant. The clamping force of the handle at the end of the drilling operation must be reduced. Having completed everything necessary, smoothly scroll the feed handle up and turn off the equipment from the electrical power.
Drawings
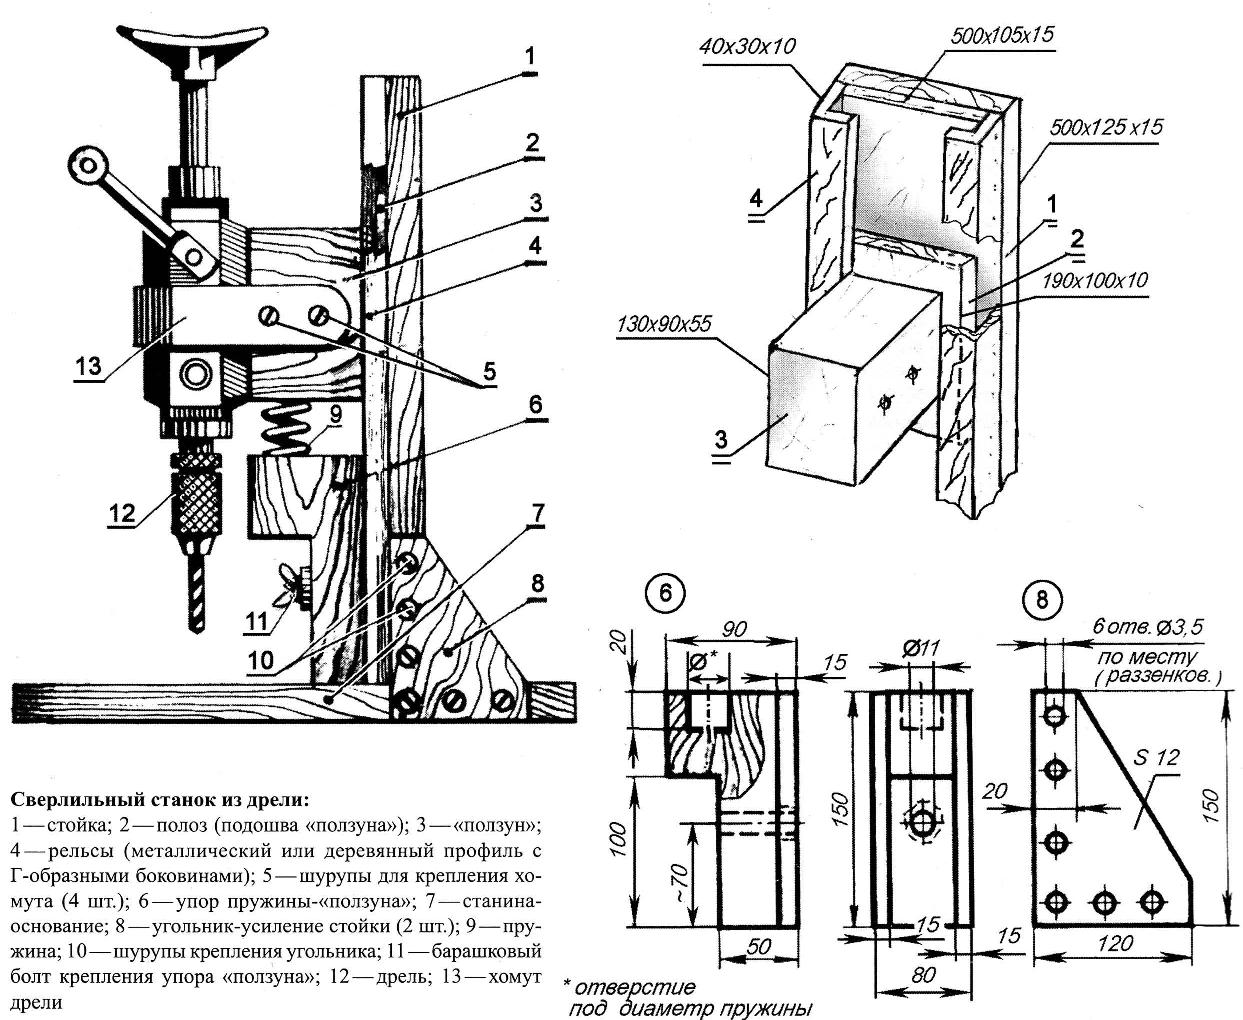
Drilling machine from a drill: step-by-step instructions
You do not need improvised semi-finished products with high tensile strength or any specialized tools. A mini-machine for performing drilling operations has only 4 fundamental components:

The stand, as a rule, is made using simple chipboard or planed boards, because the mass of such a unit is insignificant and does not require the use of more reinforced materials.
It is best to design the bed as massive. This will eliminate the occurrence of any vibrations during drilling, and, consequently, the most convenient working process.

The parameters of the quality and accuracy of drilling operations on homemade machines directly depend on the correct articulation of the base and the guide. This means that this “piece” of work must be approached with maximum responsibility.
The block itself must be made so that the electric drill is securely fixed.
The drive mechanism of drilling equipment from a drill has the design of a simple lever that moves the block along a vertical axis.
If you want to achieve maximum comfort at work and have no plans to periodically dismantle the electric drill, we recommend disassembling its switch.
Video: DIY drilling machine from a drill.
It does not always make sense or expediency to buy a factory-made drilling machine. You can make a vertical drilling machine from a drill with your own hands. To do this you will need a drill and materials to make a stand. Such equipment is recommended for use in home workshops or garages, when drilling is not the main operation or is performed quite rarely and the accuracy of the hole can be neglected.
To speed up the process, just buy a specialized stand for a drill at a tool store. The result is something like a household level vertical drilling machine, which is not inferior in drilling accuracy to machines for home workshops.
The photo shows factory-made drill stands. They can be purchased at any online tool store at prices starting from $200.

The article is intended to give you ideas on how to make a drilling machine yourself from a drill, so we do not give a clear algorithm for its manufacture, because it is made from scrap materials: some craftsmen will have it, others will not. Therefore, we give basic ideas, and everyone will apply their own constructive solutions and make your own vertical homemade drilling machine.
If you are not looking for easy ways, then we will make a homemade stand. The stand can be made of wood or metal. Wood will be cheaper and easier to manufacture, but durability will suffer.

Metal ones are more complex, but have an incomparably longer service life and strength characteristics. The choice of stand material also depends on the workpieces being processed: when constantly drilling metal, it is better to make a metal one.


Machine assembly
The metal stands are assembled from angles for the carriage, 50x50 square pipe for the stand and 10x10 for the drill bracket, strip for the base and eyes. The base and bracket are welded, after which all elements are assembled and bolted together. It is recommended to make several brackets with different adapters (clamping rings) for different types drills. The carriage moves along the rod using a steel cable wound around the handle drum. To ensure that the carriage does not have any play and does not fall down under its own weight, it is drilled, threaded and a bolt (or several bolts) is tightened. This selects the backlash between the carriage and the stand of the future drilling machine. The handle for moving the carriage is made from rolled products with a diameter of 6 - 8 mm.
Having several brackets with different clamping rings allows you to flexibly select drills and process almost any material.
In the future, home-made equipment can be upgraded and modified, for example, by marking or installing a scale that will indicate the length of movement of the carriage. This helps when drilling blind holes.
There are several mounting methods:
- several clamps;
- on a metal bracket in the hole under the neck of the drill.
Video of a design version of a drill on a wooden stand.
The easiest way to make a homemade drilling structure at home
A homemade drilling machine made from a drill will never replace a factory one and will always be inferior in build quality and drilling accuracy. The main advantage of homemade is low price, the ability to drill holes when a factory machine is not available for one reason or another.
If you find an error, please highlight a piece of text and click Ctrl+Enter.
You can make a drilling machine with your own hands at home from an ordinary electric drill or steering rack.
Mini machines in amateur radio workshops homemade are found most often for the reason that it is expensive to buy industrial units, but making a device with your own hands is not difficult.
The idea of how to make a drilling machine (including using a steering rack) occurs not only to radio amateurs, but also to people who from time to time need to carry out repair work at home.
At the same time, the manufacture of a micro-assembly does not require special devices or high-strength materials.
At the initial stage, it is necessary to create drawings to facilitate the manufacturing process of the machine.
Drilling unit from a drill
You can assemble an additive mini drilling machine from a drill with your own hands using only four main components. The first thing you need to do to create an additive machine is to select a frame - the base for the future drilling machine.
An electric drill can be used as the rotation mechanism that is necessary for the mini additive machine to function. Then you need to decide on the feeder and vertical stand.
Since the drill is light in weight, you don’t need to look for special tools or very durable materials for the stand; you can take wooden boards or chipboards.
For the bed, on the contrary, it is necessary to select a more massive material, which will eliminate the occurrence of vibration during drilling work.
A suitable material in this case is a furniture board with a thickness of 2 cm.
The best option when choosing a material for making a frame may be the stand of an unnecessary photo enlarger, but its design will have to be slightly modified.
The accuracy of the drilling process on a homemade mini unit will depend on the quality of the connection between the vertical stand and the frame.
It is necessary to cut two guide strips from steel strips to move the block with the drill. Attach these devices to the stand with screws.
To securely hold the drill during the manufacture of the block, steel clamps are used.
A rubber gasket is placed between the drill and the block to reduce vibration of the mini drilling machine.
The feed mechanism of the machine is a simple lever with which the block with the drill will move vertically. The mechanical device is equipped with a spring that is quite powerful and elastic.
One end of the spring element will rest against the block, the other - against the beam attached to the table.
Achieving the most convenient use of a mini drilling machine, provided that the drill is not planned to be removed from it periodically, will allow full analysis drill switch and mounting a separate switch on the frame.
You can consider in detail how to make an additive tabletop drilling unit using an electric drill in the proposed video.
Steering rack for drilling machine
The drilling machine can be done using an upgraded steering rack. Since buying a new steering rack will not be cheap, it is recommended to purchase a used part, preferably from a VAZ 2108.
After purchasing a steering rack, it is necessary to carry out preventive repairs of the part in order to ensure its smooth operation.
Instructions for manufacturing the frame and its installation:
- The machine body is made taking into account the dimensions of the drill and column. The table on which the platform with drilling parts will be fixed must have suitable dimensions, approximately 20x30 cm;
- The structure with which the drill will be secured is mounted on the steering part at the locations of the mounting bolts;
- The stand for the drilling machine is made of a U-shaped steel profile 30x60x30. It is welded to a sheet of metal 2 mm thick. The stand should have a height that exceeds the length of the column by 6-7 cm. The stroke of the rod for the steering rack from the VAZ 2108 is 210 mm;
- By mounting additional ribs between the two elements, the rigidity of the rack is increased.
For comfortable use of the drilling machine, it is recommended to consider convenient system its startup and shutdown.
Thematic video material will complement the topic.
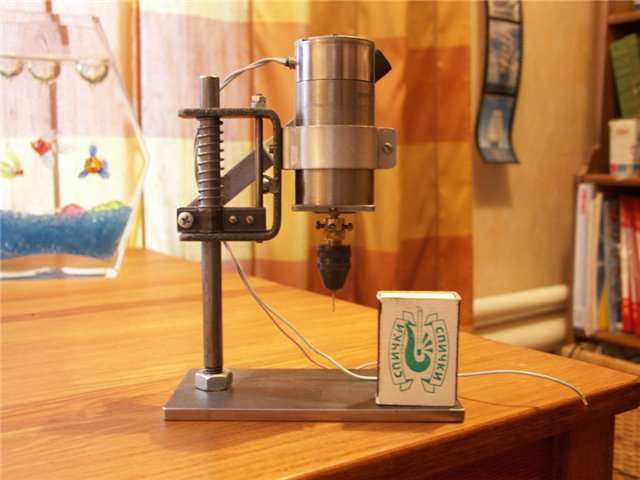
PCB Drilling Machine
To assemble a micro drilling machine for printed circuit boards, you will need the following parts:
- micro motor or high speed motor;
- clamping collet for securing miniature drills;
- two wooden beams, a U-shaped profile, a fastening ring for fixing the electric motor;
- mobile platform of the machine for printed circuit boards - made independently from scrap materials.
When assembling a desktop micro drilling machine for printed circuit boards, it is recommended to pay attention to the fact that the drill drops exactly perpendicular to the board.
The video below shows a mini drilling machine for printed circuit boards.
If the motor is skewed, then when drilling printed circuit boards, the drills will fail. Clearance and poor fixation of the motor are not allowed; at high speeds it can be knocked out of the frame.
Video material will tell you how to make a micro machine with your own hands for drilling circuit boards.
Design of the coordinate table
If in a homemade drilling machine the functions of the coordinate table are performed by the feed mechanism, then the coordinate milling table has a different design.
A coordinate milling table is a manipulator consisting of a certain number of axes. The milling table is designed to move the processing head in several planes.
At home, you can make a milling table using linear modules made of aluminum profiles.
A gear rack, a reinforced belt or a ball screw element is used as a transmission.
Computer numerical control (CNC) and action controllers are required to control the X-ray table. Controllers are used to manage technical tasks.
To make a milling table, first drawings are made, calculations are made and components are selected.
In this case, the calculation made must be suitable for technical requirements to the use of the machine, including moving masses, speed, acceleration and positioning accuracy.
The design of the coordinate table can be lightweight or reinforced, and be two or three coordinate. That is why it is recommended to initially decide why a milling table will be needed.
Two-coordinate table - base with a movable cross. A desktop is mounted on it. The crosspiece must contain hardened, adjustable and ground slats.
Travel stops are also installed to eliminate clearance. The base is fixed on the legs.
More details about making a coordinate table with your own hands can be found in the video provided.
Homemade vices for machines
If you can’t afford a Soviet vice, and you don’t like Chinese products, then in addition to a drilling machine, you can make a vice with your own hands.
To assemble a homemade vice, you need to have the following parts on hand:
- screw – thread 20 mm, length – 150 mm, the head of the screw must have a slot, as sometimes it does not fit the size of the handles, but it is expanded with a file;
- a screw with a ring is used as a handle for tightening;
- studs can be purchased at the store or found in old parts;
- then you need to make a stationary sponge, possibly from pine wood, and nail the board to the tabletop;
- To make the movable part, you will need a board (20 mm thick, 18 mm wide), the length of the movable jaws must be at least 50 cm.
Holes with a diameter of 21 mm are made in the wood. The diameter of the holes in the studs should be 10 mm. Studs, screws, nuts and bolts are installed in the finished holes.
If the vice will be used to work with short workpieces, then the studs in the structure will be rearranged.
The vice is equipped with additional holes, which should be located near the clamping screws.
Homemade vices can have different parameters, it all depends on the selected parts.
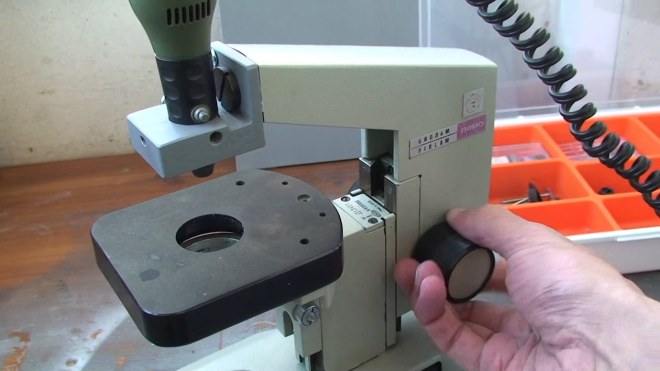
Using a conventional hand drill, it is almost impossible to manually drill a strictly perpendicular hole in a thick block or perform a series of precise parallel drillings. Buying even an inexpensive drilling machine for this purpose is extremely wasteful if such work is of an occasional nature.
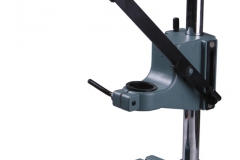
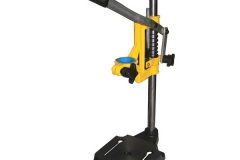
There are special devices for factory-made electric drills that expand their capabilities in this regard. Click on the small pictures on the right to view them in more detail.
Their use allows you to turn a drill into a kind of drilling machine. Of course, you can get one of these devices by choosing it for your tool, but you can make a drilling machine from a drill with your own hands. Let's consider several approaches to solving this problem.
Do-it-yourself drilling machine from a drill, drawings
Detailed drawings of such a device cannot be found even on the Internet. This is partly explained by the multiplicity of approaches and technical solutions, and partly by the simplicity and availability of methods for solving this problem. Let's analyze those that we managed to find.
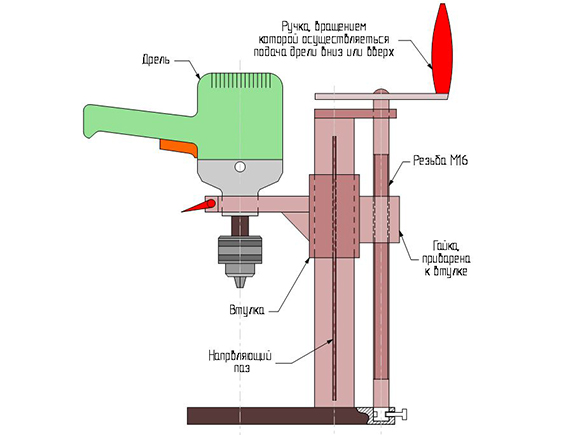
This one is perhaps the most detailed and detailed. The main advantage of this arrangement is the absence of any gear pairs that ensure vertical movement of the drill along the stand, which is the basis of the device. The spring-loaded holder moves along the stand by the distance between it and the lower stop, minus the thickness of the compressed spring. To prevent its rotation in the horizontal plane, there is obviously a groove in the rack along which the screw 16 moves. The location of the tool in the holder is determined based on the parameters of a particular drill.
Even easier to implement on your own is a drawing of a wooden stand for a drill.

Not all sizes are shown on it, due to the fact that they are not of fundamental importance. And the lever feed system, as in the previous case, will ensure strictly parallel movement of the electric drill along the rack. Holding the tool in the upper position is achieved due to friction forces in the grooves and on the side cheeks of the holder and is regulated by the tightening force of the screws.
If you have a spare pair of screws, perhaps from an old vice, it can also be used for the tool feed system in a homemade electric drill stand.
For small drills, you can also use a regular threaded rod Ø 16-20 mm with a corresponding widened nut, which are sold in hardware stores.
Simple designs of homemade stands for a drilling machine
We have selected for you easy-to-make, but in our opinion interesting designs of stands for homemade drilling machines based on an electric drill.
Such a wooden stand can function successfully without a lever, and the tool is raised and lowered either by the handle of the tool itself, or by top part the box in which it is secured.
An interesting design is in which the system of 2 levers is replaced by 1 with a longitudinal groove along which the thrust screw moves.
![]()
A productive method is to combine materials for stands to turn an electric drill into a drilling machine. Thus, the main material for their manufacture is wood, but the most wearable components are made of metal, which radically extends the service life of the entire device.
An interesting design using industrially produced furniture runners as guides:
The high precision of their execution has virtually no backlash.
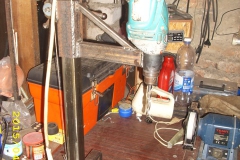
The process of creating a stand for an electric drill is greatly simplified if you have a photo enlarger of any model at your disposal. It is unlikely that it will ever be able to serve you for its intended purpose, but it will make an excellent drilling machine. After all, it already has in its design both guides and a gear rack for moving a rather heavy head along them, instead of which a holder for a drill should be hung.


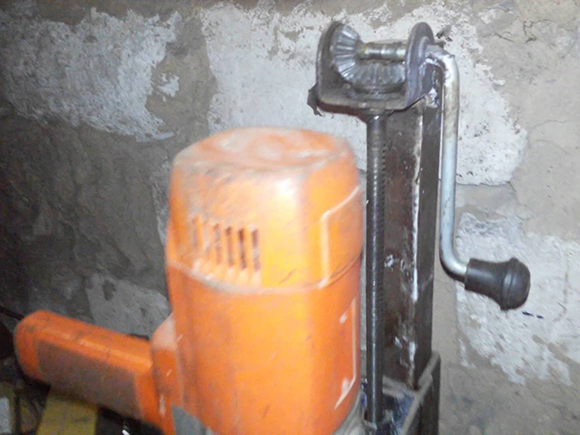
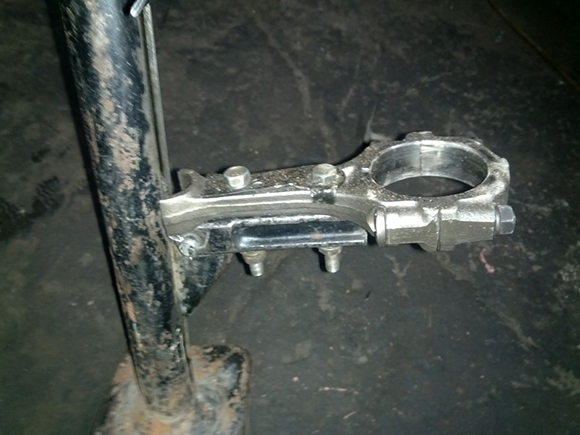
No less productive is the option of converting old Volgov or Zhiguli rack jacks into a drilling machine rack. After all, you do not need their entire height for the normal operation of such a device, but only a small space of the screw.
To do this, you just need to slightly modify the lifting lever, in which to secure the drill, and the thrust pad.
And here is the video:
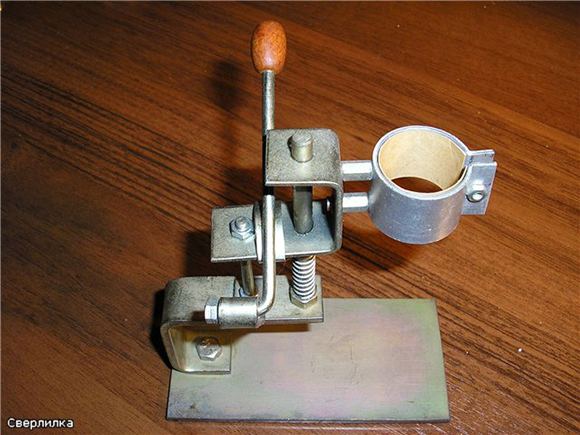
You can do it even simpler by rigidly securing the drill to the top of such a jack, and placing a work table on the lever. Do not lower the drill for drilling, but lift the workpiece itself, especially since the lower part of the screw in such jacks is the least worn.
And in general, the same principle can be applied to fairly large and powerful drills, securely fixed in any way on a powerful stand of the future machine. And you can make a small lifting table in the image and likeness of what is shown in the video:
Or use a small diamond-shaped car jack for the same purpose, providing it with a reliable base and replacing the upper stop with a working platform with a vise or a prism.
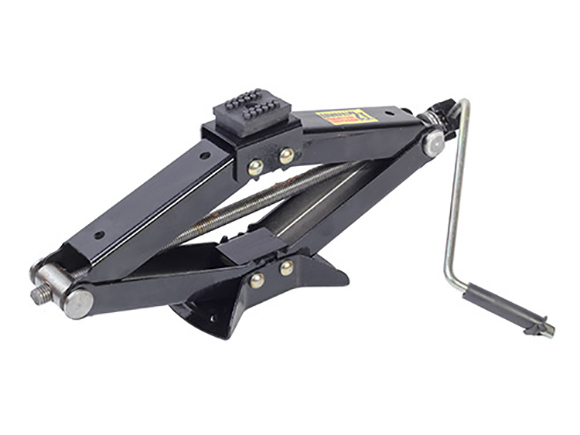
Moreover, both the first and second can be made removable, and in long time intervals between drilling work the jack itself can be used for its intended purpose.
More powerful drill press designs
And yet, when we talk about a drilling machine, we mean something more fundamental than described in the previous section, and the material for such devices should be metal, even if we are talking about very small machines for low-power power tools, like this one:
And even such a primitive design significantly expands the capabilities of a hand drill. But how to make an almost full-fledged drilling machine with your own hands, without using complex technical solutions for this? Of the simplest, the most reliable design seems to us to be this:
Its biggest drawback is the ability to freely rotate the holder, and with it the drill, around the stand, but if you use square or rectangular pipes instead of round ones, this drawback will be eliminated. The main thing: very carefully select the size of the gaps between the stand and the movable bushing of the drill holder frame.
Slightly different, but no more complicated technical solution To feed the tool to the part in which drilling is being done, it was carried out by a home craftsman from the video:
In conclusion, about choosing a drill
If you are just planning to select a specific drill model with the possibility of using it in conjunction with the device, the designs of which we described above, then:
1. Give preference to a tool with a power of at least 1 kW.
2. Choose a model with a removable handle, secured with a circular clip around the girth. They have a convenient wide cylindrical part on the body for mounting in a holder.

3. Choose a tool that has multiple speeds or smooth adjustment rpm
4. The button on your drill must have a lock in the on position.
5. It is better to connect the drill on the stand to the network through a socket or extension cord that has a power button, and firmly fix it on the frame in a place convenient for emergency shutdown.
Dear readers, if you have any questions, please ask them using the form below. We will be glad to communicate with you;)