Today, a bathhouse has ceased to be a luxury item in our lives. Most people who have private house or a dacha, they install a structure of this type on their site.
But not everyone can afford to supply gas to their dacha; some simply want to reduce the cost of this pleasure and try to make welded homemade sauna stoves with their own hands. This article will tell you how to weld a sauna stove with your own hands.
Classification of welded sauna stoves
Have you thought about the question of how to weld a sauna stove with your own hands? This is not as difficult a task as it might seem at first glance. Although, of course, you will have to work.
Welded sauna stoves can be made using different types of fuel, and first you need to solve this very issue, and then think about how to weld a sauna stove, just different components will be required for different designs.
Welded bath stoves can be classified according to the following criteria:
- Solid fuel stoves that can use briquettes or firewood for heating. This option attracts many connoisseurs of the Russian bath. If used for heating birch firewood, they will not sparkle and will provide the necessary heat for high-quality heating of the room.
- There are models that work using liquid fuel, for example kerosene. But in this case, you should think about fire safety and unpleasant odor. These are significant shortcomings.
- Available on the market large number various types electric heater. This is a pretty good option; it’s easiest to install an electric oven yourself. This design is perfect for a small bathhouse, but no one knows how much electricity will cost tomorrow, and the maintenance of such a model can be quite expensive, and the electrical wiring will have to be changed.
- When installing a gas-powered model, a fuel supply system is required, but a filled cylinder can also be used. Although in this case you should think very carefully about fire safety and explosion hazards.
Metal stove for a bath
Homemade welded sauna stoves made of metal are the leaders in manufacturing today. The material for such a design is freely available. The ease of manufacture and availability of materials attract everyone more people.
There are advantages that are difficult to dispute:
- A welded sauna stove is quite fireproof.
- Availability and low cost of raw materials.
- Fast heating of equipment.
- Requires a small area for installation.
- Possibility of installation on a lightweight foundation, which leads to a significant reduction in costs.
- Welded stoves for a bathhouse can be made with your own hands, without resorting to outside help.
- This design is quickly installed and does not require additional permits.
- High reliability and safety of the structure.
There are, of course, some disadvantages:
- The use of thin metal in installation leads to rapid cooling of the structure. The stove should be kept burning at all times.
- Fire safety is significantly lower than that of a stove made of brick.
- The volume of the heated area directly depends on the dimensions of the heater, which determines the size of the structure.
- Rapid and strong heating of the walls can cause thermal shock or burns, so installation with a double wall is often used.
Installation conditions
Before you cook a sauna stove, you need to become familiar with a number of rules that require careful adherence:
- The stove must be installed on a solid and reliable foundation. It must be made of non-flammable materials. There is no need to make a separate foundation for a structure of this type.
- Heat-insulating material should be placed in front of the combustion chamber and covered with a sheet of metal on top.
- The heating unit should not be installed near walls made of wood or other flammable materials. When installing, heat-insulating screens should be used to prevent overheating of the bathhouse surfaces.
- It is advisable to place the boiler in a separate room.
Attention: installation of a furnace made of metal is carried out in accordance with SNiP 2.0405-91. Installation of supply and exhaust ventilation is required. A special channel should be made for air supply, which is mounted below the floor line.
It is possible to install ventilation holes in the bottom of the unit. This is the case if the stove has legs. The supply channel must be at least 100 cm². When entering a steam room, it must be closed with a metal grill.
Tools and materials
To do the work yourself, you will need to purchase some materials and tools with which the installation will be performed.
- Sheet steel required at least 8 mm thick. The thicker the better - the heat capacity of the oven will depend on this.
- Thick-walled pipe with with a diameter of at least 50 mm.
- Rebar or square with with a diameter of at least 10 mm.
- Grate of the required size. Better fit cast iron
- The door for the heater, firebox and blower (or can be made from waste during the manufacture of the structure).
- Need a chimney pipe not less than 100 mm.
- You will need a grinder for cutting metal and cutting and grinding wheels.
- Welding machine with power 220 W.
- A water container of about 1 m³ (or can be made from a piece of pipe).
Making a furnace
Here we will tell you how to cook a stove for a bathhouse with your own hands. Wear safety glasses when cutting and welding metal.
From the pipe large diameter cut out future oven elements:
We told you how to cook a sauna stove, all that remains is to place it correctly in the room.
Correct installation of the stove
Anyone can install a stove indoors. But when installing a stove with your own hands, you must adhere to certain norms and standards so that later problems do not arise with regulatory authorities:
- The stove must be installed with its front facing towards the outlet.
- Installation must be carried out on a solid and non-combustible base with a height not lower than 20 cm.
- The heater must not be placed close to the wall.
- When the chimney exits through the ceiling, it must be treated with non-combustible insulation, the pipe must go outside at least 50 cm from the roof itself. Its surface needs to be insulated.
- Place the shelves in the steam room near the wall near which the stove is located. And place the shelves in such a way as to prevent your head from touching the ceiling, which can get quite warm from the air.
Increasing the heat capacity of the furnace
To increase the quality of heating, the stove is usually lined with brick. This will add aesthetics to the design, increase heat transfer and make it safer. The work is done in half a brick and does not require large investments.
Masonry should be done using clay mortar, in which it is made adding fireclay powder in a ratio of 2:2:1
Attention: do not lay the brick close to the metal structure! If placed close, the metal can burn out in a fairly short time. Carry out the laying at a distance of 10-15 cm between the brick and the metal.
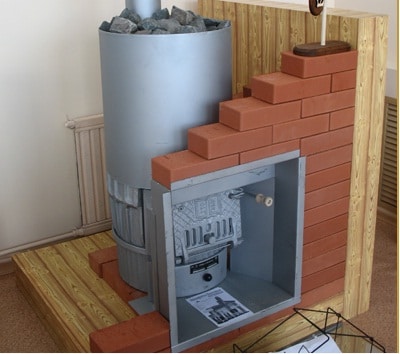
The stove should be covered with half a brick.
When the furnace is fully lined, a corner should be placed on the brick walls; this is done to ensure high-quality production of the ceiling. Also requires installation of doors at the top and bottom brickwork, which will allow free passage of air and ensure high-quality heating.
Before starting operation, the oven should be warmed up several times, without heating it too much. This will shrink the material and completely dry the structure.
One of the important stages of arranging a private bathhouse on the site is the manufacture and installation of a heating stove.
Having chosen to assemble a metal stove, you should take into account the main disadvantages of the device. These include:
- constant control over the operation of the device;
- high probability of getting burns from direct contact with a metal surface;
- fire hazard.
Important! Metal furnaces have low heat capacity- to retain heat for a longer period of time, they are often lined, leaving a gap for a layer of air.
The dimensions of the stove are calculated individually, taking into account the size of the room in which it will be used. Before starting production, it is necessary to carefully study the working drawings and assembly diagrams.
Design features and types of furnaces
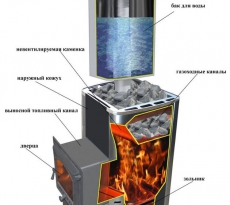
The sauna stove structurally consists of the following elements:
- Ash pit. It is located under the combustion chamber and is intended to collect ash after combustion of fuel material.
- Blower. A protective door that provides natural air circulation in the combustion chamber for better combustion.
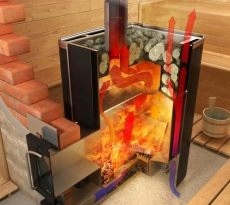
- Firebox. It is intended for loading and combustion of fuel, as a result of which the room is heated and water is heated.
- Grate. Divides the combustion chamber into two compartments, the upper one for loading and burning fuel, the lower one for collecting ash.
- . Built into a chimney or fuel chamber for heating water and heating.
- Chimney pipe. Used to remove exhaust gases released during combustion of fuel material.
- . Designed to create natural draft in furnace equipment. The intensity and rate of combustion of the fuel material depends on the size of the valve.
By type of fuel used, modern heating stoves for a bath there are:
- Wood-burning. The simplest and durable option stove structure made of brick, stone or metal. Such devices provide fast and efficient heating of rooms of any size. Firewood, pellets, briquettes and solid fuel material can be used as fuel.
- . Devices with a constant heating function operate at natural gas or liquid fuel. Provides fast and uniform heating of rooms in a short period of time.
- Electric. Such units differ in size, operating power and functionality. Electric ovens capable of maintaining high temperatures. Despite their practicality and durability, they are quite energy-intensive, so they are suitable as an additional source of heating.
Technology for making a metal sauna stove with your own hands
It’s quite simple to weld a sauna stove yourself, since making a homemade heating equipment does not require serious calculations and diagrams.
In terms of its technical and operational characteristics, the finished device will be absolutely incomparable to factory products.
So, how to cook a sauna stove with your own hands from available materials? First you need to prepare a reliable foundation for your homemade device.
Construction of the foundation for the furnace
Despite the compact dimensions and light weight of a metal stove, the mechanical load on the floor at the installation site of the device will be significant. That's why .
The best option for a metal structure is concrete foundation. All work is carried out in the following order:
- At the installation location heating device a pit up to 55 cm deep is prepared. The width of the pit should exceed the dimensions of the furnace by 10 cm on each side.
- A waterproofing sand cushion up to 12 cm high is poured into the bottom. It is compacted tightly and moistened.
- Next, formwork is installed from narrow boards, upper part which should be at the level of the finished floor.
- A frame of reinforcing bars is installed between the boards.
- The foundation is poured with concrete mixture and tamped with a construction vibrator.
- After the concrete has hardened, the formwork is dismantled, and a platform of refractory bricks is laid on top in 2 rows. The height of the finished platform should be 20 cm above the floor level.
Step-by-step oven assembly
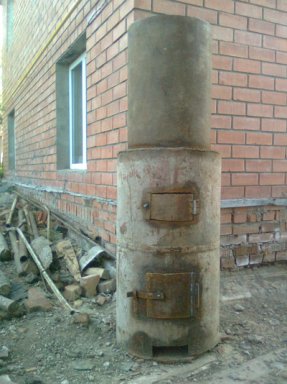
The most affordable option homemade stove- from sheet metal up to 6 mm thick. Dimensions of the finished device: height – 75 cm, width – 55 cm, length – 85 cm. 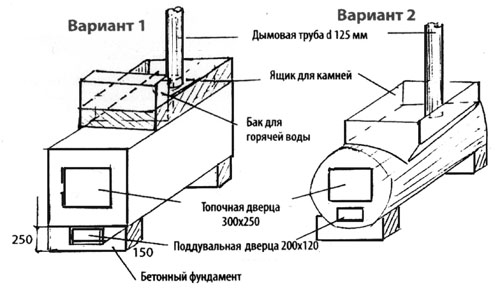
Welding is used to assemble the main structural elements. All work is carried out in the following order:
- Using a grinder, 4 blanks are prepared for future walls. Two have dimensions of 65 × 85 cm, two – 65 × 55 cm. The dimensions of the bottom, internal partition and upper part of the structure are 54 × 84 cm for the allowance when welding the walls to the base.
- The bottom is laid out on a flat base. First, one side wall is fixed, then the correctness of the resulting angle is checked with a square. The remaining walls are fixed in the same way - the second side and rear. After assembling the walls, carefully weld all the connecting seams around the perimeter.
- Inside, the body is divided into three compartments - for ash, firebox and heater.
- For fixation internal partitions a corner measuring 3 × 3 cm is used. Four blanks of 84 cm each are prepared.
- Two blanks are fixed by welding to the side walls at a level of 14 cm, the rest - at a level of 40 cm.
- In the workpiece for the partition measuring 54 × 84 cm, a small indent of 5 cm is made and a hole of 15 × 25 cm is cut out. Next, reinforcing rods with a diameter of 10 mm are welded, which are used as a grate. The distance between individual elements is 10 mm.
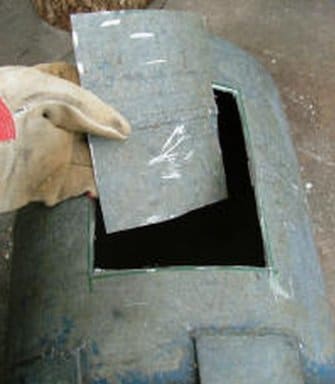
- In the workpiece for the front side, with a distance of 4 cm from the bottom, a 10 × 25 cm hole is made as a door for the ash compartment. Stepping back 4 cm from the product, make another 15 × 25 cm window to add fuel.
- The front part is welded to the structure.
- Corners are installed into the inner part of the body onto the grate partition and fixed by welding.
- An outlet hole for the pipe is made on the roof. Next, the cover is fixed around the perimeter.
- The pipe is installed and fixed by welding around the circumference of the base.
- Protective doors are mounted using fixing elements.
- A water tank is installed on the back of the housing.
- Bath stones are laid on top of the combustion chamber.
- Finally, legs made of metal corners, up to 12 cm long.
Now any bathhouse owner can cook a stove with his own hands and create a practical and reliable heating device.
Owners of a private house often think about how to weld a sauna stove themselves.
The reason lies in the fact that today not every owner has sufficient funds to purchase a finished metal product.
Moreover, there is no guarantee that a factory stove will last a really long time. A homemade stove is usually durable. In addition, the owner saves the family budget.
Types of baths
Most people associate a sauna with wooden benches that emit a special aroma, an oak broom, hot steam and a copper ladle. Memories after visiting the bathhouse last a long time.
There are a great variety of bathhouses depending on their configuration and air temperature.
Basically, it is customary to divide baths into 3 groups - a Japanese bath, a bath with dry air supply and the so-called “raw” bath. Each of the baths has its own characteristics.
A Japanese bath is somewhat reminiscent of our ordinary bathroom. It lacks the usual bath paraphernalia; a person is immersed chest-deep in a tank of water, the water temperature is about 50˚C.
For convenience, use a seat that is located in a round or oval wooden font (barrel). Hot water promotes the removal of toxins from the body.
It is believed that the Japanese “bath” can heal and rejuvenate the human body. For patients who have suffered a heart attack, doctors recommend a Japanese bath as a means of rehabilitation.
In a sauna with a supply of dry air, those who like to steam with a broom will not be able to get real pleasure.
The broom will instantly dry out and fall off, as the air temperature ranges from 90˚C to 130˚C. If a visitor decides to use a broom in the sauna, this attempt may result in burns on the skin.
You can build such a comfortable room with your own hands and enjoy visiting the bathhouse. The small size of the bath allows it to be installed even in an apartment.
The most popular is the Russian steam room with good couple. In a Russian bath, the steam is moist: relative humidity ranges from 40 to 70%.
Steam is produced using water and stones that are placed on the surface of the oven. The stones should be as hot as possible.
Pouring water onto stones produces steam. The smaller the particles of steam produced, the more pleasant the air that a visitor to a Russian bathhouse inhales.
The air temperature should not be too high - visiting a sauna heated to 55 - 70˚C will be pleasant.
Humid air has greater thermal conductivity than dry air, so the human body warms up at lower temperatures.
The healing effect is enhanced by the massage effect of a classic birch or oak broom and the aromas of a eucalyptus or juniper broom.
Options for sauna stoves
There are many types of stoves that are not difficult to make with your own hands.
The following designs are distinguished:
- brick kilns;
- metal;
- combined.
Stone samples of furnace equipment are the most common.
The ability of stone to retain heat for a long time makes it possible to heat large rooms.
Refractory brick does not come into contact with combustion products and has high level fire safety. The most durable stoves are those made from high-quality fireclay bricks.
It is quite easy to make a brick oven yourself. In addition, installing a sauna stove with your own hands is much cheaper than hiring a professional.
One of the disadvantages that must be taken into account before construction is the heavy weight of the stove.
Before you make such a structure with your own hands, you need to make sure that the foundation on which it will be located is solid. A stone stove is sometimes lined with metal.
A brick stove in a metal case is used in saunas and Russian baths.
In a couple of hours, such a stove will produce 30 - 40 liters of water at a temperature of fifty degrees, which is enough for 3-4 visitors.
The main thing is not to forget to put a fence around the case. The temperature of the metal with which the brick is sheathed exceeds 100˚C.
The stove, which is made of metal, is available in a variety of configurations. This type of furnace equipment has proven itself to be excellent.
The design of metal sauna stoves is quite popular, since you can start steaming indoors literally within a few minutes after kindling.
Sometimes this factor is decisive when choosing furnace equipment. Compared to stone furnaces, metal heats up five to six times faster.
When choosing ready-made models or when making a stove with your own hands, you need to pay attention to the seams - they must certainly be airtight.
The advantage of a metal structure is its relatively low weight, so there is no need to build a massive foundation. This, in turn, will help reduce the cost of building a steam room.
The disadvantage of such a stove is that there is a fairly large surface area on which you can get burned.
The walls of the furnace become very hot during operation, so it is better to eliminate the possibility of burns by covering the metal with a nice refractory brick.
DIY oven
Whatever models of ready-made stove equipment you choose, none of them can compare with a stove that is made correctly and efficiently with your own hands.
When choosing a location for a metal stove, it is necessary to take into account the distance to wooden structures and, if necessary, take fire safety measures.
The iron structure should be placed no closer than a meter from the walls. The walls must be protected from heating by a screen made of bricks.
The process of manufacturing a heating device for a metal bath will take about 2-3 hours. You need to carefully consider the design diagram.
Exact calculations are not required.
It is only necessary to first prepare the grinder, cutting wheels, welding apparatus and materials for making the stove, namely:
- cuts metal pipes diameter 50 – 60 cm and 10 cm;
- grate;
- fittings;
- finished doors.
You can make a stove from a steel sheet 8 mm thick or using a piece of steel or metal pipe.
The option using pipes will be more profitable and cheaper - the body of the structure is more airtight and requires less welding.
In a piece of pipe 1 m high, which will later become the heater of the stove, a cutout (20 cm by 6 cm) is made for the blower. You need to place grate bars in the ash pit, securing them to special ledges.
The projections can be formed using a metal plate welded internally to the pipe, or by welding alone.
Then a niche for the firebox is cut in the pipe above the hole for the blower (a cutout measuring 25-26 cm by 30 - 35 cm).
Then a piece of pipe 25 cm long and 30 cm in diameter is taken and fixed at a distance of 100 mm from the bottom by welding.
A door with a latch is welded onto the firebox niche. The door for the firebox and ash pan, which is attached to hinges, can be factory-made or made by yourself. After this, another cut is taken.
A circle is welded to the top of the pipe, in which a cutout has been previously made. Water can later be poured through this cutout.
The lower part of the chimney is tightly welded to the tank so that water does not enter the firebox compartment. The chimney is made mainly of tin, the thickness of which is 1 - 1.5 mm.
Possible at chimney weld a square-shaped steel sheet that will be used for installation.
Having carefully studied all the technological nuances, you can make a sauna stove with your own hands, which will not only please the owner of private property, but will also become a source of pride for the owner in front of relatives and friends.
In addition, the material costs for building a metal stove are much less than for building a brick bathhouse.