In a modern developed community, not a single person can refuse to watch television. News, entertainment shows, educational programs - an ordinary person is unlikely to be able to spend his day without this. And of course, in order to get the most out of watching TV, people choose high-quality means for broadcasting TV channels. It is considered the most reliable and popular equipment for this. But if purchasing it is not a problem, then how to configure channels on a satellite tuner? All information about this issue is presented below.
What is included in the satellite TV package?
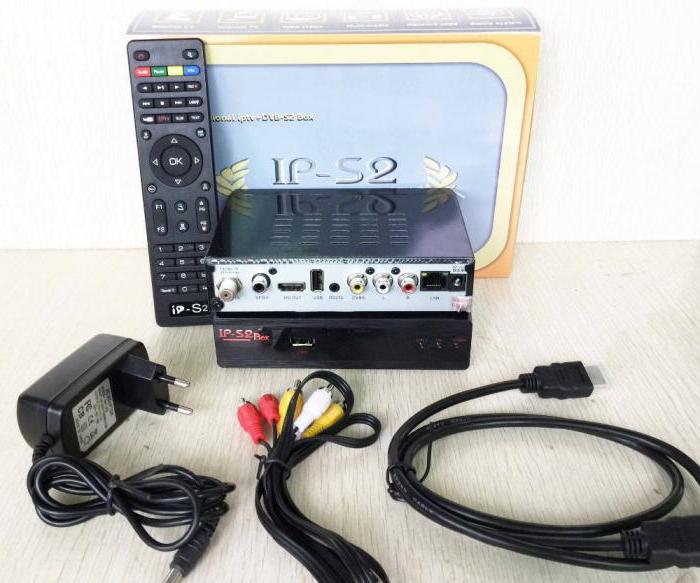
Today, anyone can purchase a kit for installing satellite television. The standard and most optimal kit will cost from 50 to 80 US dollars. Typically the kit includes the following list:
- A tuner, or receiver, is also called a receiver. This is the most expensive part in the installation kit, and you need to choose it very carefully, since the quality of the video broadcast depends on it. It is better to choose a broadcast in mpeg4 format, but mpeg2 is also suitable. How to install it, and how to independently configure satellite channels on the tuner, will be discussed below.
- Antenna. Necessary in order to receive a signal. It can be from 70 centimeters to 1.2 meters in diameter.
- Head, or converter. There can be several of them at once, but models with three heads are more common. Each of them receives from one satellite.
- Multifeed. This is the name of the special head mount. The standard kit includes 2 of them.
- Disek. He switches converters.
- TV cable. It should have a resistance of 75 Ohms and a length of 3 to 5 meters, with a small margin.
- F-connectors. Designed to connect parts of the kit. For a satellite dish with three converters, 8 such plugs are provided.
- Bracket and dowels (anchors) for mounting the antenna.
Before you independently configure channels on a satellite dish tuner, you should figure out how to properly install and configure the antenna itself.
Required Tools
To begin installing the antenna at hand, you must have:
- Extension cord for socket.
- A hammer drill for making holes to secure the bracket to the surface using dowels or anchors. You can also use a drill for this purpose.
- Drill bits for a drill or hammer drill.
- Two wrenches, 10 and 13 mm in diameter.
- Phillips screwdriver.
- Hammer.
- Insulating tape. Instead, you can use plastic ties.
Installation
- First, we completely assemble the antenna. All fasteners must be securely tightened. Bolts, washers and engravers should be carefully checked for strength.
- The next step is to attach the multifeed to the head holder on the right and left sides. Here we also screw in the converters themselves, that is, the heads. Don't tighten them too much.
- We fix the bracket to the wall and hang the antenna on it. It should be directed to the south or southeast. You can determine the direction of the world yourself, or you can look around and pay attention to where your neighbors’ antennas are “looking.”
What to do next?
In fact, the antenna installation is complete; now you should correctly connect all the cables between the antenna, tuner and TV. Please note that the cables are connected to the tuner only when it is not connected to a power outlet. It is not enough to simply turn it off; you must unplug the plug from the socket.
So, you need to make at least two connections. Then you need to figure out how to configure the channels on the satellite tuner yourself.
- We connect the antenna and receiver (tuner).
- We connect the tuner to the TV.
- If necessary, you can also make a third connection, namely, connect peripheral devices.

Connecting the antenna to the tuner
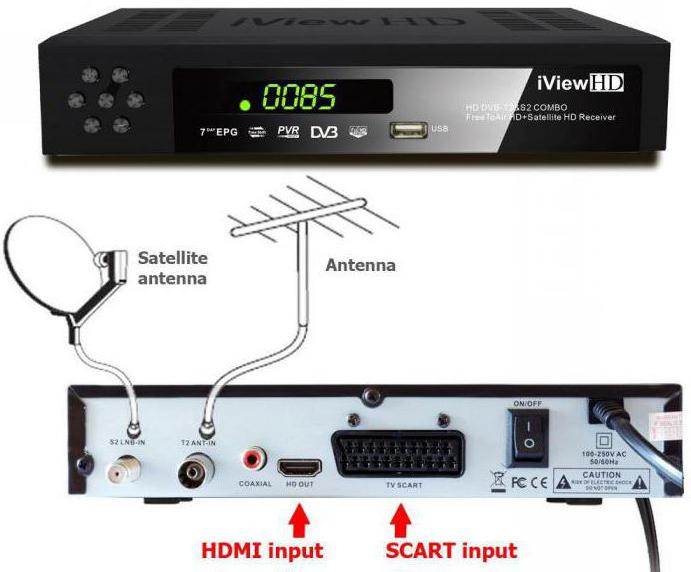
F-connectors should be screwed onto the ends of the cable from the satellite dish; they are needed for direct connection to the tuner. And on the tuner itself there is a connector called LBN IN, intended for this connection. This connector needs to be connected to the connector and screwed on. Before you configure the channels on the satellite tuner yourself, we remind you that the tuner must be completely disconnected from the electrical network during the connection process.
Connecting to a TV
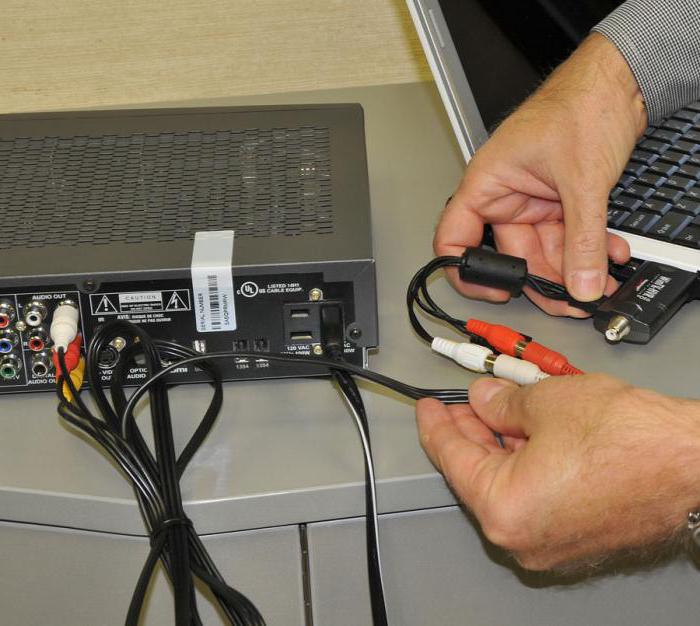
You can connect the tuner to any of the TVs; for this purpose, a number of special inputs are located on the rear panel of the receiver:
- antenna cable input;
- tulips;
- Scart or HDMI connector.
How to connect is selected either according to the capabilities of the TV (it all depends on its model), or according to the desired playback quality.
Connecting via HDMI is considered the best, the image quality will be at the highest level. Next, based on this criterion, the connection follows with the help of tulips. And in last place in terms of quality is the antenna output.
Only very old TV models have one antenna output without the additional ones listed above. New TV models have at least two connection methods from the above, and most often - all four.
But if it happens that the TV does not have other connectors other than the antenna, then you will need an antenna cable with special connectors, which are called “male antenna” and “male antenna”. These connectors are simply screwed onto the ends of the cable and the “female” connects to the tuner, and the “male”, respectively, to the TV.
All other connections are made using a connecting cable with appropriate connectors. Such cables can be included with your TV or satellite dish, and can also be purchased at any electronics store.
Receiver setup
It is best to start the process of getting acquainted with the menu of the purchased tuner by reading the operating instructions.
The first thing to do is to check whether the signal is being received from the required satellite.
Second, check the settings of the satellite heads. The head label should indicate its type and the local oscillator frequency required for high-quality operation.
Third, you need to set the correspondence between each satellite and DiSEqC ports. To do this, during installation you need to write down which head is connected to which of the DiSEqC outputs. Then in the tuner menu you should set the switch in the order in which the heads are connected to the ports.
If this was not done when installing the satellite dish, then you need to carry out this adjustment using the selection method, one by one selecting the corresponding satellites to the ports.
These are the basic settings that should be made before setting up channels on a satellite tuner.
Channel search
In order to search for channels on the receiver, you need to scan the corresponding transponder on a specific satellite.
First you need to find out the characteristics of the transponder. To do this, you need to decide on the channel that you want to broadcast. So, the channel has been selected, now you need to find out which satellite it is broadcasting on and look at the transponder settings for it. For example, let's look at how to tune an NTV channel on a satellite tuner. Note that the NTV channel is broadcast on the ABS1 satellite, and there are 2 types of transponder settings for it. If the receiver plays video in mpeg-4 format, then you need to make the following settings: transponder 11473, vertical polarization, speed 22500. If this option is not available, then you need to select a different speed (43200).
Now that all the information about the settings is known, the process of setting up an NTV channel on a satellite tuner will not take much time. You need to go to the settings of the satellite tuner and select the sub-item responsible for setting up the transcoder. In this menu, select or manually enter the appropriate settings for the NTV channel, and press the button on the remote control to start scanning. The TV screen should display a hint at the bottom of the screen (which button on the remote control is responsible for scanning).
Automatic search
When the button to scan has already been pressed, a button will appear on the screen with the option to select the type of scan. Depending on the receiver model, the names of menu items may differ slightly from each other. For example, when looking at how to set up channels on an Openbox satellite tuner, the menu will suggest "Blind Search", "Automatic Scan" and "Manual Search".
Automatic scanning is convenient because you will not need to enter the transponder settings; the system will independently select all the transponders that the satellite dish receives.

If your search doesn't return any results
It happens that searching for a channel does not produce results, the antenna cannot reproduce it and shows a black screen with the settings entered correctly. Most often the problem is that the antenna itself is poorly tuned. This is worth checking, and it is better, of course, to involve specialists in this field who can help at any stage of the process of installing and configuring a satellite dish and tuner.
You can also independently check the availability of the custom channel according to DVB-S or DVB-S2, MPEG-2 or MPEG-4 standards.
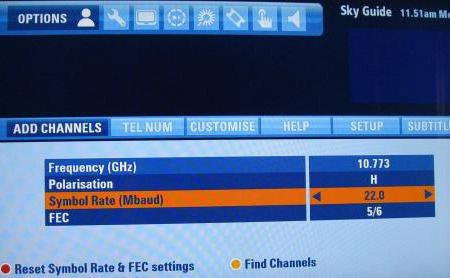
You can also double-check the settings for the selected channel; perhaps outdated information about the satellite, transponder and its speed was originally found. So, many users are faced with the problem of how to set up the Inter channel on a satellite tuner, because such a large media group is constantly developing, growing and changing. And in parallel with these processes, it changes satellites for broadcasting. This happened recently; now you can watch “Inter” on two satellites - Astra 4A or Sirius 5 with the transponder settings:
- Frequency - 12399 MHz;
- Polarization - V;
- Speed - 27500;
- FEC - ¾;
- Standard/Modulation - DVB-S/QPSK.
Today, the process of how to tune the Inter channel on a satellite tuner can only be carried out in this way, and in no other way.
Creating a channel list
In the instructions for each receiver there is a clause about creating a list of favorite channels, where everything is described step by step.
In order to go to the menu item on how to configure channels on the Eurosky satellite tuner, you should find “Channel Editor” in the general menu, and then “TV channels” and alternately mark the necessary and most interesting ones.
In most receivers, including the Orton tuner, you can configure satellite channels either using the joystick buttons on the remote control or using colored additional keys. This makes setup much easier.
All questions about how to set up channels on a satellite tuner have been exhausted, so you should carefully read these instructions point by point again, and you can start installing the satellite dish.